Disclaimer
In this guide, I will use Fedora 41 Cloud Edition as the base operating system. Some steps may vary depending on the distribution you are using.
Introduction
- Kubernetes is an open-source container orchestration platform that automates the deployment, scaling, and management of containerized applications. The software was initially developed by Google and is now maintained by the Cloud Native Computing Foundation (CNCF). Kubernetes is an effective tool for the efficient management of a substantial number of containers.
- Tailscale is a virtual private network (VPN) service that facilitates secure access to a network from any location worldwide. The configuration process is straightforward and the software is compatible with a range of operating systems, including Windows, macOS, Linux, iOS and Android.
- This guide will demonstrate the process of establishing a basic Kubernetes cluster utilising the Tailscale VPN infrastructure.
Prerequisites
- A Tailscale account
- Two or more machines with a minimum of a 2-core CPU and 4 GB of RAM, running a Linux operating system.
I will use the following machines:
- Master Node:
- Hostname: m1.srv.mtaha.dev
CPU: Intel(R) Celeron(R) N3450 (4) @ 2.20 GHz (x86_64)
RAM: 8 GB
OS: Fedora 41 Cloud Edition
Location: Homelab
Machine: Zimaboard 832- Worker Node 1:
- Hostname: w1.srv.mtaha.dev
CPU: Intel Xeon (Skylake, IBRS, no TSX) (2) @ 2.10 GHz (x86_64)
RAM: 4 GB
OS: Fedora 41 Cloud Edition
Location: Hetzner Cloud
Machine: CX21- Worker Node 2:
- Hostname: w2.srv.mtaha.dev
CPU: ARM Cortex-A76 (4) @ 2.40 GHz (aarch64)
RAM: 8 GB
OS: Fedora 41 Cloud Edition
Location: Homelab
Machine: Raspberry Pi 5 - 8 GB
Step 1: Install Tailscale
-
Install Tailscale on all machines where Kubernetes will be installed. Use the following script to automate the Tailscale installation process on machines:
curl -fsSL https://tailscale.com/install.sh | sh -
Once Tailscale has been installed, use the following command to authenticate it:
sudo tailscale up -
The command will provide you with a URL. Open the URL in your browser and authenticate your machine.
Step 2: Set up Tailscale ACL
-
The next step is to configure the Tailscale ACL (access control list) to allow communication between machines in your Kubernetes cluster. You can edit the ACL list from this link. I recommend that you use the following ACL list.
{ "tagOwners": { "tag:personal": ["autogroup:admin"], "tag:servers": ["autogroup:admin"], "tag:k8s-operator": ["autogroup:admin"], "tag:k8s-node": ["tag:k8s-operator"], "tag:k8s-pods": ["tag:k8s-operator"], }, "acls": [ { "action": "accept", "src": ["tag:personal"], "dst": ["*:*"], }, { "action": "accept", "src": [ "autogroup:admin", "tag:servers", "tag:k8s-node", "tag:k8s-pods", "tag:k8s-operator", "10.0.0.0/8", "172.16.0.0/16", ], "dst": [ "tag:servers:*", "tag:k8s-node:*", "tag:k8s-pods:*", "tag:k8s-operator:*", "10.0.0.0/8:*", "172.16.0.0/16:*", ], }, ], "ssh": [ { "action": "accept", "src": ["autogroup:admin", "tag:personal"], "dst": ["tag:servers"], "users": ["autogroup:nonroot", "root", "fedora"], }, ], } -
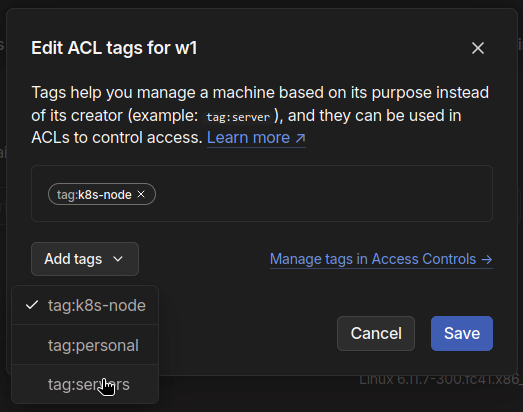
After configuring the ACL list, you can apply the ACL tags to the machines in the main Tailscale dashboard. Select the machine > click on the ellipsis and select ‘Edit ACL Tags’ > add the tags ‘servers’ and ‘k8s-node’ to the Kubernetes nodes.

Step 3: Set up Hostname and Hosts File
-
The next step is to set up the hostname and hosts file on all the machines. This can be done by editing the
/etc/hostnameand/etc/hostsfiles on each machine. In newer distributions, thehostnamectlcommand can be used to set the hostname.sudo hostnamectl set-hostname <hostname>
-
Then edit the
/etc/hostsfile. Add the following lines for the per machine:127.0.0.1 <hostname> ::1 <hostname>Note
Replace
<hostname>with the hostname of the machine.
Step 4: Set up FirewallD rules
-
The next step is to configure the FirewallD rules on all the machines. To do this, run the following commands:
#~ flush all rules
sudo iptables -F

#~ add tailscale and kubernetes cni interfaces
sudo firewall-cmd --zone=trusted --permanent --add-interface={tailscale0,cni0,vxlan.calico,flannel.1,cali+}

#~ add ports for kubernetes
sudo firewall-cmd --zone=public --permanent --add-service={dns,http,https,mdns,llmnr}

#~ enable masquerade and forwarding
sudo firewall-cmd --permanent --add-forward
sudo firewall-cmd --permanent --add-masquerade

#~ reload firewall
sudo firewall-cmd --reload
Step 5: Enable CGroup and Disable Swap
-
The next step is to enable CGroup and disable swap on all the machines. CGroup is a Linux kernel feature that provides a way to limit, account for, and isolate the resource usage of a collection of processes. To enable CGroup and disable swap, look at the following steps:
-
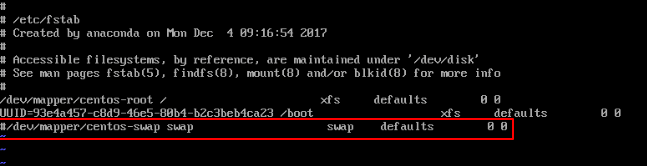
If you are using swap (not zram), you need to disable it by running the following commands:
sudo swapoff -a sudo vim /etc/fstab #~ comment the swap line-
Example:
-
-
For GRUB users:
-
Open the
/etc/default/grubfile and change the following line:GRUB_CMDLINE_LINUX="cgroup_enable=memory systemd.zram=0"
-
-
For systemdboot users:
-
Open the
/etc/kernel/cmdlinefile and add the following lines:cgroup_enable=memory systemd.zram=0
-
-
For Raspberry Pi users:
-
Open the
/boot/cmdline.txtfile and add the following lines:cgroup_enable=memory systemd.zram=0
-


Step 6: Enable IP Forwarding and Load Required Modules
-
The next step is to enable IP forwarding on all the machines. To do this, follow the steps below:
-
Open the
/etc/sysctl.d/kubernetes.conffile and add the following lines:net.bridge.bridge-nf-call-ip6tables = 1 net.bridge.bridge-nf-call-iptables = 1 net.ipv6.conf.all.forwarding = 1 net.ipv4.conf.all.src_valid_mark = 1 net.ipv4.ip_forward = 1
-
Then run the following command to apply the changes:
sudo sysctl --system -
After that, we need to load the some required kernel modules. Create a file named
/etc/modules-load.d/kubernetes.confand add the following lines:br_netfilter overlay
Step 7: Update System Packages
-
The next step is to update the system packages on all the machines. To complete this step, run the following commands:
# For Ubuntu/Debian
sudo apt update && sudo apt upgrade -y

# For CentOS/RHEL
sudo dnf --refresh update -y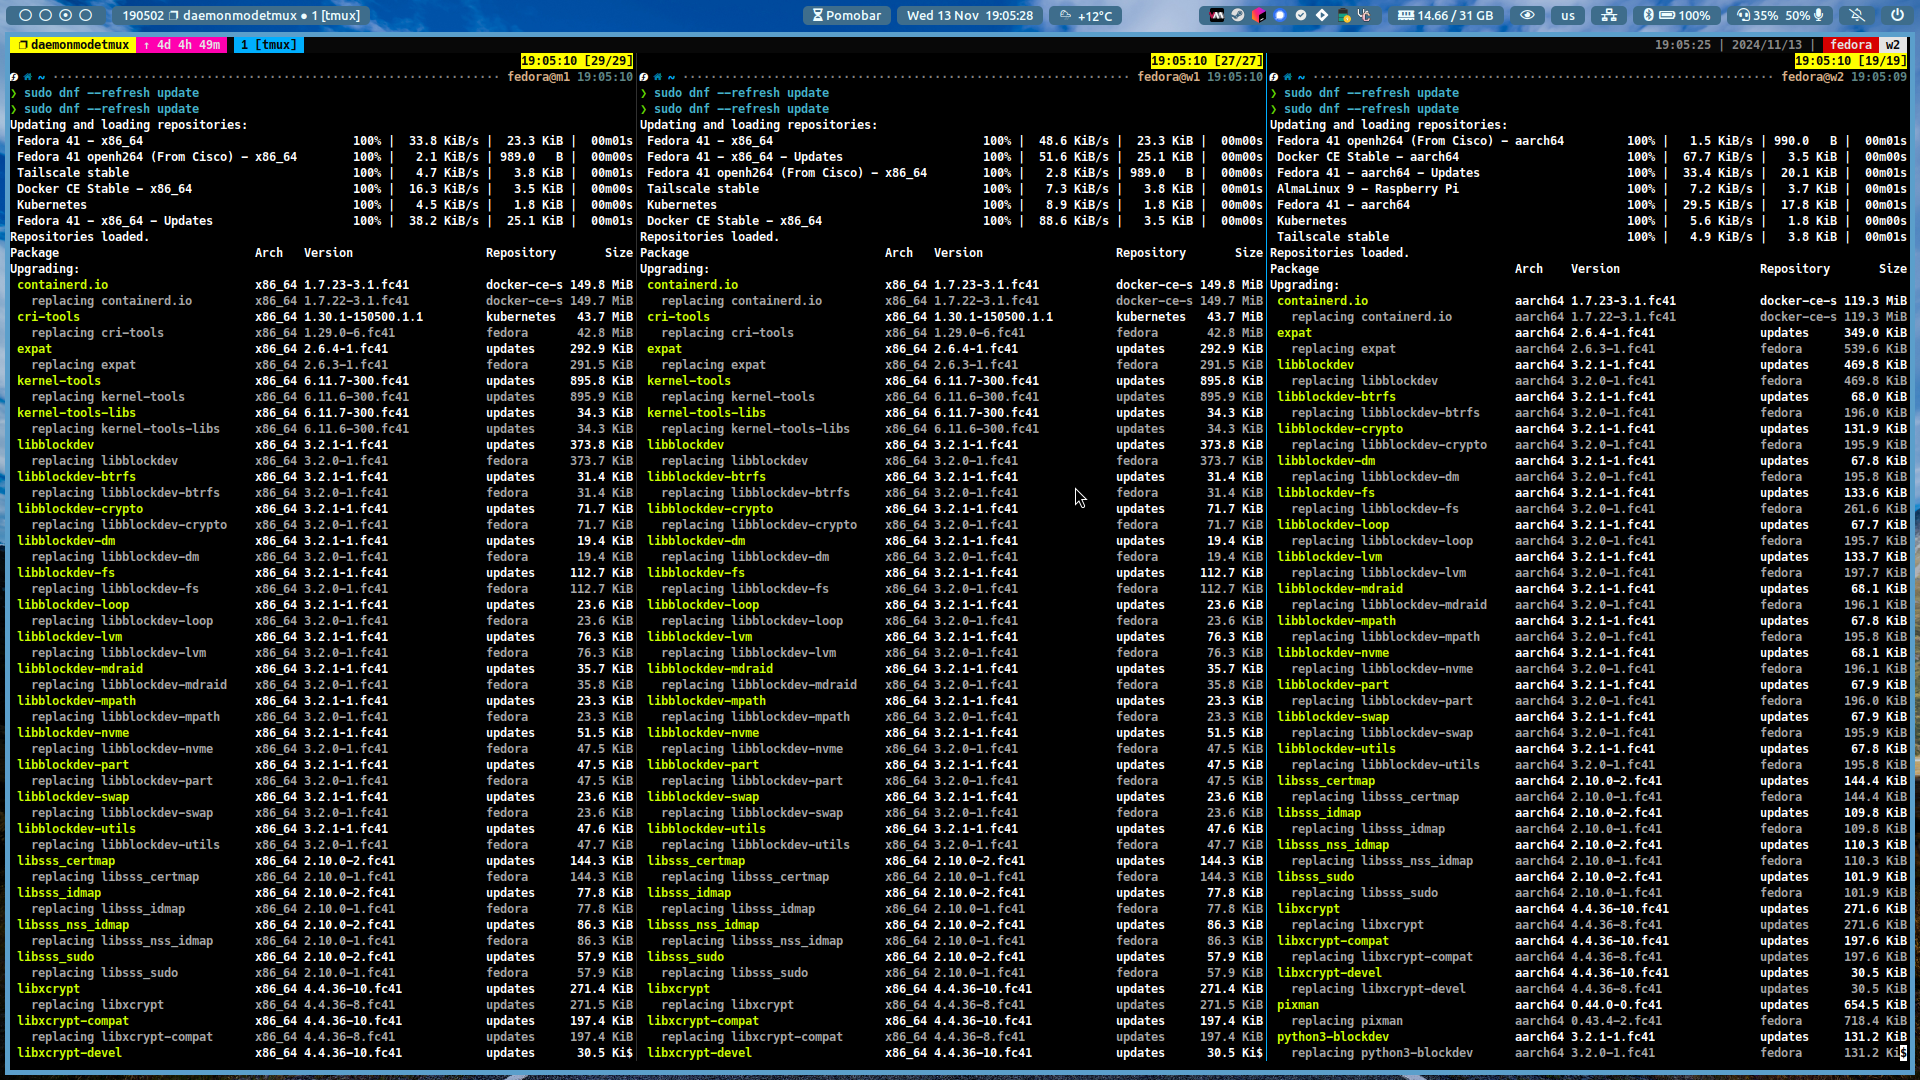
Step 8: Regenerate Initramfs and Apply Bootloader Configuration
-
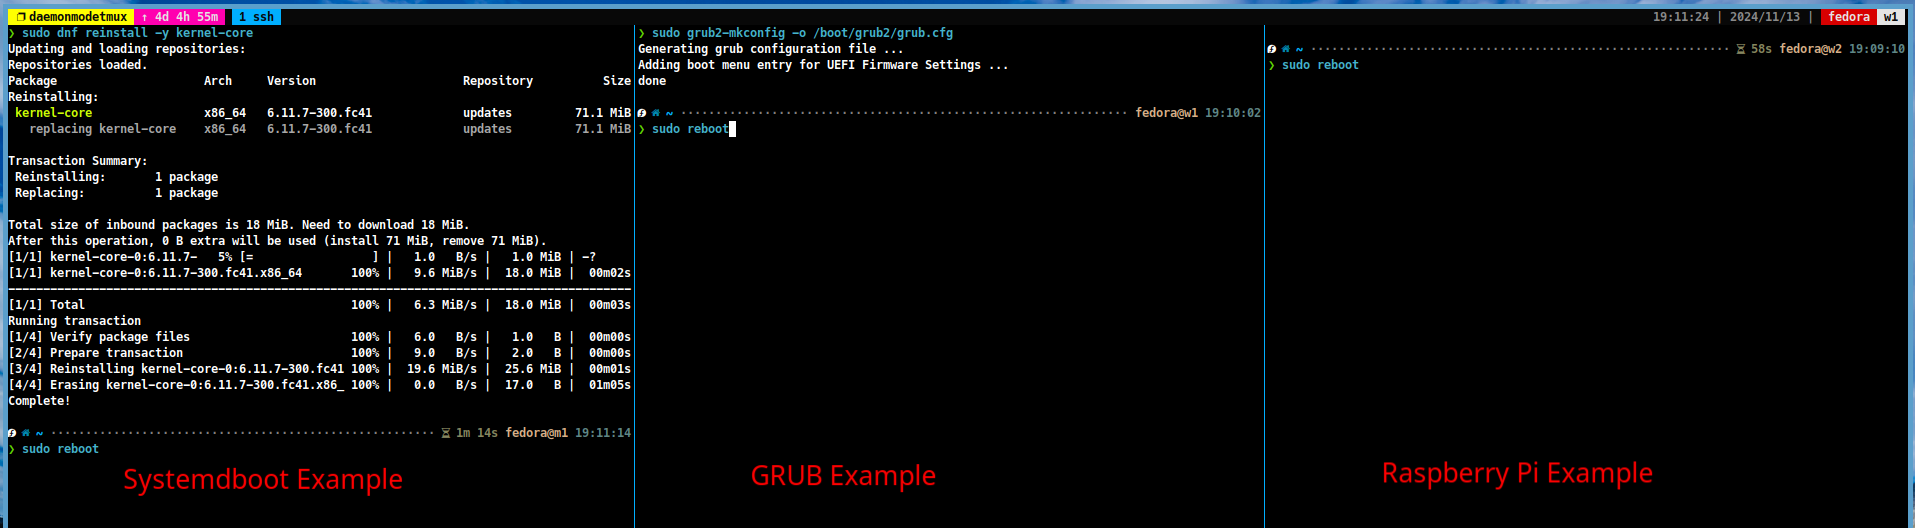
In the next step, you need to regenerate the initramfs and apply the bootloader configuration to all the machines. You can do this by running the following commands:
-
For GRUB users:
# For Ubuntu/Debian sudo update-initramfs -u sudo update-grub # For CentOS/RHEL sudo dracut -fv sudo grub2-mkconfig -o /boot/grub2/grub.cfg -
For systemdboot users:
# For Ubuntu/Debian
sudo update-initramfs -u
sudo systemctl restart systemd-boot-update

# For CentOS/RHEL
sudo dracut -fv
sudo dnf reinstall -y kernel-core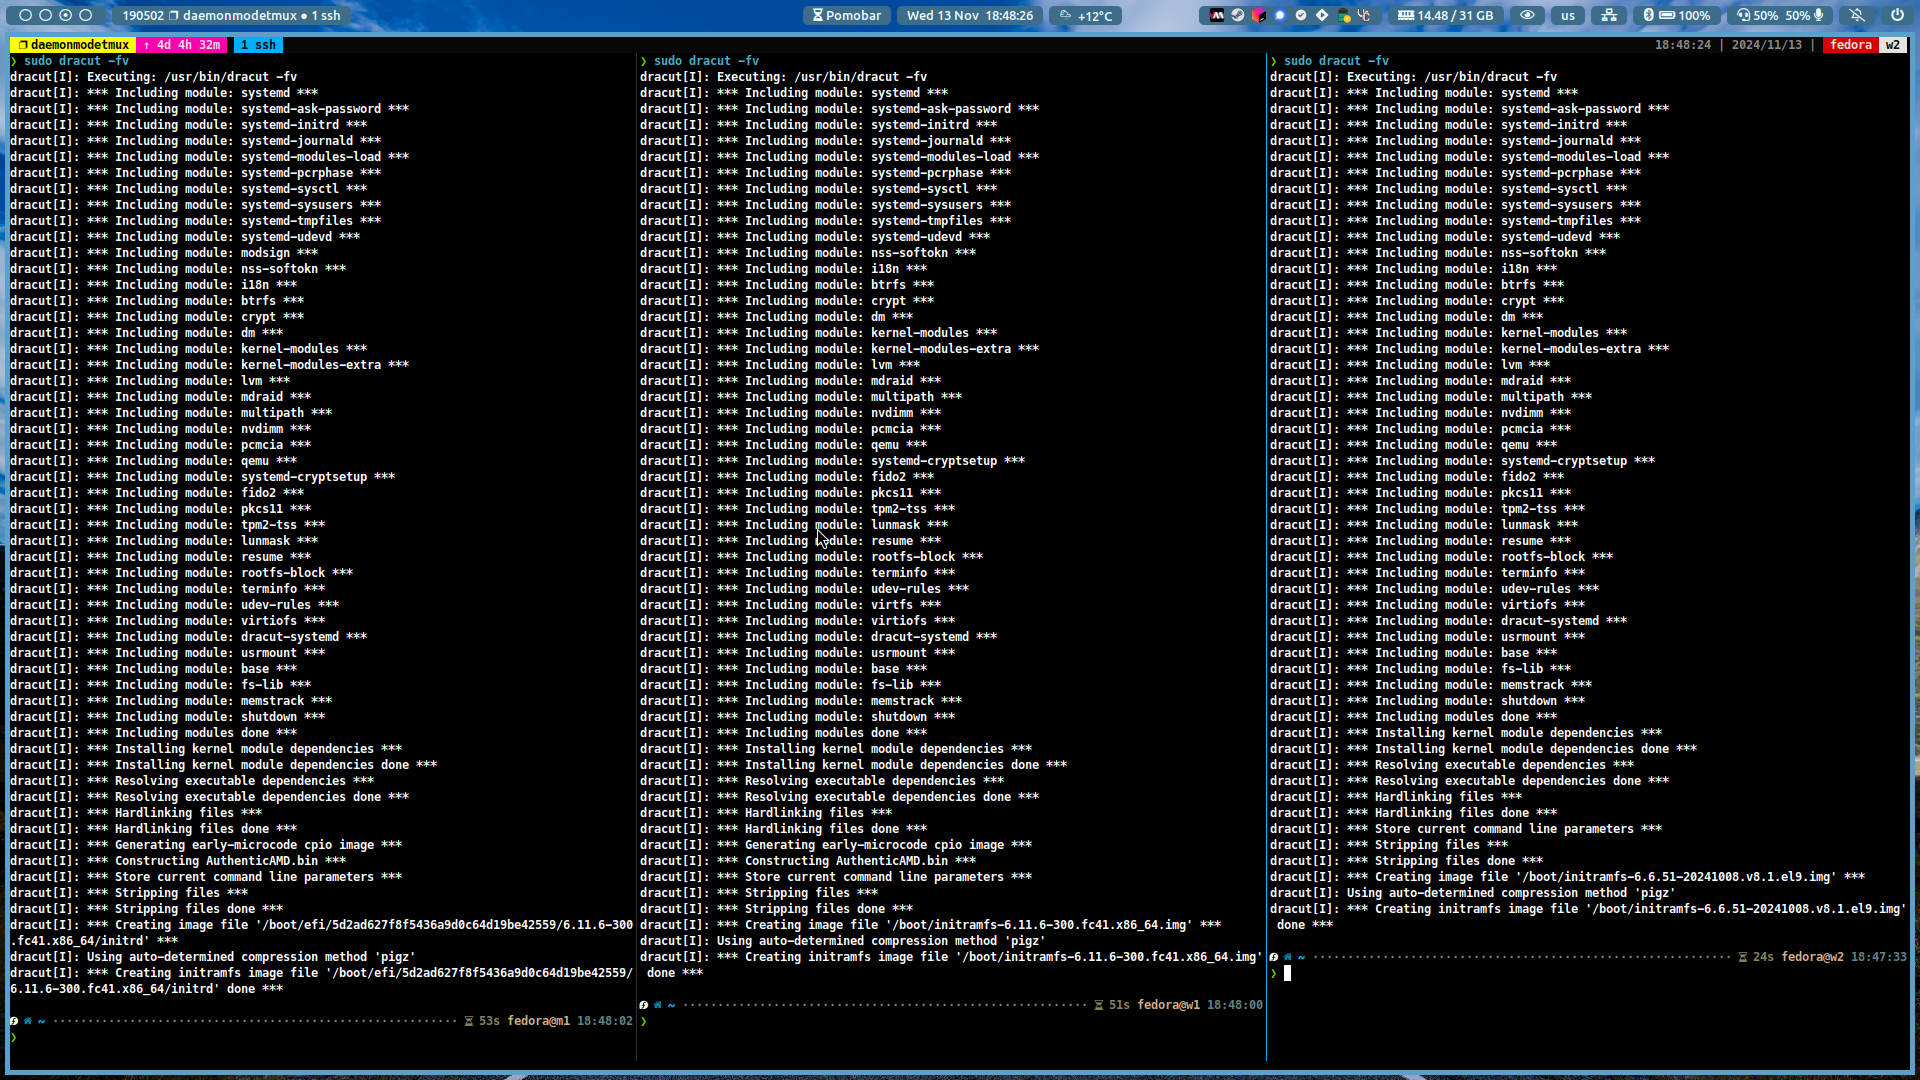
Step 9: Verify the Changes
-
You can verify the changes by running the following commands:
# Check the swap/zram status (if output is empty, it means swap/zram is disabled)
swapon
zramctl

# Check the CGroup status
cat /proc/cgroups

Optional Step: Install K9s CLI
- K9s is a powerful CLI tool that provides a terminal-based interface for managing Kubernetes clusters. You can install K9s by following the steps in the official K9s documentation.
Step 10: Set up Kubernetes Repository
-
In this step, you can install Kubernetes on all the machines. You can do this by following the official Kubernetes installation guides: link1, link2
-
For Debian/Ubuntu users
-
Open the
/etc/apt/sources.list.d/kubernetes.listfile and add the following lines:deb [signed-by=/etc/apt/keyrings/kubernetes-apt-keyring.gpg] https://pkgs.k8s.io/core:/stable:/v1.33/deb/ / -
Then run the following commands to add the Kubernetes repository key:
curl -fsSL https://pkgs.k8s.io/core:/stable:/v1.33/deb/Release.key | sudo gpg --dearmor -o /etc/apt/keyrings/kubernetes-apt-keyring.gpg
-
-
For CentOS/RHEL users
-
Open the
/etc/yum.repos.d/kubernetes.repofile and add the following lines:[kubernetes] name=Kubernetes baseurl=https://pkgs.k8s.io/core:/stable:/v1.33/rpm/ enabled=1 gpgcheck=1 gpgkey=https://pkgs.k8s.io/core:/stable:/v1.33/rpm/repodata/repomd.xml.key

-
Step 11: Install Kubernetes Packages
-
Once you have set up the Kubernetes repository, install the Kubernetes packages on all the machines. Run the following commands to do this:
# For Ubuntu/Debian
sudo apt install -y containerd kubeadm kubelet kubectl kubernetes-cni

# For CentOS/RHEL
sudo dnf install -y containerd kubeadm kubelet kubectl kubernetes-cni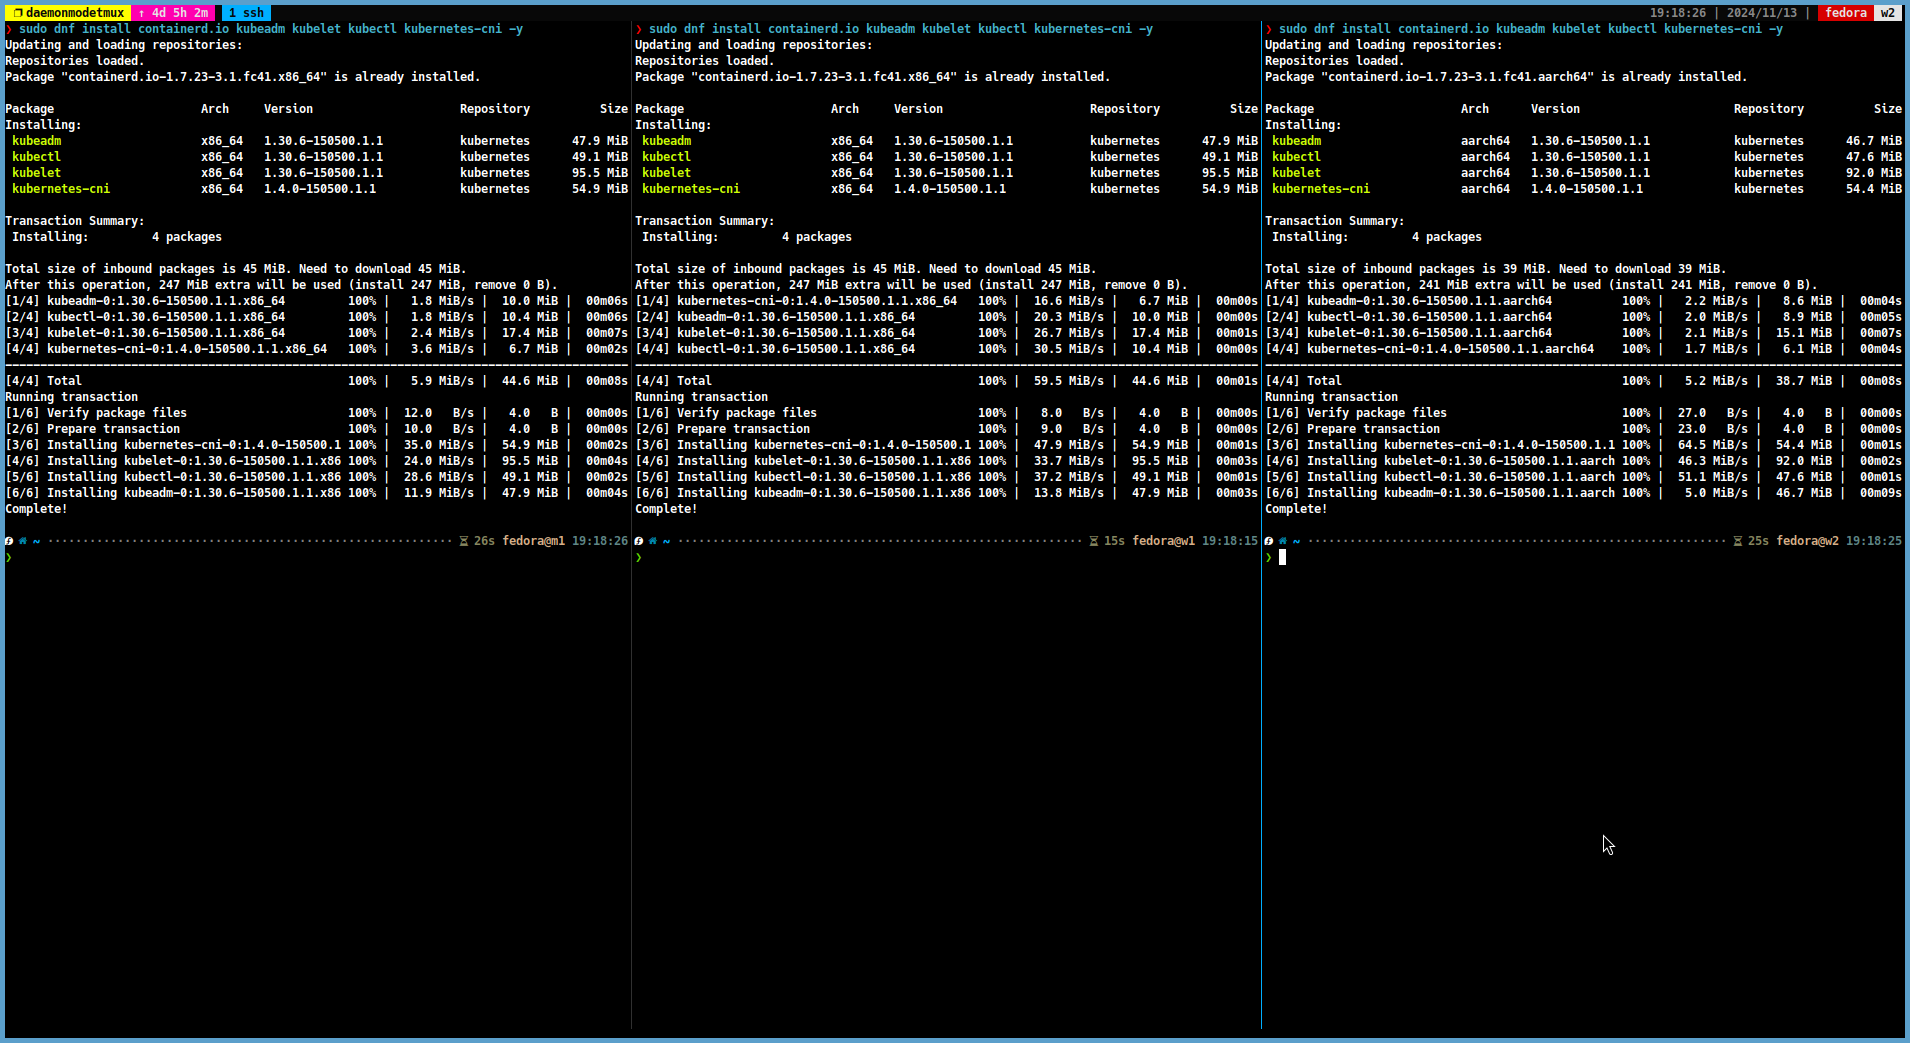
Step 12: Set up Containerd to use CGroup
-
You must set up Containerd to use the CGroup on all the machines. Run the following commands to do this:
containerd config default | sudo tee /etc/containerd/config.toml

sudo sed -i 's/ SystemdCgroup = false/ SystemdCgroup = true/' /etc/containerd/config.toml
Step 13: Set up Kubelet Extra Args to Use Tailscale IP Address
-
You must set the
KUBELET_EXTRA_ARGSvariable to use the Tailscale IP address on all machines. Edit/etc/default/kubelet(or/etc/sysconfig/kubeletfor RHEL/CentOS) and add the following line:# For Ubuntu/Debian echo "KUBELET_EXTRA_ARGS=\"--node-ip=$(tailscale ip --4)\"" | sudo tee /etc/default/kubelet # For CentOS/RHEL echo "KUBELET_EXTRA_ARGS=\"--node-ip=$(tailscale ip --4)\"" | sudo tee /etc/sysconfig/kubelet -
Then restart the kubelet service by running the following command:
sudo systemctl restart kubelet containerd
Step 14: Initialize Kubernetes Cluster
-
In the next step, you can initialise the Kubernetes cluster on the master node by running the following command:
sudo kubeadm init --control-plane-endpoint $(tailscale ip --4):6443 --apiserver-advertise-address $(tailscale ip --4) --pod-network-cidr 172.16.0.0/16 --upload-certs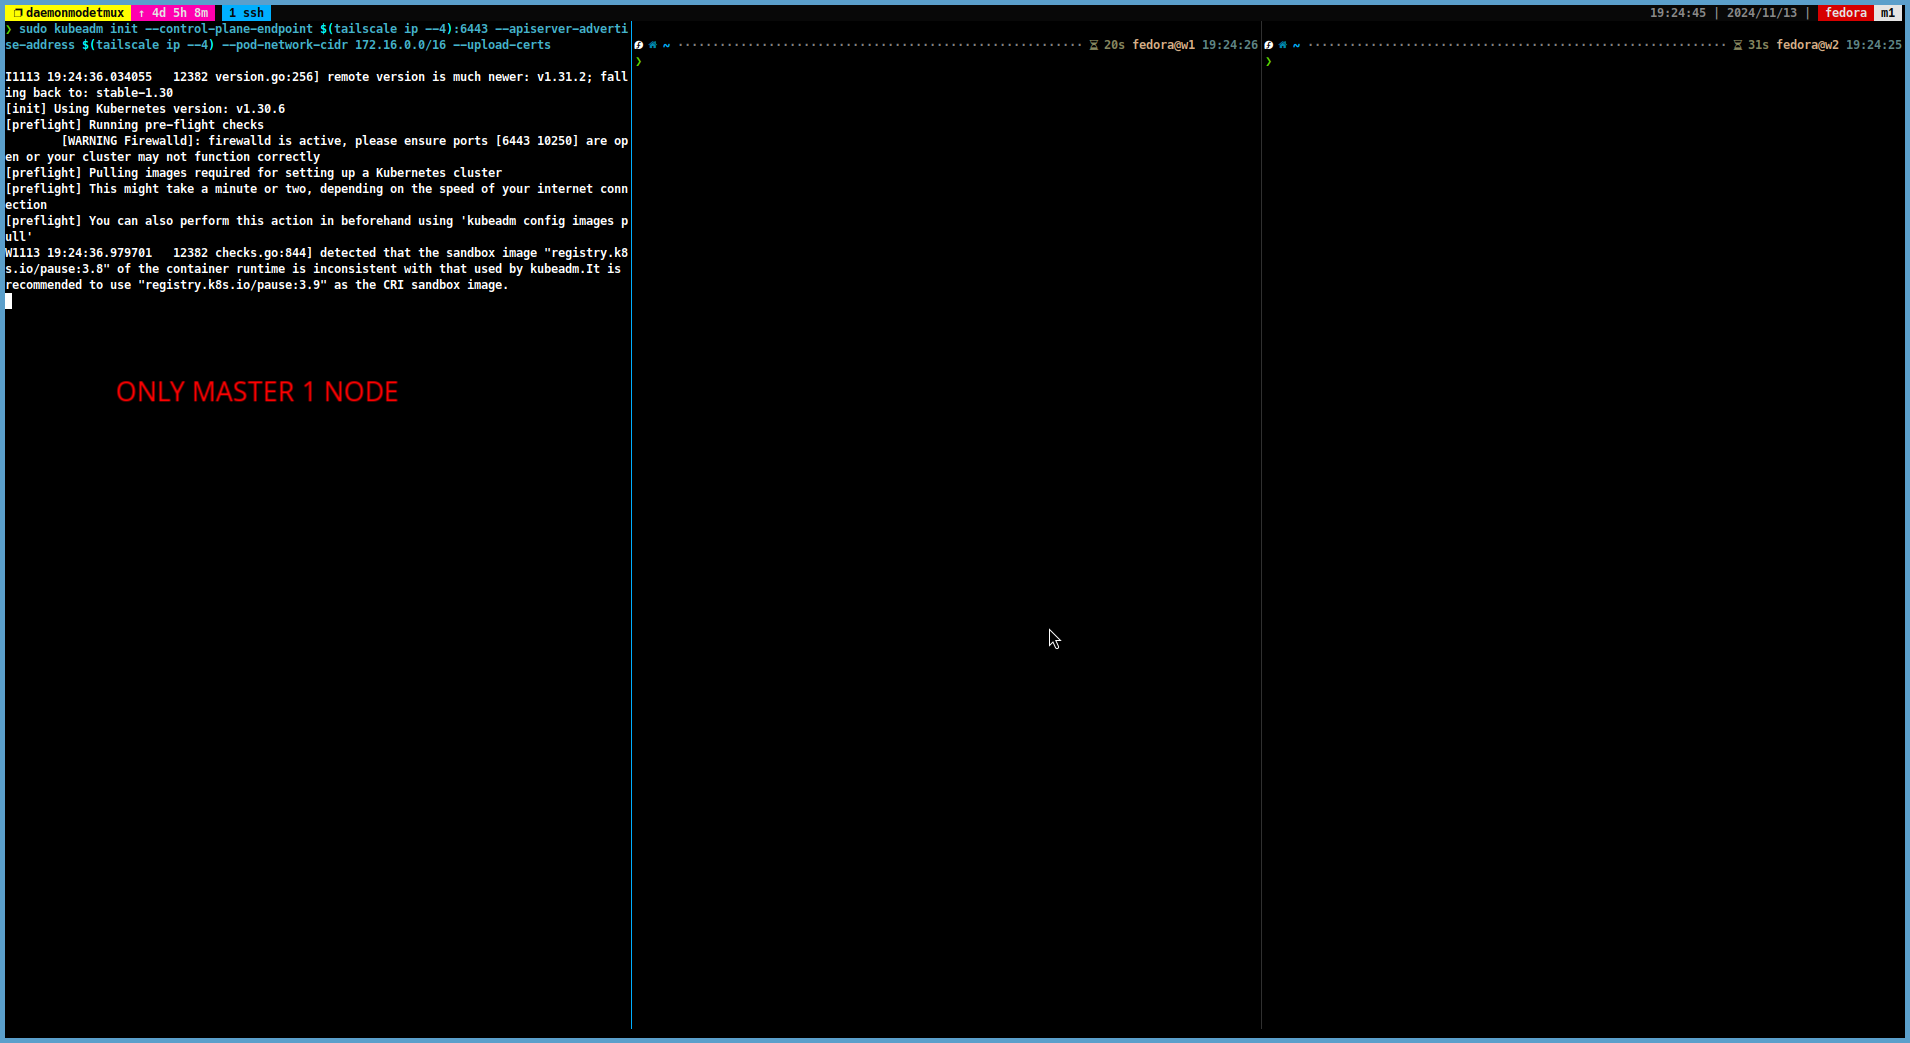
-
After the initialisation process is complete, run the following commands to set up the Kubernetes configuration file:
mkdir -p $HOME/.kube
sudo cp -i /etc/kubernetes/admin.conf $HOME/.kube/config
sudo chown $(id -u):$(id -g) $HOME/.kube/config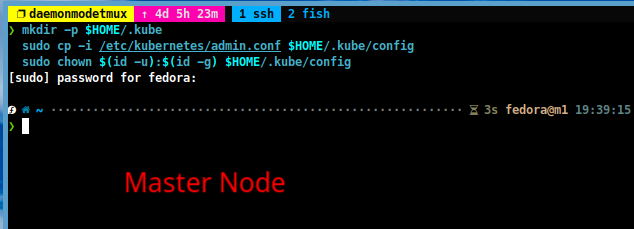
Step 15: Join Worker Nodes to Kubernetes Cluster
-
Once you have initialised the Kubernetes cluster on the master node, you can join the worker nodes to the cluster by running the following command on each worker node:
sudo kubeadm join <join-string-from-step-14> --apiserver-advertise-address $(tailscale ip --4)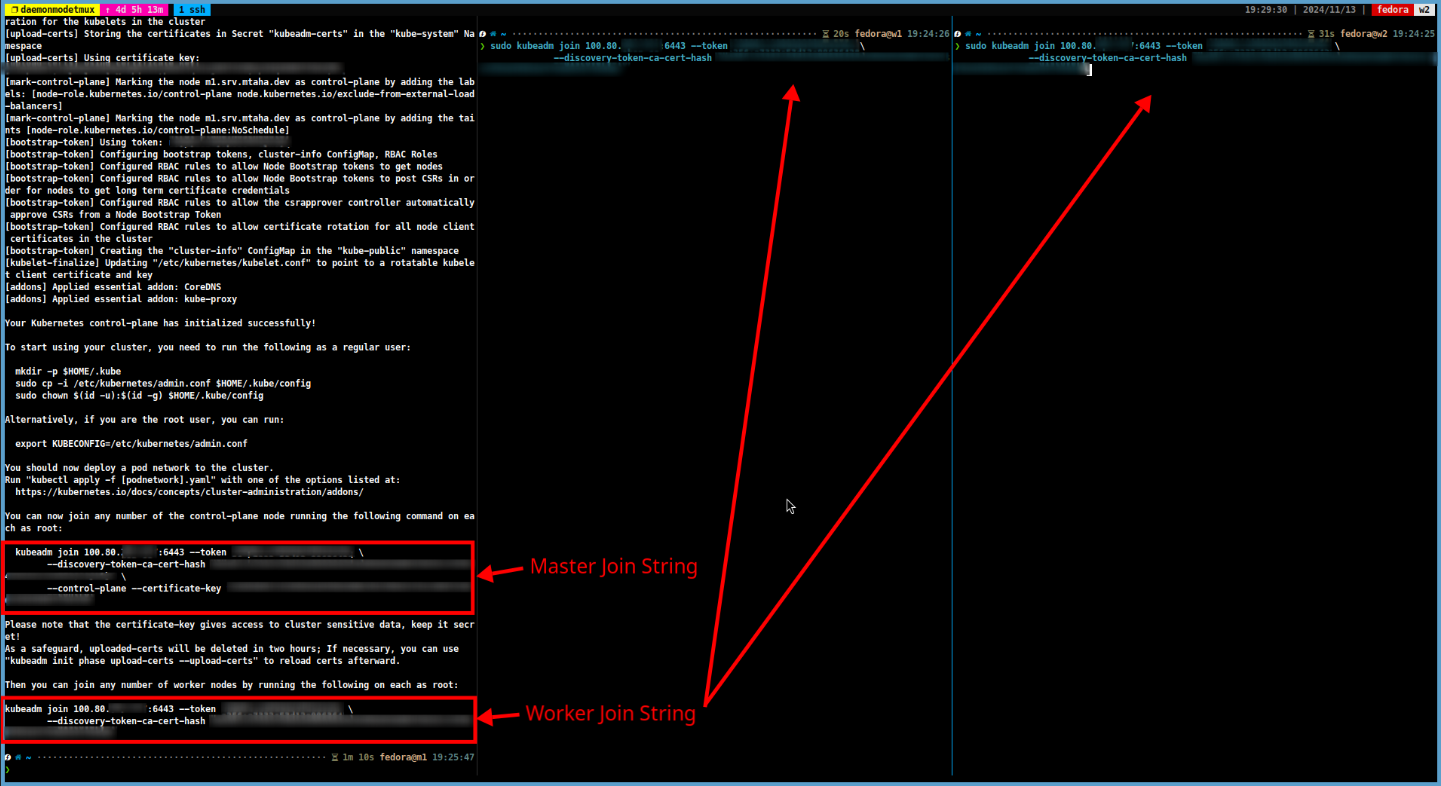
Tip
I recommend that you save the master join string to a file and use it for new master nodes in the future.
Step 16: Install Helm Package Manager in Master Node
-
In the next step, install the HELM package manager in the master node. HELM is a package manager for Kubernetes that allows you to deploy and manage applications on your Kubernetes cluster. You can install HELM by running the following commands:
curl https://raw.githubusercontent.com/helm/helm/main/scripts/get-helm-3 | bash
Step 17: Install CNI Plugin
-
The next step is to install the Container Network Interface (CNI) plugin on the Kubernetes cluster. The CNI plugin is responsible for providing networking capabilities to the containers running on the cluster. If you have high system requirements, I recommend using the Calico CNI plugin. Otherwise you can use the Flannel CNI plugin.
-
For Calico
-
Deploy the tigera operator by running the following command:
kubectl create -f https://raw.githubusercontent.com/projectcalico/calico/v3.29.0/manifests/tigera-operator.yaml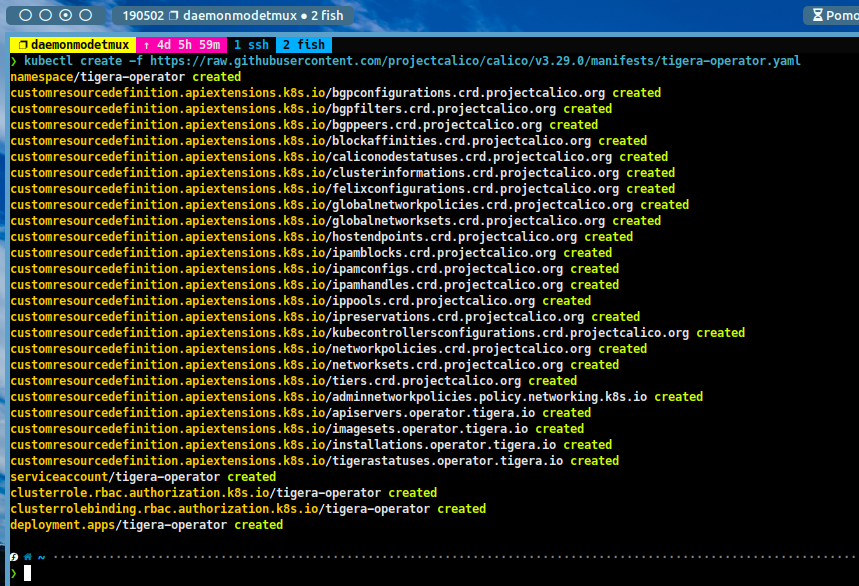
-
Then download calico custom manifest file:
curl -O https://raw.githubusercontent.com/projectcalico/calico/v3.29.0/manifests/custom-resources.yaml > calico.yaml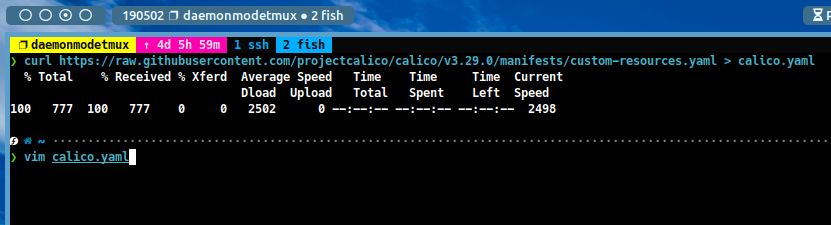
-
Edit the calico.yaml file and change the
cidrvalue to172.16.0.0/16.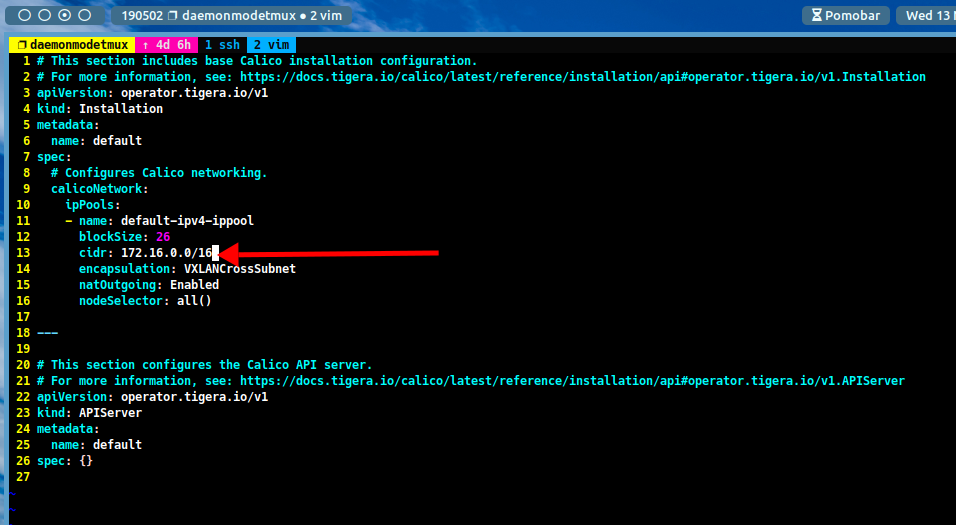
-
Apply the calico custom manifest file:
kubectl create -f calico.yaml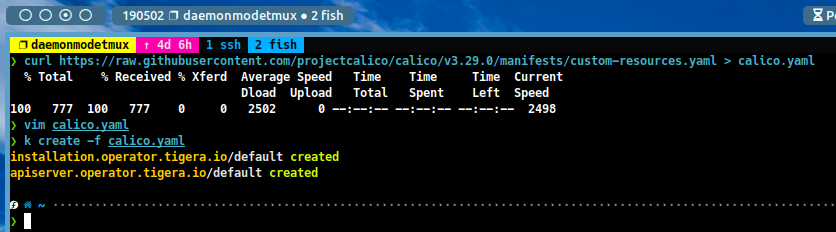
-
Finally, verify the calico installation by running the following command:
kubectl get pods -A

# or use k9s
k9s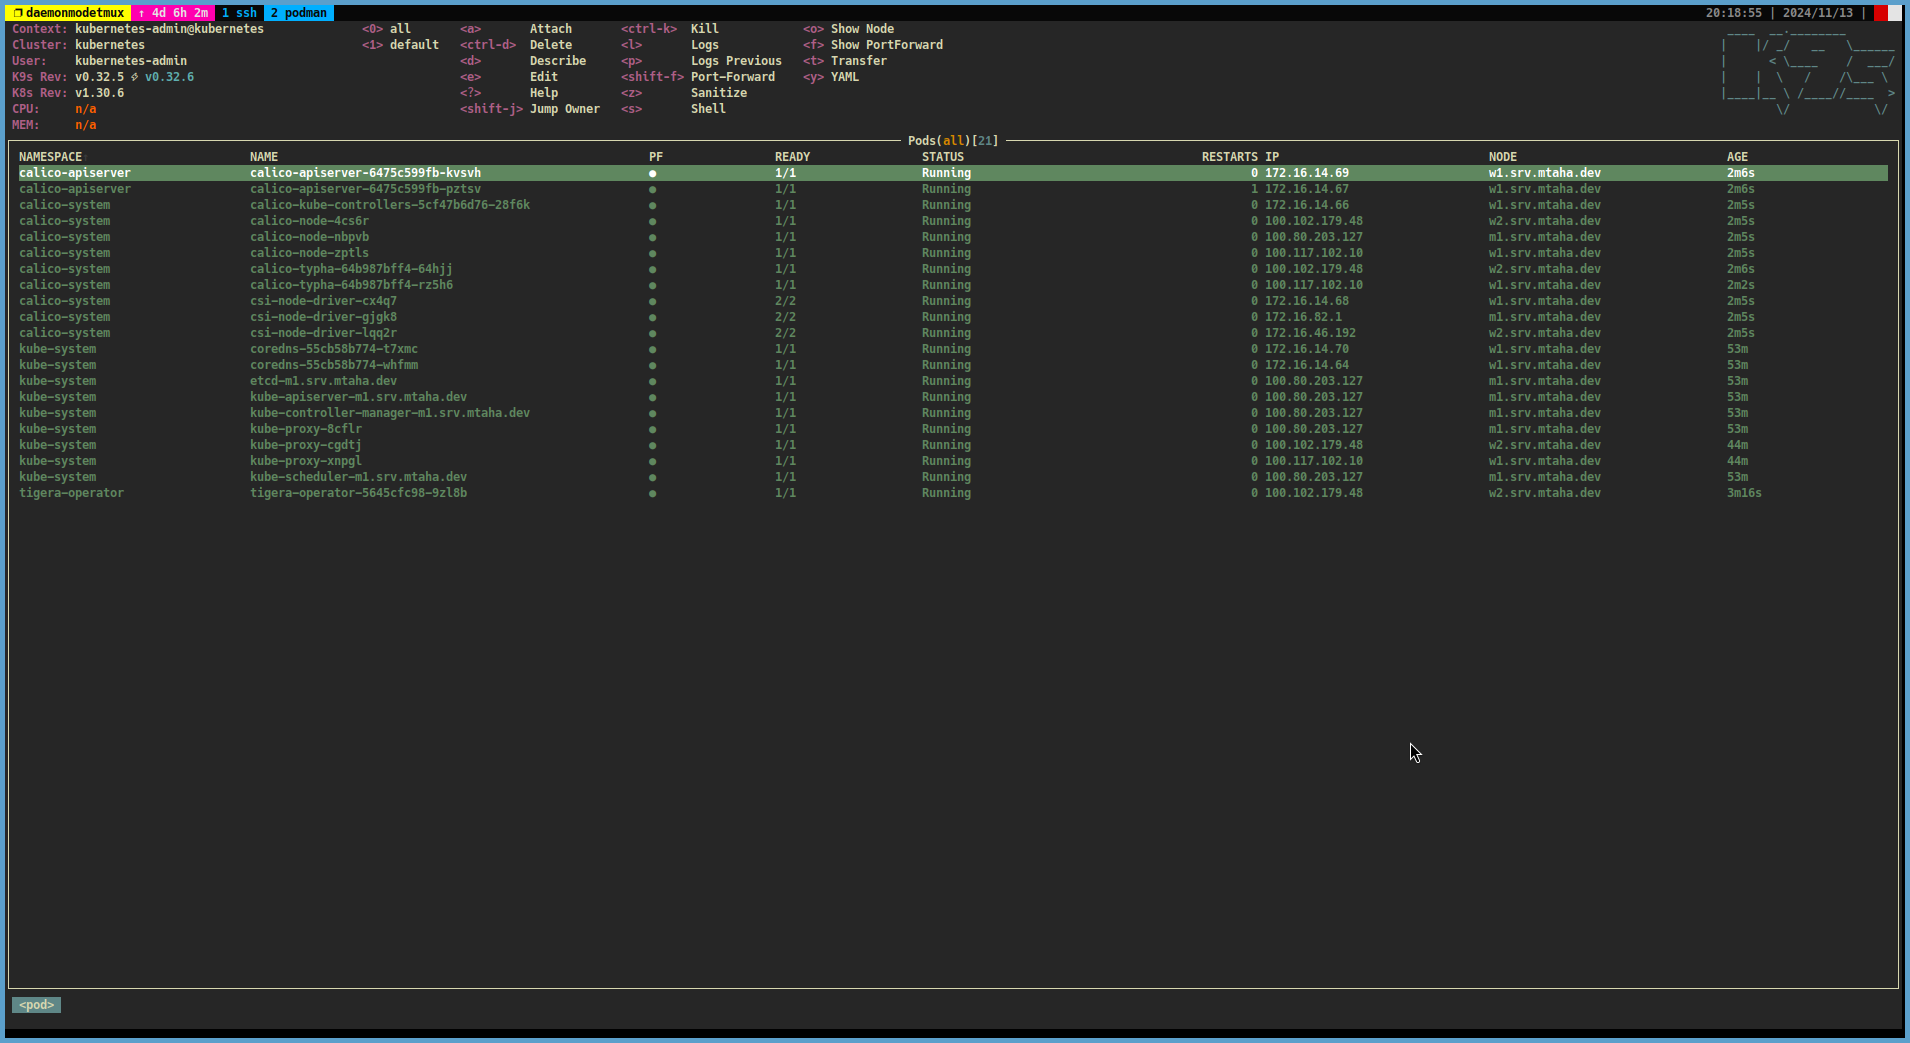
-
-
For Flannel
-
Install the Flannel CNI plugin by Helm:
# Add the Flannel repository
helm repo add flannel https://flannel-io.github.io/flannel/

# Install Flannel
helm install flannel --set podCidr="172.16.0.0/16" --set flannel.args[0]='--ip-masq' --set flannel.args[1]='--kube-subnet-mgr' --set flannel.args[2]='--iface=tailscale0' --namespace kube-flannel flannel/flannel --create-namespace

# Label the Flannel pods
kubectl label --overwrite ns kube-flannel pod-security.kubernetes.io/enforce=privileged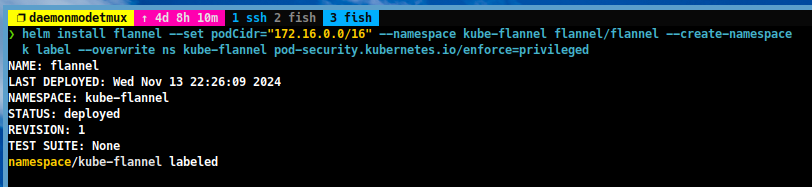
-
Verify the Flannel installation by running the following command:
kubectl get pods -A

# or use k9s
k9s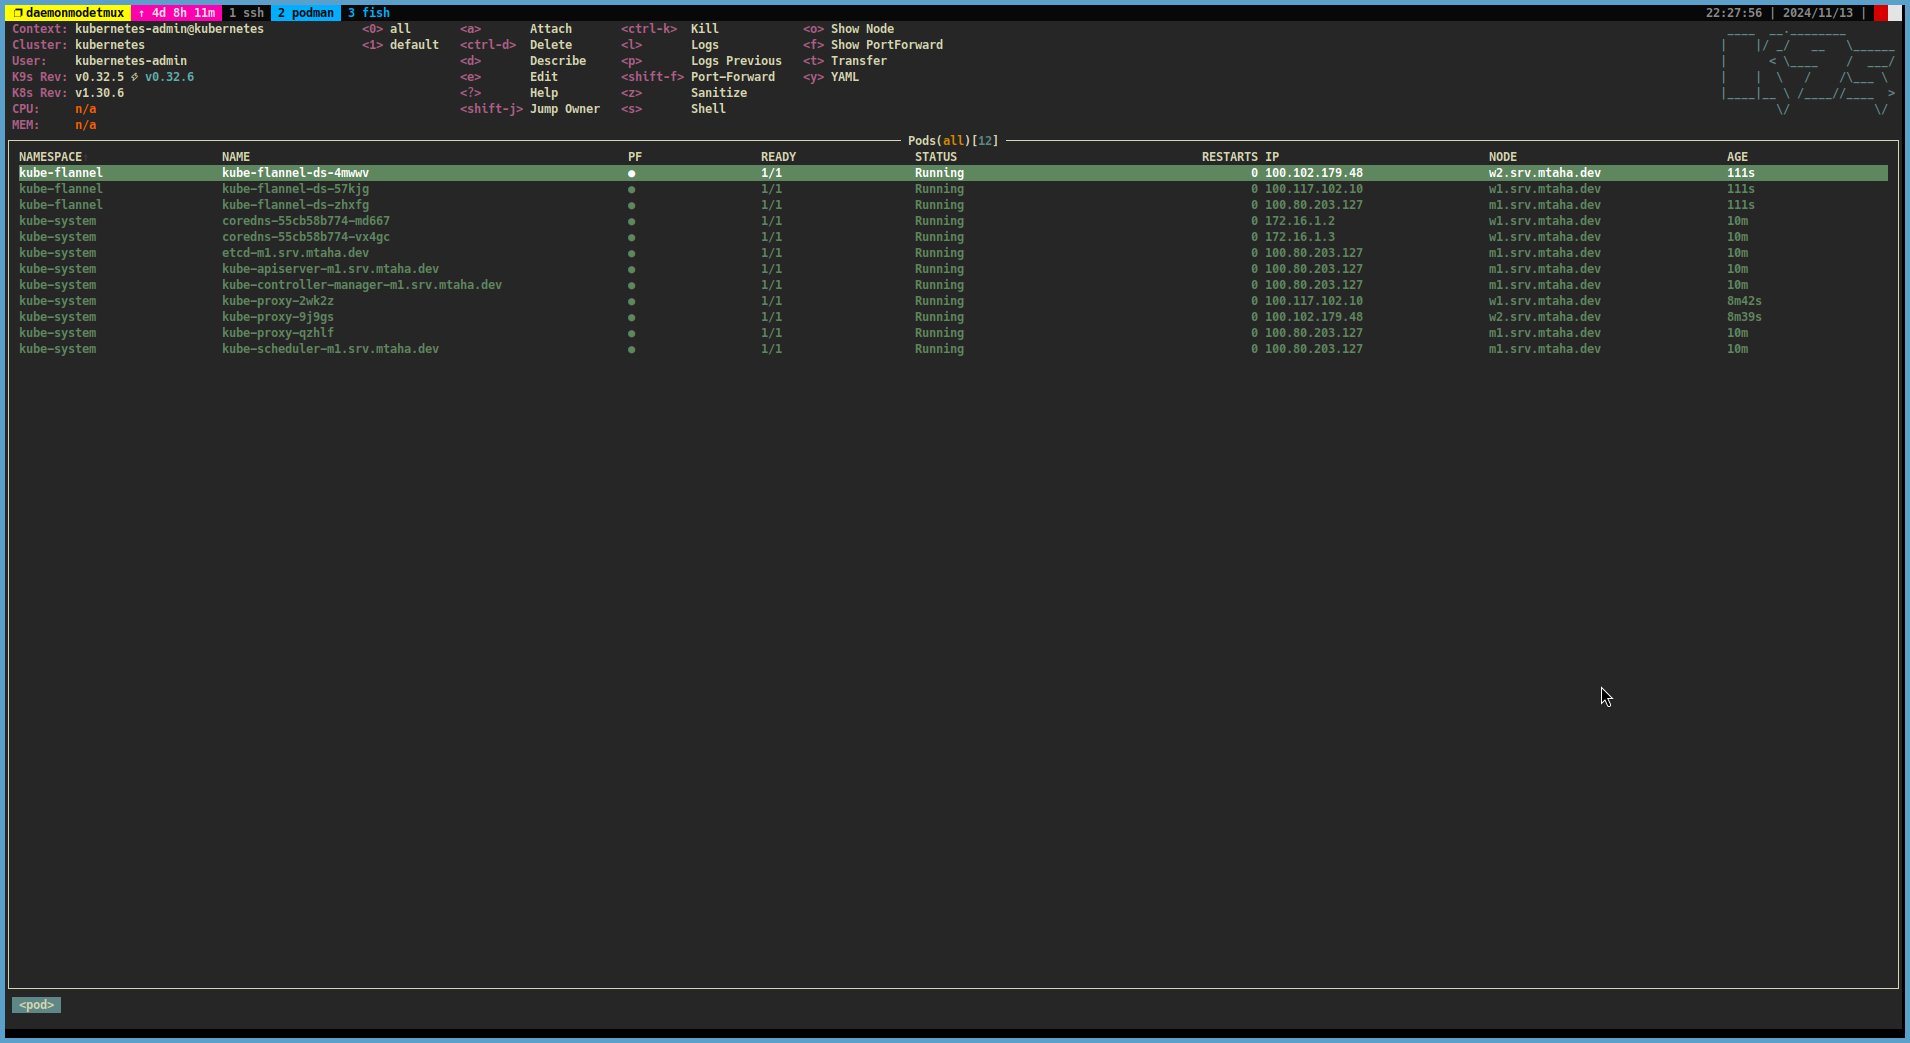
-
Step 18: Install MetalLB Load Balancer
-
The next step is to install the MetalLB load balancer on the Kubernetes cluster. MetalLB is a load balancer that provides network load balancing for Kubernetes clusters. You can install MetalLB by running the following steps:
-
Create a file with the name `metallb.yaml’ and add the following content:
apiVersion: metallb.io/v1beta1
kind: IPAddressPool
metadata:
  name: default
  namespace: metallb-system
spec:
  addresses:
  - 172.16.20.0/24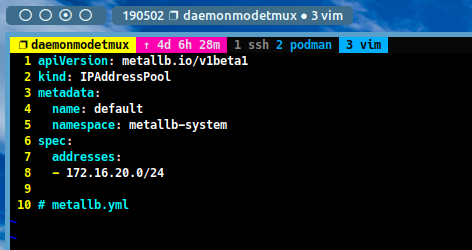
-
Install MetalLB by Helm with the following command:
helm repo add metallb https://metallb.github.io/metallb
helm install metallb metallb/metallb --namespace metallb-system --create-namespace

until $(kubectl get pods -n metallb-system --no-headers | awk '{print $3}' | uniq | grep -q 'Running'); do
  echo "Waiting for MetalLB pods to be in Running state..."
  sleep 5
done

kubectl apply -f metallb.yaml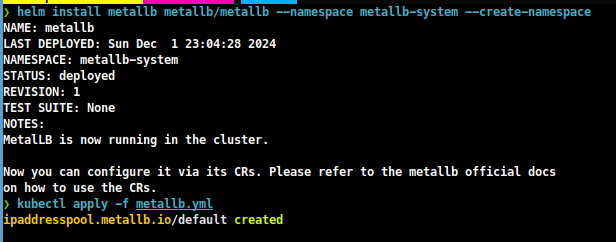
-
Verify the MetalLB installation by running the following command:
kubectl get pods -A

# or use k9s cli
k9s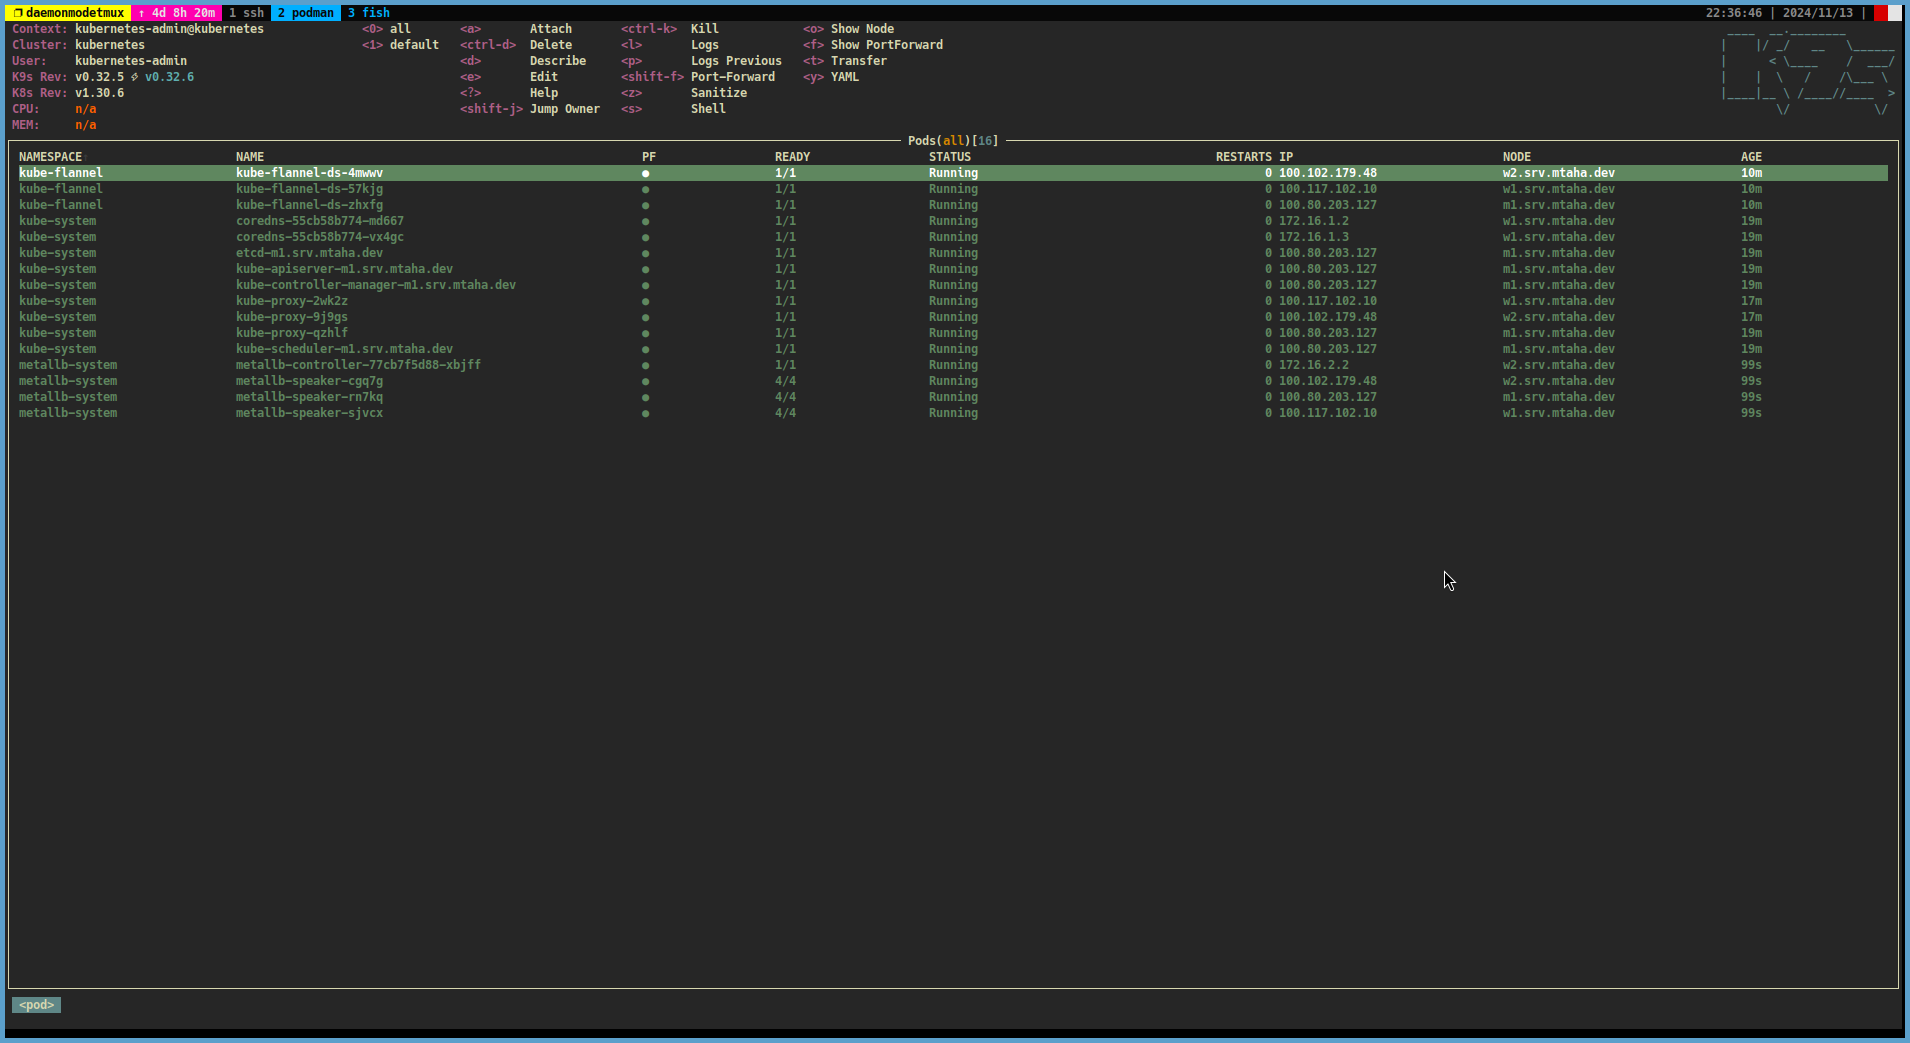
Step 19: Install local-path-provisioner Storage Class
-
Finally, you can install the local-path-provisioner storage class on the Kubernetes cluster. The local-path-provisioner is a storage class that provides persistent storage for the containers running on the cluster. You can install the local-path-provisioner by running the following steps:
-
Install the local-path-provisioner with the following command:
# Install local-path-provisioner
kubectl apply -f https://raw.githubusercontent.com/rancher/local-path-provisioner/v0.0.28/deploy/local-path-storage.yaml

# Patch the local-path storage class
kubectl patch storageclass local-path -p '{"metadata": {"annotations":{"storageclass.kubernetes.io/is-default-class":"true", "defaultVolumeType":"local"}}, "allowVolumeExpansion": true}'
-
Verify the local-path-provisioner installation by running the following command:
kubectl get pods -A

# or use k9s
k9s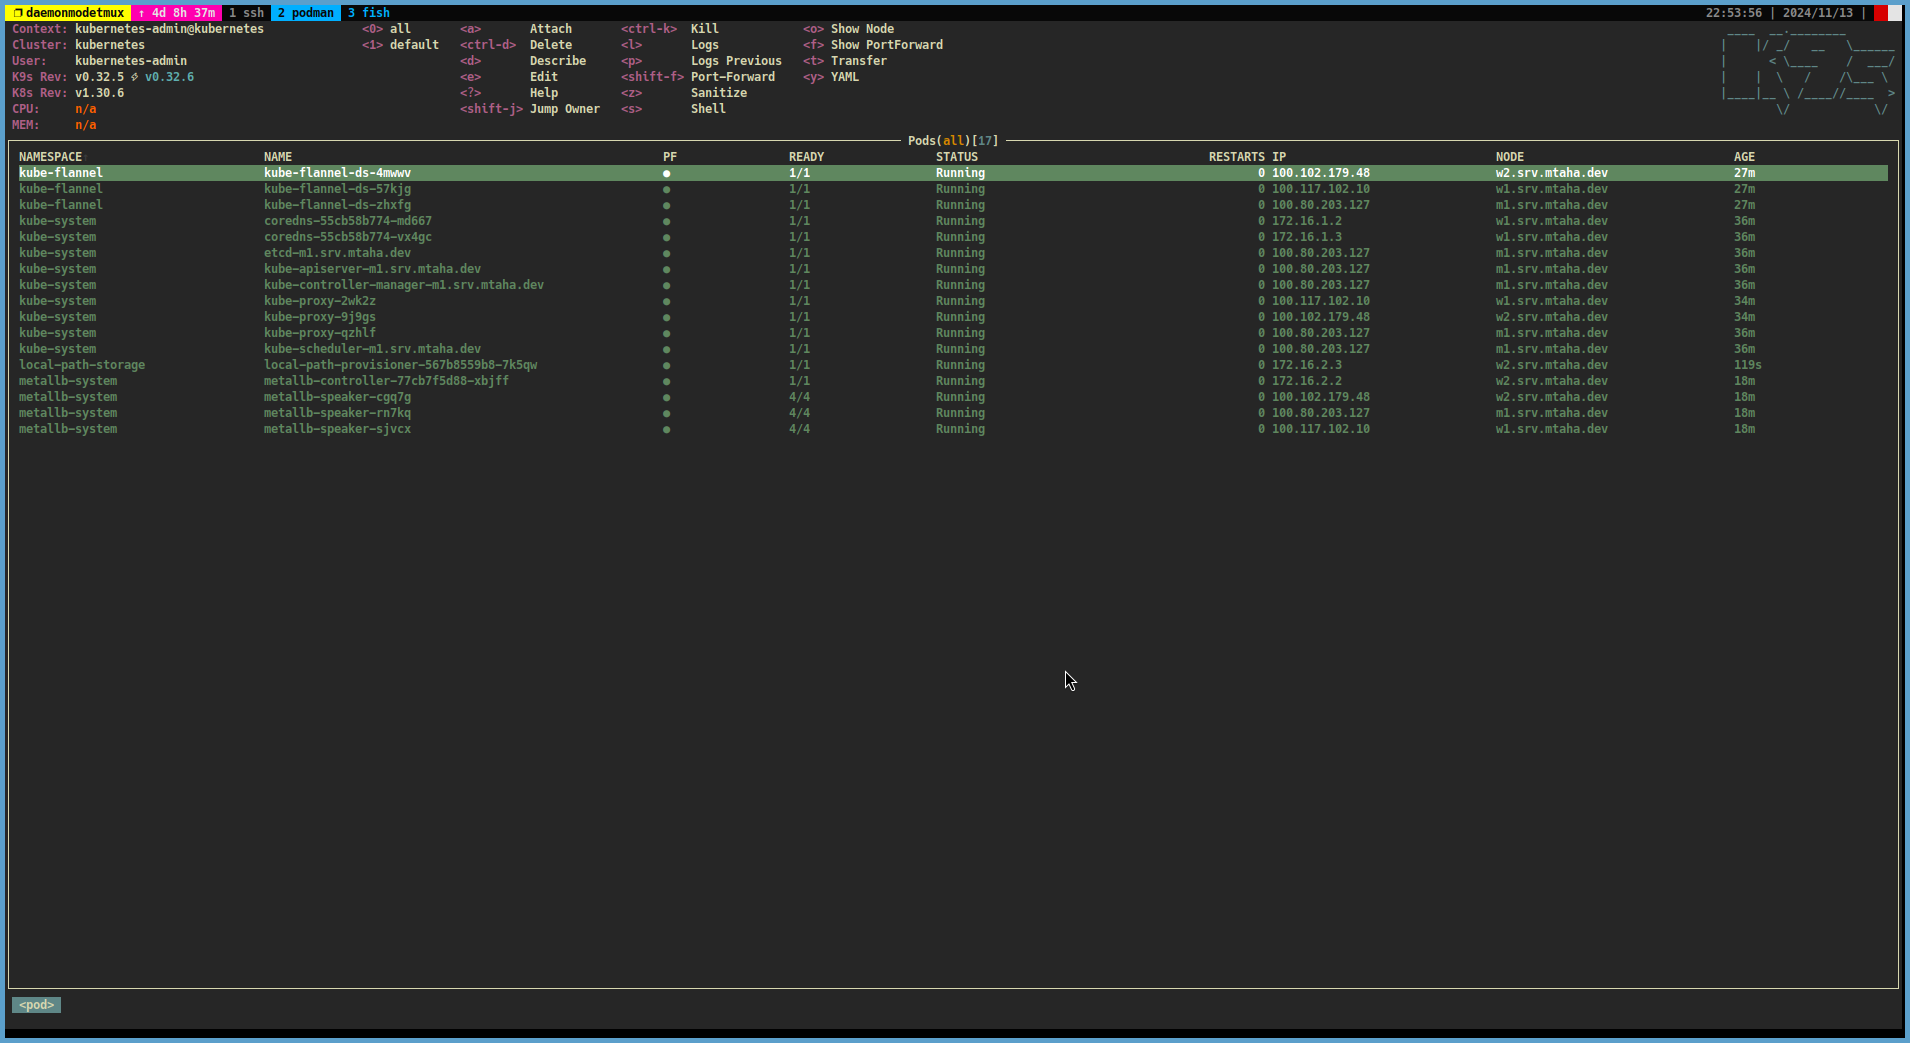
Conclusion
- In this guide, I’ve shown you how to set up a vanilla Kubernetes cluster using the Tailscale VPN infrastructure. Tailscale is a secure and easy to use VPN service that provides secure access to your network from anywhere in the world. Kubernetes is a powerful container orchestration platform that can be used to manage large numbers of containers. By following the steps in this guide, you can set up a Kubernetes cluster on your own machines and start deploying containerised applications.