Disclaimer
This guide is for advanced users only. Making changes to your bootloader can leave your system UNBOOTABLE. Proceed only if you are comfortable with UEFI firmware and Linux system administration, and make sure you have a full backup and a Fedora live/rescue USB available.
Introduction
- GRUB has long been known as the dominant bootloader in the Linux world and is renowned for its power and versatility. However, modern systems and the search for a faster experience have brought a minimalist alternative called systemd-boot (formerly Gummiboot) to the forefront.
- GRUB (Grand Unified Bootloader) is a bootloader adopted as a standard for Linux distributions. It offers users a flexible boot experience, supports multiple operating systems and different file systems, and provides broad hardware compatibility.
- In contrast, systemd-boot is a fast and simple bootloader designed specifically for UEFI-based systems. Developed as part of the systemd ecosystem, this bootloader requires less configuration and can significantly reduce boot time.
- In this blogpost, we will walk through the process of switching from GRUB to systemd-boot with Secure Boot support.
Prerequisites
- Fedora installed in UEFI mode (not legacy BIOS).
- Secure Boot enabled in firmware.
- Basic Linux command line and admin skills.
- Full backup of /boot and /boot/efi partitions.
- A Fedora live/rescue USB drive and confirmed access to your firmware/BIOS menu.
Step 1: Remove GRUB and Shim
DANGER: You are about to delete your current bootloader.
Do NOT continue unless you have a working live USB, full backup, and are 100% certain you can finish this guide. If something goes wrong before systemd-boot is installed, your system will not boot!
#~ Remove DNF protection to allow deleting GRUB and Shim packages
sudo rm /etc/dnf/protected.d/{grub2-,shim}*

#~ Remove GRUB and Shim packages
sudo dnf remove grub2\* shim\*

#~ Remove GRUB and Shim configuration files
sudo rm -rf /boot/{grub2,loader,{initramfs,vmlinuz}*} /boot/efi/EFI/{BOOT,fedora,Linux}*
Step 2: Remove /boot partition and remount /boot/efi
Background:
Fedora usually uses two separate partitions for
/bootand/boot/efiin its default installations, and systemd-boot waits for configuration files in the/boot/efi/loader/directory.If your current installation has a separate
/bootpartition, you must remove it and mount your EFI partition to/boot/efifor systemd-boot to work correctly.Only follow this step if
lsblkormount | grep '/boot'shows/bootas a separate partition. Otherwise, skip.
#~ Unmount /boot if it is a separate partition
sudo umount -lf /boot

#~ Create /boot/efi directory
sudo mkdir -p /boot/efi

#~ Remount existing EFI partition to /boot/efi
sudo mount /boot/efi

#~ Remove /boot partition from /etc/fstab
sudo sed -i '/\/boot.*ext4/d' /etc/fstab
- After changing partition setup, remove any GRUB entries from UEFI:
#~ List all current EFI boot entries
sudo efibootmgr- Locate the entry number for the old GRUB boot entry (often labeled “fedora” or “GRUB”), then remove it.
#~ Remove GRUB entry from EFI boot manager (replace XXXX with your Boot####)
sudo efibootmgr -Bb XXXX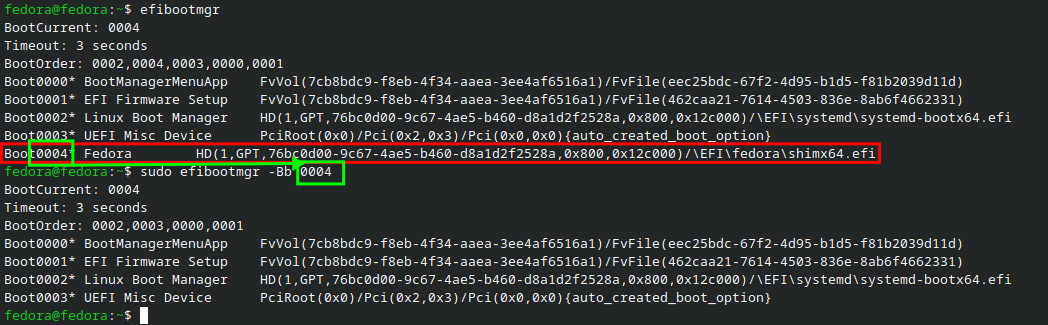
Step 3: Install required packages
- After removing GRUB, you need to install systemd-boot and tools for Secure Boot and Unified Kernel Image (UKI) creation. You can do this with the following command:
sudo dnf install -y mokutil openssl sbsigntools systemd-boot-unsigned systemd-ukifyStep 4: Initialize Systemd-Ukify (UKI signing) configuration
- Unified Kernel Image (UKI) is a single EFI binary bundling the kernel and initramfs, signed for Secure Boot. In this step, we will set up the configuration for signing UKI binaries.
- Initialize the ukify configuration with the following commands:
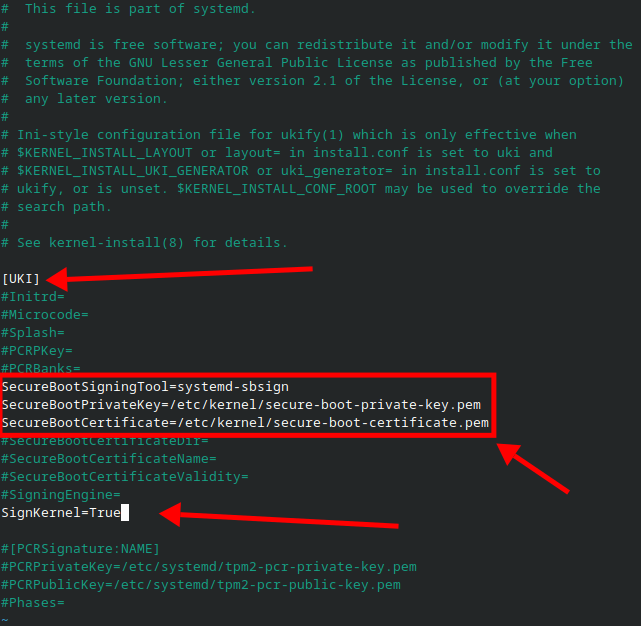
sudo cp /usr/lib/kernel/uki.conf /etc/kernel/
sudo vim /etc/kernel/uki.conf-
Adjust the configuration as shown below and in the screenshot.
Step 5: Generate Secure Boot Key with ukify
- You need your own Secure Boot keys to sign your systemd-boot binary and
kernel images. You can generate a new key pair using
ukify:
sudo ukify genkey --config /etc/kernel/uki.conf
Step 6: Sign & Install SDBoot binaries
- Secure Boot requires all EFI binaries to be signed by a trusted certificate. You sign Systemd-Boot with your new key, then install to the EFI partition. You can do this with the following commands:
#~ Sign systemd-boot EFI binary with your private key
sudo /usr/lib/systemd/systemd-sbsign sign \
    --private-key /etc/kernel/secure-boot-private-key.pem \
    --certificate /etc/kernel/secure-boot-certificate.pem \
    --output /usr/lib/systemd/boot/efi/systemd-bootx64.efi.signed \
    /usr/lib/systemd/boot/efi/systemd-bootx64.efi

#~ Install systemd-boot to EFI partition using signed binary/keys
sudo bootctl install --esp-path=/boot/efi --secure-boot-auto-enroll yes \
    --certificate /etc/kernel/secure-boot-certificate.pem \
    --private-key /etc/kernel/secure-boot-private-key.pem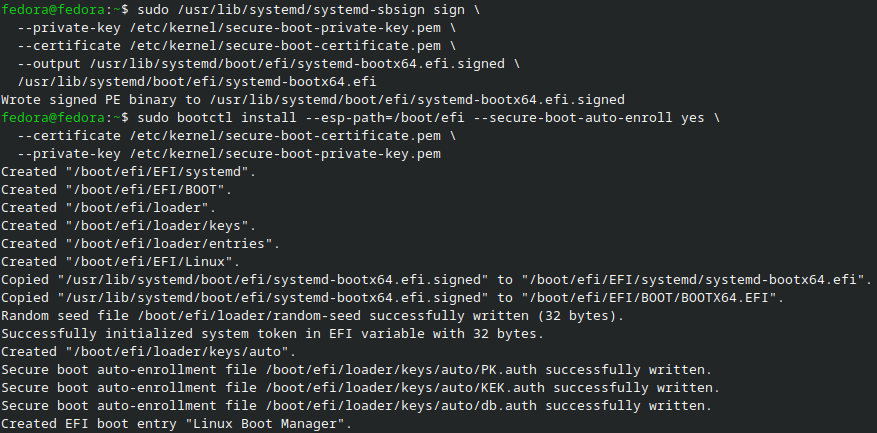
Step 7: Enroll (import) your certificate to MOK
-
The Machine Owner Key (MOK) database is used by shim to allow custom keys for Secure Boot. You need to enroll your Secure Boot certificate into the MOK database so that your signed binaries can be verified at boot time.
-
First, convert your signing certificate to DER format and then enroll it using
mokutil:
#~ Convert your signing certificate to DER format
sudo openssl x509 -in /etc/kernel/secure-boot-certificate.pem \
    -outform DER -out /etc/kernel/secure-boot-certificate.der

#~ Enroll the certificate to the MOK database
sudo mokutil --import /etc/kernel/secure-boot-certificate.der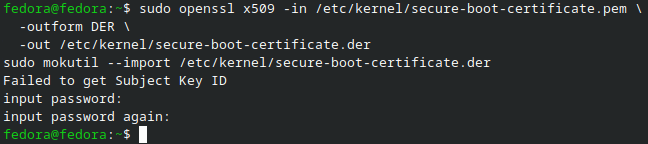
- You will be prompted to set a password for MOK enrollment. Write this down; you’ll need it on reboot for final enrollment.
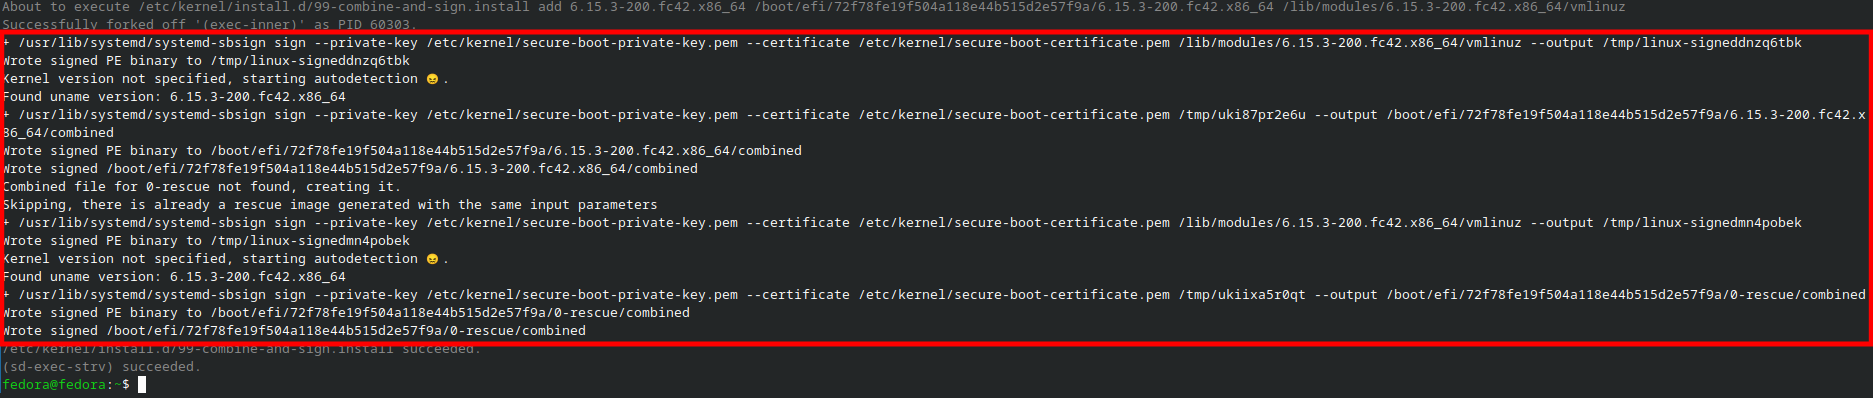
Step 8: Add Custom Hook for Combining Initramfs and Kernel with Ukify
- Create a custom hook to combine the initramfs and kernel into a single signed
binary. Create a file named
/etc/kernel/install.d/99-combine-and-sign.installwith the following content:
#!/usr/bin/env bash
set -eu

[ "$1" = add ] || exit 0

BOOT_ROOT="$KERNEL_INSTALL_BOOT_ROOT"
ENTRY_DIR_ABS="$3"
KERNEL_VERSION="$2"
MACHINE_ID="$KERNEL_INSTALL_MACHINE_ID"
VMLINUZ="$4"

[[ ! -f $VMLINUZ ]] && {
  echo "vmlinuz $VMLINUZ missing!" 1>&2
  exit 1
}

combine_and_sign() {
  local kver="$1"
  local output="$2"

  INITRD="$ENTRY_DIR_ABS/initrd"
  LOADER_ENTRY="$BOOT_ROOT/loader/entries/$MACHINE_ID-$KERNEL_VERSION.conf"
  [[ "$kver" == "0-rescue" ]] && {
    /usr/lib/kernel/install.d/51-dracut-rescue.install add "$KERNEL_VERSION" "$ENTRY_DIR_ABS" "$VMLINUZ"
    INITRD="$BOOT_ROOT/$MACHINE_ID/0-rescue/initrd"
    LOADER_ENTRY="$BOOT_ROOT/loader/entries/$MACHINE_ID-0-rescue.conf"
  }

  /usr/lib/systemd/ukify build \
    --linux="$VMLINUZ" \
    --initrd="$INITRD" \
    --cmdline=@/etc/kernel/cmdline \
    --os-release=@/usr/lib/os-release \
    --sign-kernel \
    --signtool=systemd-sbsign \
    --secureboot-private-key=/etc/kernel/secure-boot-private-key.pem \
    --secureboot-certificate=/etc/kernel/secure-boot-certificate.pem \
    --output "$output"

  sed -i "/^initrd/d" "${LOADER_ENTRY}"
  sed -i "/^linux/s/linux$/combined/" "${LOADER_ENTRY}"

  [[ -f "/etc/kernel/remove_unsigned" ]] && {
    echo "Removing unsigned initrd and vmlinuz files."
    rm -f "$INITRD" "$ENTRY_DIR_ABS/vmlinuz"
  }
}

combine_and_sign "$KERNEL_VERSION" "$ENTRY_DIR_ABS/combined"
[[ ! -f "$BOOT_ROOT/$MACHINE_ID/0-rescue/combined" ]] && {
  echo "Combined file for 0-rescue not found, creating it."
  combine_and_sign "0-rescue" "$BOOT_ROOT/$MACHINE_ID/0-rescue/combined"
}- Make the script executable:
sudo chmod +x /etc/kernel/install.d/99-combine-and-sign.install- Optionally, you can create a file
/etc/kernel/remove_unsignedto remove the original unsigned initramfs and kernel files after combining them into a single signed binary. This is useful for keeping your/boot/efi/<machine-id>/<kernel-version>/directory clean and ensuring only signed binaries are present.
Step 9: Generate and sign EFI kernel image
- After creating the custom hook, you need to trigger the kernel installation to apply the changes. This will generate a unified signed kernel image (UKI) that systemd-boot can use.
sudo kernel-install add "$(uname -r)" "/lib/modules/$(uname -r)/vmlinuz" -v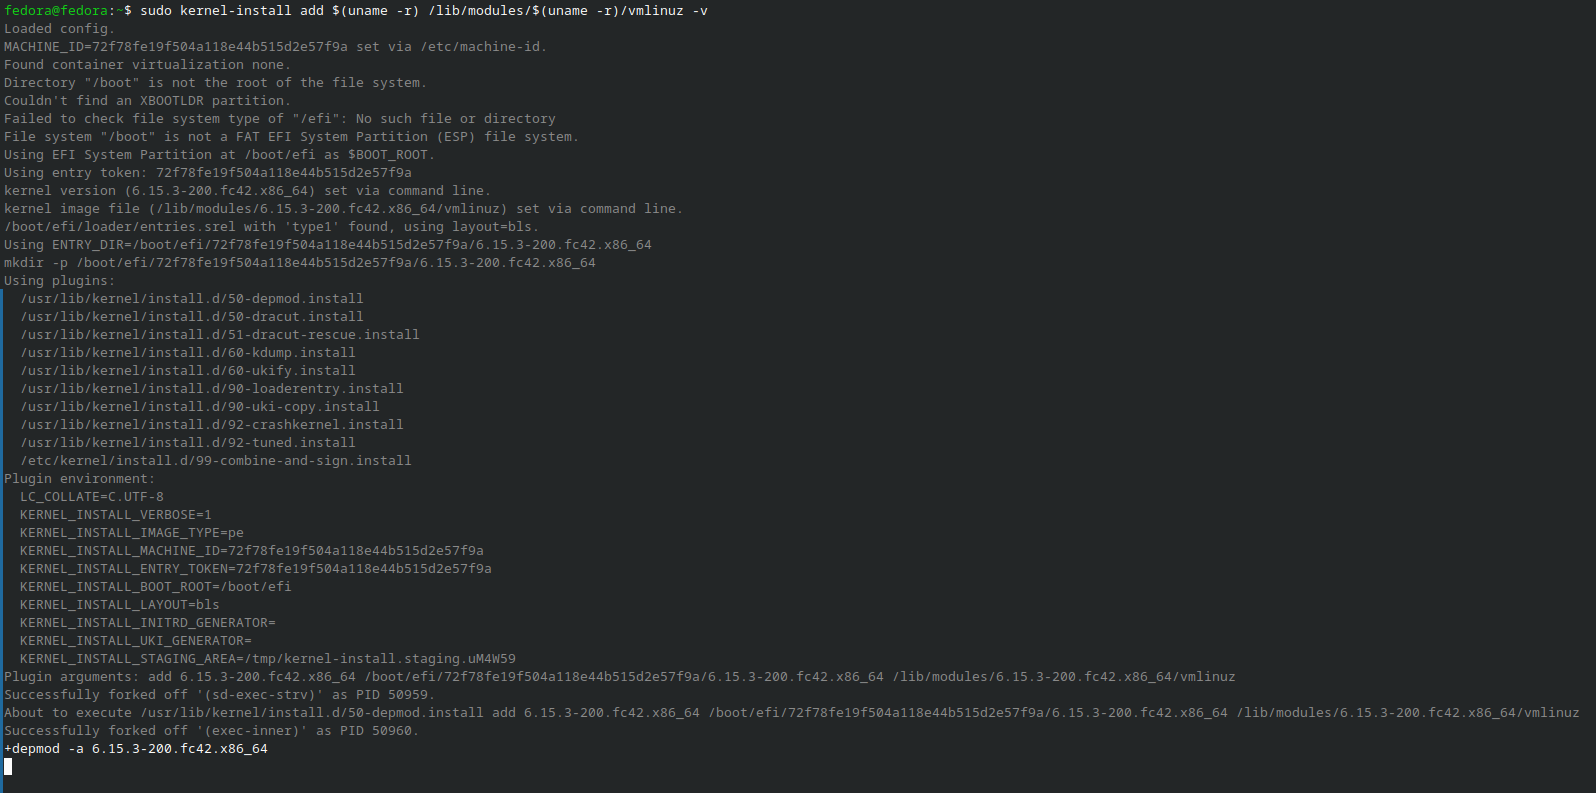
Step 10: Reboot and Enroll MOK
- The final step is to reboot your system and register the Machine Owner Key (MOK)
that you created earlier. Systemd-Boot should handle this automatically
(The
--secure-boot-auto-enroll yesflag in step 6 ensures this). If this step fails, the MOK screen will be displayed.
If the MOK screen does not appear:
After booting, check the secure boot state (
mokutil --sb-state).Try to re-import the certificate as shown above.
DANGEROUS METHOD: Delete all secure boot keys in your BIOS/UEFI firmware settings.
Step 11: Verify All is Working
After rebooting and enrolling MOK, verify Secure Boot and systemd-boot status:
#~ Verify systemd-boot installation
sudo bootctl status

#~ Check secure boot state
sudo mokutil --sb-state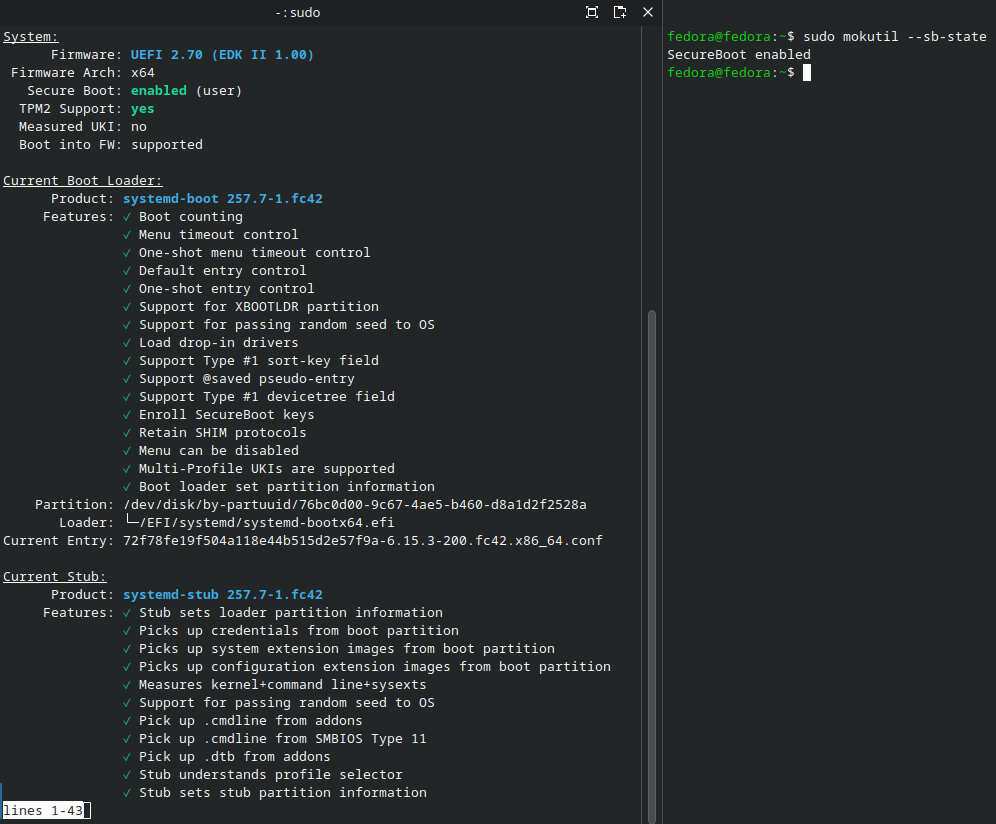
Conclusion
Migrating from GRUB to systemd-boot on Fedora with Secure Boot provides a cleaner, more modern UEFI boot setup and greater control over cryptographic signatures. However, this process is risky and should only be performed by advanced users. Test carefully, keep recovery media on hand, and enjoy the benefits of a streamlined secure boot flow.
References
- https://github.com/joelmathewthomas/archinstall-luks2-lvm2-secureboot-tpm2
- https://medium.com/@umglurf/full-uefi-secure-boot-on-fedora-using-signed-initrd-and-systemd-boot-3ff2054593ab
- https://sysguides.com/fedora-uefi-secure-boot-with-custom-keys
- https://wiki.archlinux.org/title/Unified_Extensible_Firmware_Interface/Secure_Boot#Assisted_process_with_systemd
- https://www.edu4rdshl.dev/posts/uki-secure-boot-on-archlinux-systemd-boot-walkthrough/