The latest advances in virtualization now make it possible to run multiple
operating systems simultaneously on high-performance computers. In this
guide, we’ll show you how to use dual GPU migration to assign a powerful
graphics card to a Windows virtual machine running on a Linux system,
allowing you to run Windows and Linux seamlessly on the same machine.
Passthrough allows a virtual machine (VM) to use the hardware directly,
which is a huge advantage, especially for gamers and users of
graphics-intensive applications. On a dual GPU system, you can assign one GPU
to the Linux host system and the other GPU to the Windows virtual machine to
maximize the graphics performance of both operating systems independently.
Prerequisites
16 GB of RAM or more (8 GB for each system)
A computer with UEFI compatible two GPUs (one for the host and one for the guest)
A CPU with virtualization support (Intel VT-x or AMD-V)
A Linux distribution with a recent kernel (5.0 or later)
A Windows installation ISO
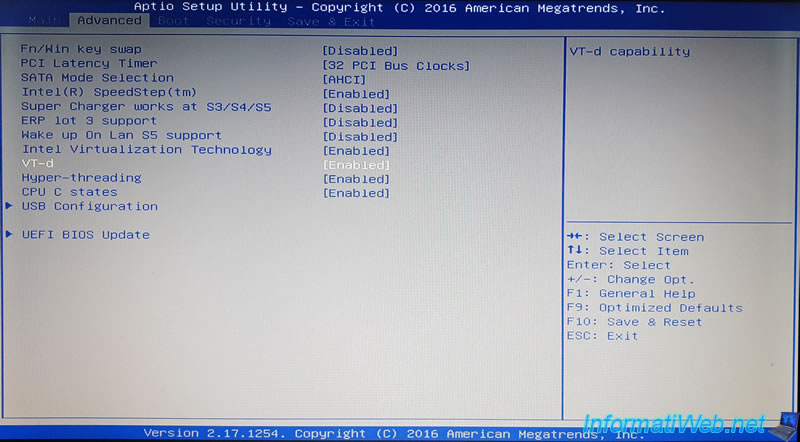
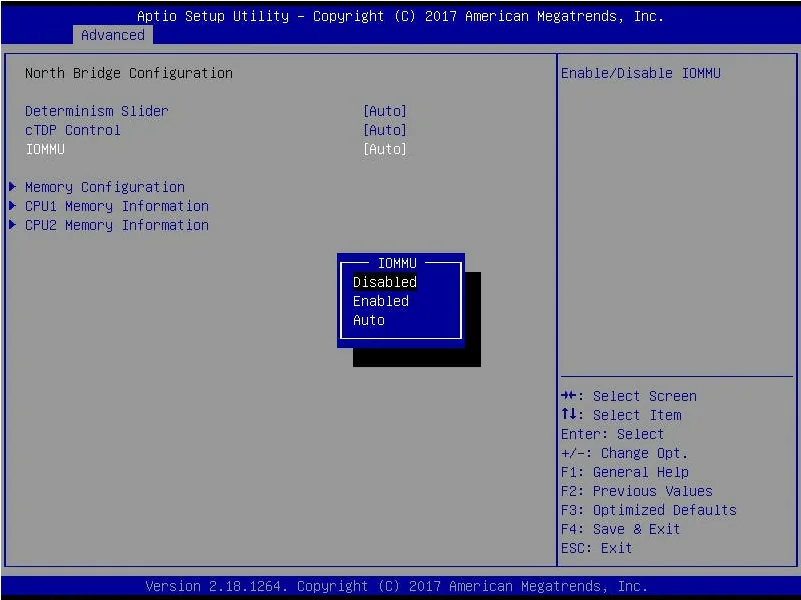
Step 1: Enable IOMMU from BIOS
IOMMU (Input/Output Memory Management Unit) is a feature that allows the system
to map device memory addresses to physical memory addresses. This is essential
for passthrough to work correctly. To enable IOMMU, you need to enable IOMMU
(AMD-Vi for AMD chipset, VT-d for Intel chipset)
For Intel:
For AMD:
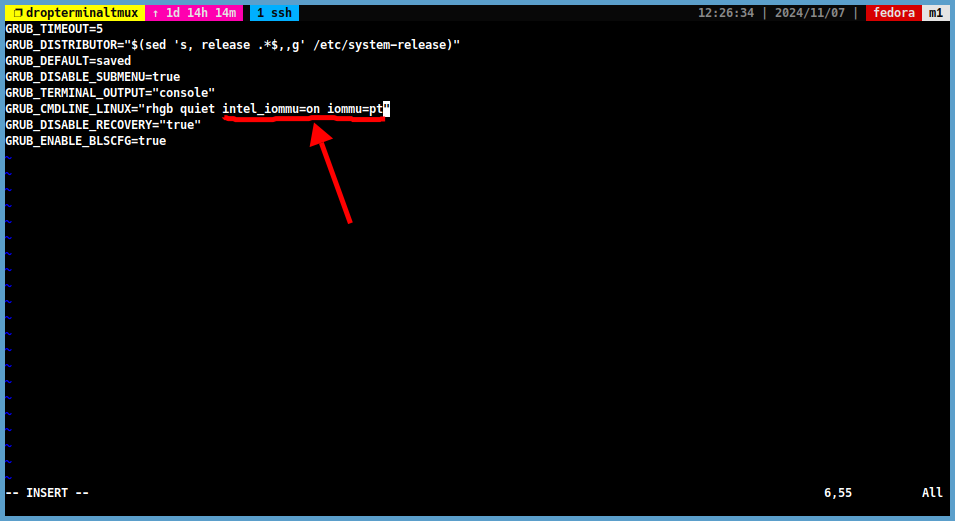
Step 2: Enable IOMMU in the Kernel
To enable IOMMU in the kernel, you need to add the following kernel parameters
to the bootloader configuration files.
If you’re using GRUB bootloader;
Open the GRUB configuration file:
sudo vim /etc/default/grub
Add the following line to the GRUB_CMDLINE_LINUX parameter:
GRUB_CMDLINE_LINUX="... intel_iommu=on iommu=pt" # For IntelGRUB_CMDLINE_LINUX="... amd_iommu=on iommu=pt" # For AMD
Update the GRUB configuration:
sudo update-grub
or
sudo grub-mkconfig -o /boot/grub/grub.cfg
or
sudo grub2-mkconfig -o /boot/grub2/grub.cfg
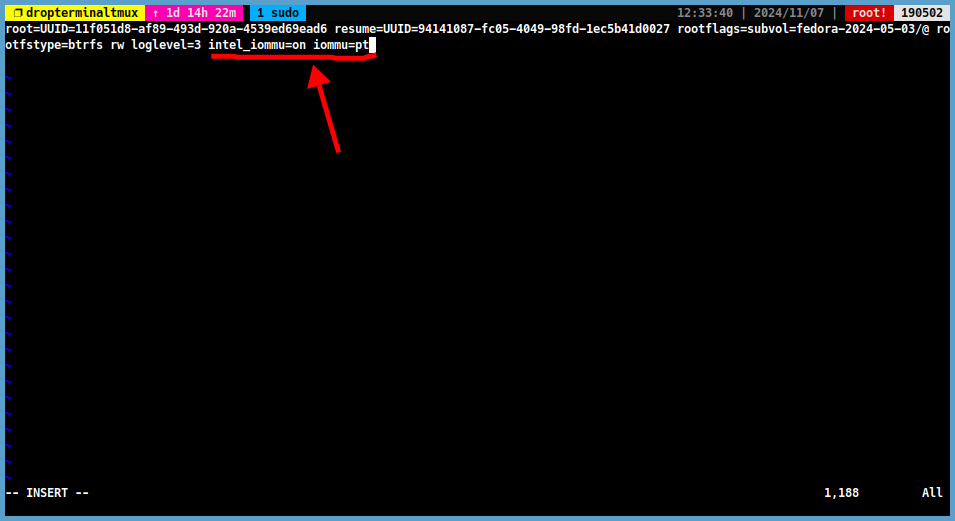
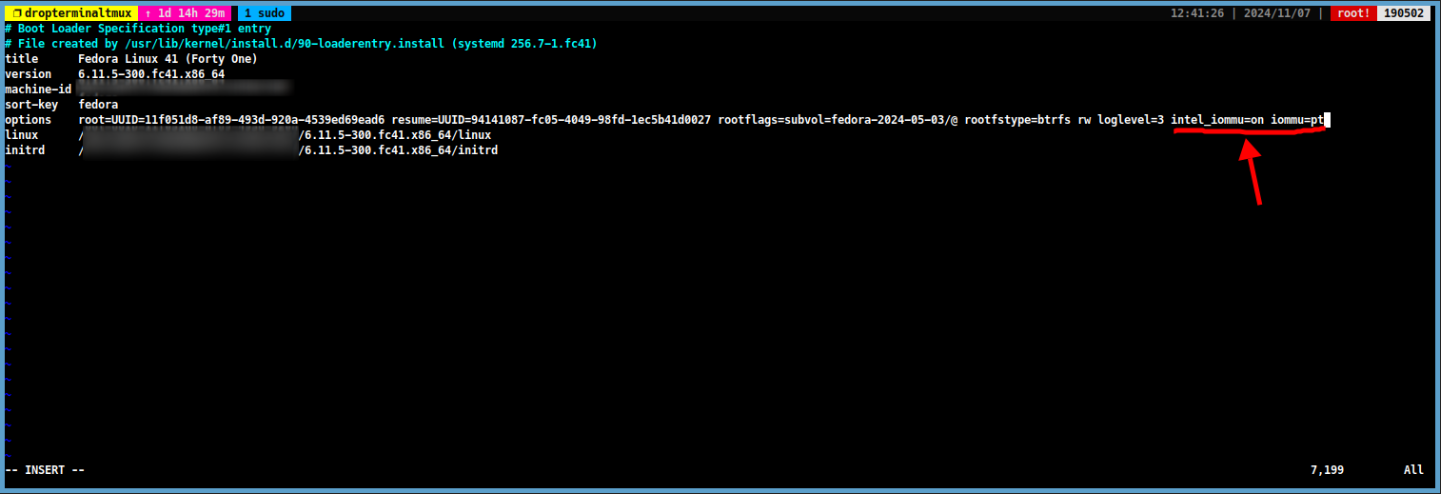
If you’re using systemd-boot;
Open the default kernel command line file:
sudo vim /etc/kernel/cmdline
Add the following line to the file:
intel_iommu=on iommu=pt # For Intelamd_iommu=on iommu=pt # For AMD
And open the current kernel configuration file:
sudo vim /boot/loader/entries/$(cat /etc/machine-id)-$(uname -r).conf
or
sudo vim /boot/efi/loader/entries/$(cat /etc/machine-id)-$(uname -r).conf
Add the following line to append the options line:
intel_iommu=on iommu=pt # For Intelamd_iommu=on iommu=pt # For AMD
Reboot the system to apply the changes.
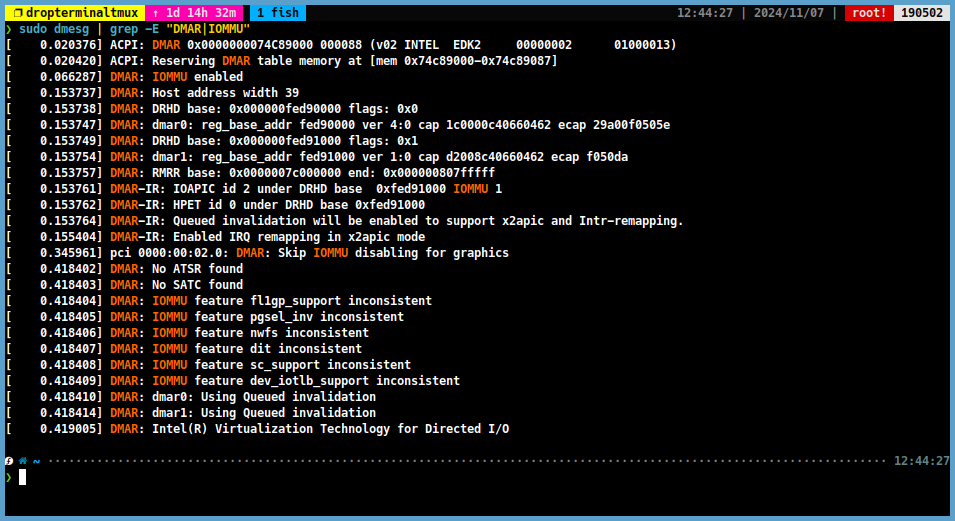
Step 3: Verify IOMMU Support
To verify that IOMMU is enabled and working correctly, run the following command:
sudo dmesg | grep -E 'DMAR|IOMMU'
If you want to see the IOMMU groups, you can use the following script:
vim lsiommu.sh
Add the following lines to the file:
#!/bin/bashshopt -s nullglobfor g in $(find /sys/kernel/iommu_groups/* -maxdepth 0 -type d | sort -V); do echo "IOMMU Group ${g##*/}:" for d in $g/devices/*; do echo -e "\t$(lspci -nns ${d##\*/})" done;done;
Save the file (esc + :wq) and make it executable:
chmod +x lsiommu.sh
Run the script:
./lsiommu.sh
The output will show you the IOMMU groups and the devices in each group.
You will see the GPU vendor ID and device ID in the output. You will require
this information when configuring the virtual machine. This is an AMD GPU
with the vendor ID 1002 and device ID 67df ([1002:67df]).
The audio device is also shown in the same group with the vendor ID 1002
and device ID aaf0 ([1002:aaf0]).
Add your user to the libvirt and kvm groups with the following command:
sudo usermod -aG libvirt,qemu,kvm $USER
Note
If you’re get group x does not exist error, remove group x from the
command and try again.
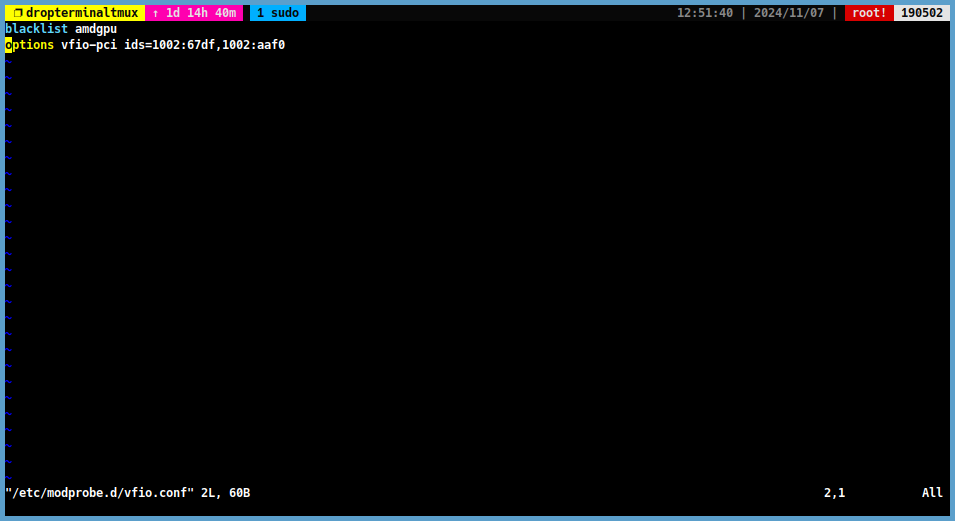
Step 6: Block the GPU Driver
To stop the GPU driver loading at boot, you must blacklist the driver. Create
a new file in the /etc/modprobe.d/ directory with the following command to do this:
sudo vim /etc/modprobe.d/blacklist.conf
Add the following lines to file:
For NVIDIA:
blacklist nouveaublacklist nvidia
For AMD or Radeon:
blacklist amdgpublacklist radeon
Now, append the GPU vendor ID and device ID to the file from the Step 3 output:
options vfio-pci ids=1002:67df,1002:aaf0
Save the file and regenerate the initramfs:
For Ubuntu/Debian:
sudo update-initramfs -c -k all
For Fedora:
sudo dracut -fv
For Arch:
sudo mkinitcpio -P
Step 7: Enable and Start the Libvirt Service and Reboot
Enable and start the libvirt service:
sudo systemctl enable libvirtd
Reboot the system to apply the changes.
sudo reboot
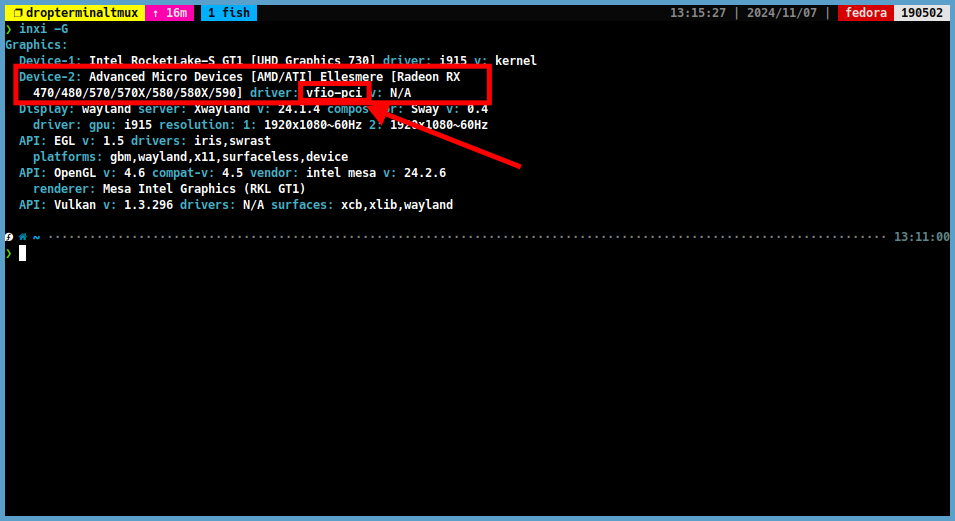
Step 8: Check the GPU Drivers
After rebooting the system, check if the GPU driver is loaded by inxi command.
Run the following command to check the GPU driver:
inxi -G
Warning
If you don’t see the vfio-pci driver in the output, go back to Step 6 and check
the configuration file.
Step 9: Download the Windows ISO File and VirtIO ISO Drivers
Download the Windows installation ISO from the Microsoft website:
Windows 10,
Windows 11
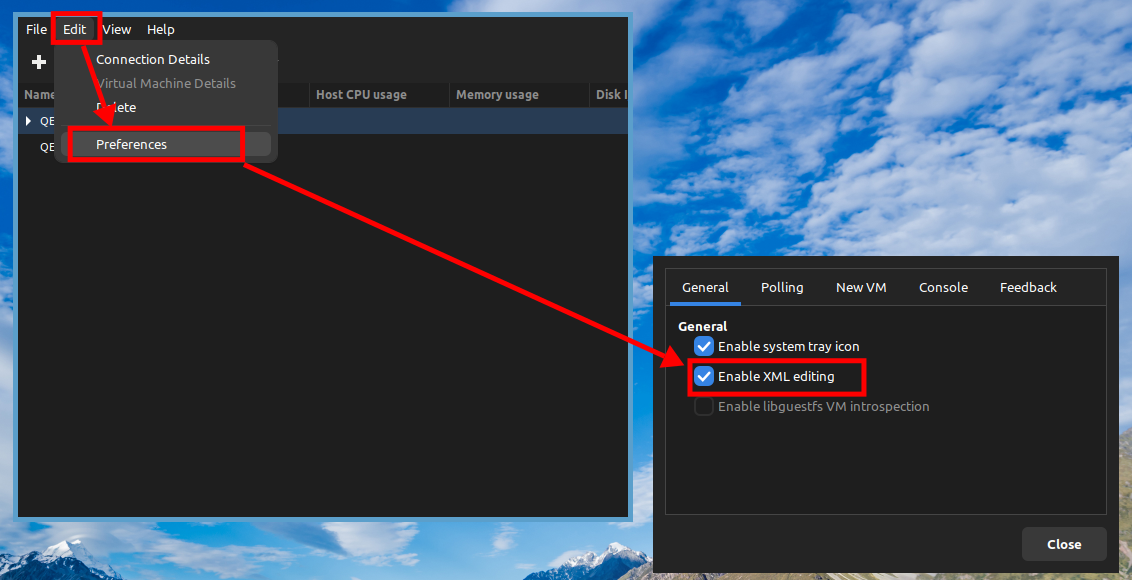
Open the Virtual Machine Manager (virt-manager) and click Edit > Preferences.
Now, enable the Enable XML editing option.
Click Edit > Connection Details. Now, switch to the Virtual Networks tab.
Select the default adapter. Ensure that the Autostart option is enabled.
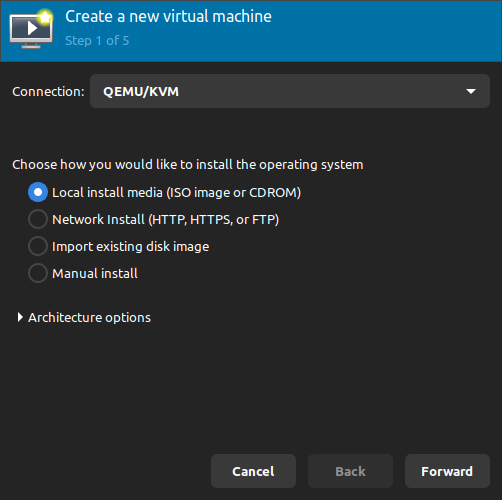
Then close the settings window and click the Create a new virtual machine button.
Select the Local install media (ISO image or CDROM) option and click the
Forward button.
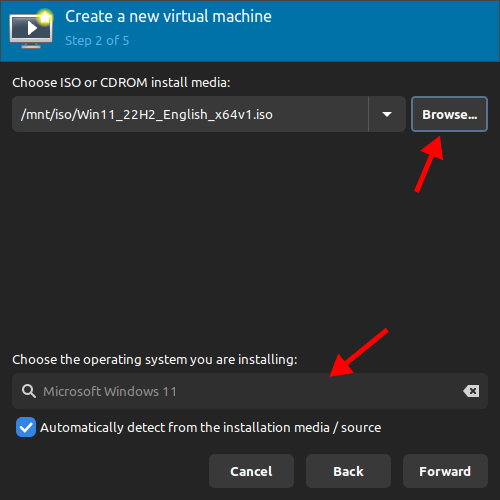
Click the Browse button and select the Windows ISO file. And click the Forward
button.
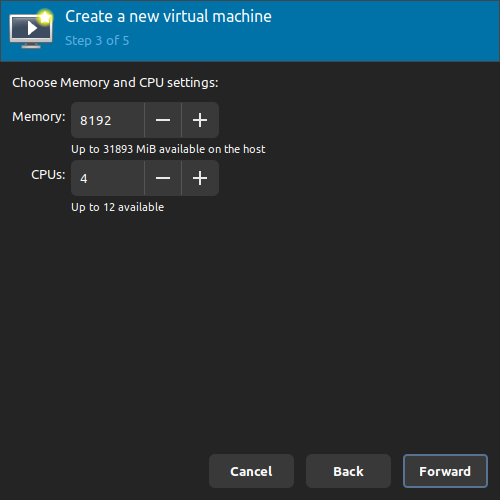
Set the memory size to 8 GB or more and click Forward. If you have a CPU with
more than 4 cores, set the CPU core to 4 or more.
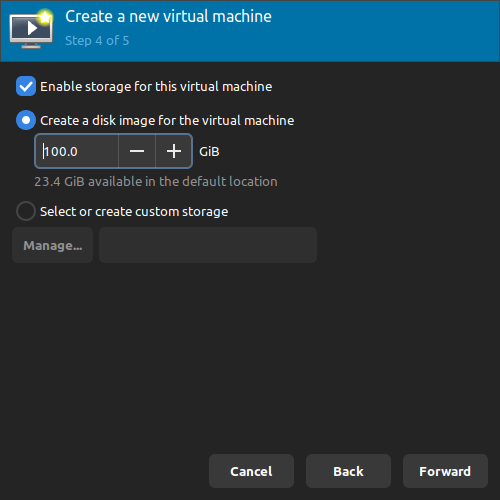
Create a new disk image of at least 100 GB and click Forward.
Name the virtual machine and select the Customise configuration before
installation option. Now, click the Finish button.
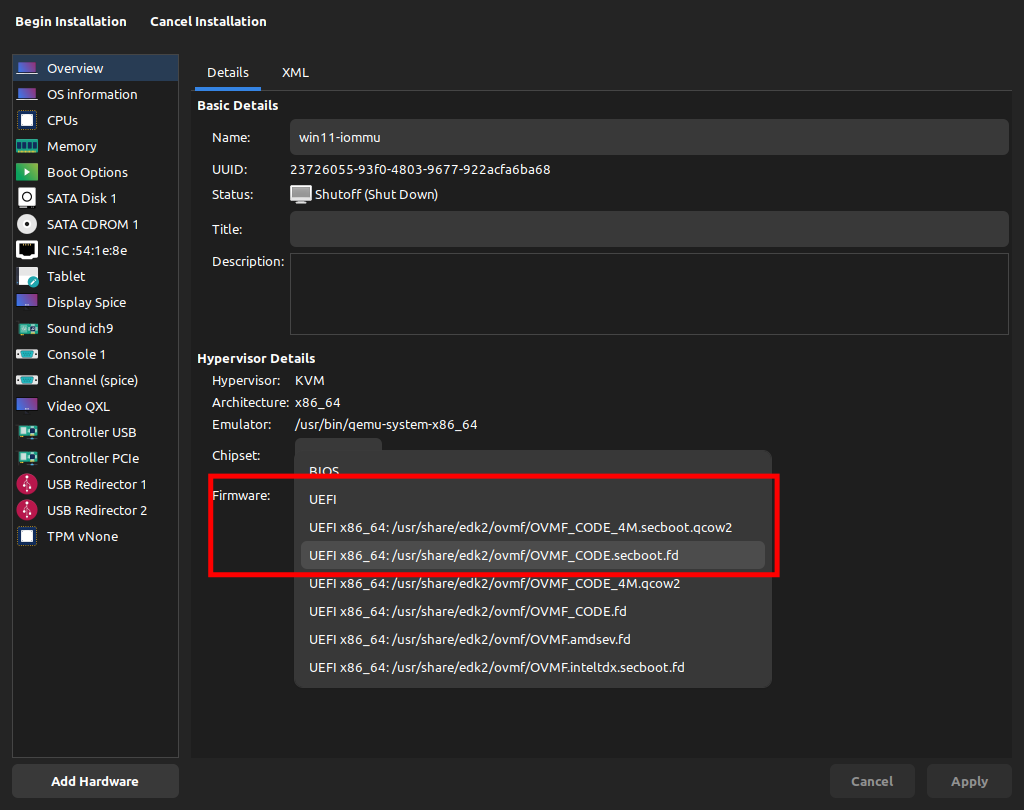
Go to the Overview tab and click on Firmware. Select UEFI x86_64: /usr/share/edk2/ovmf/OVMF_CODE.secboot.fd option.
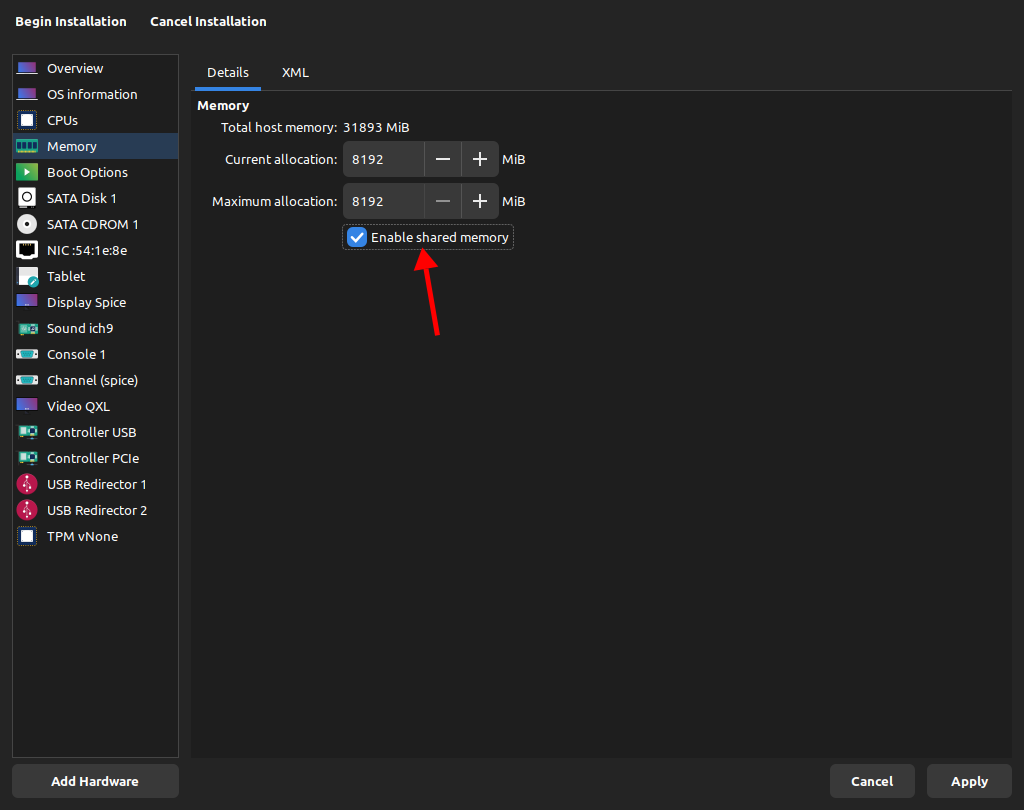
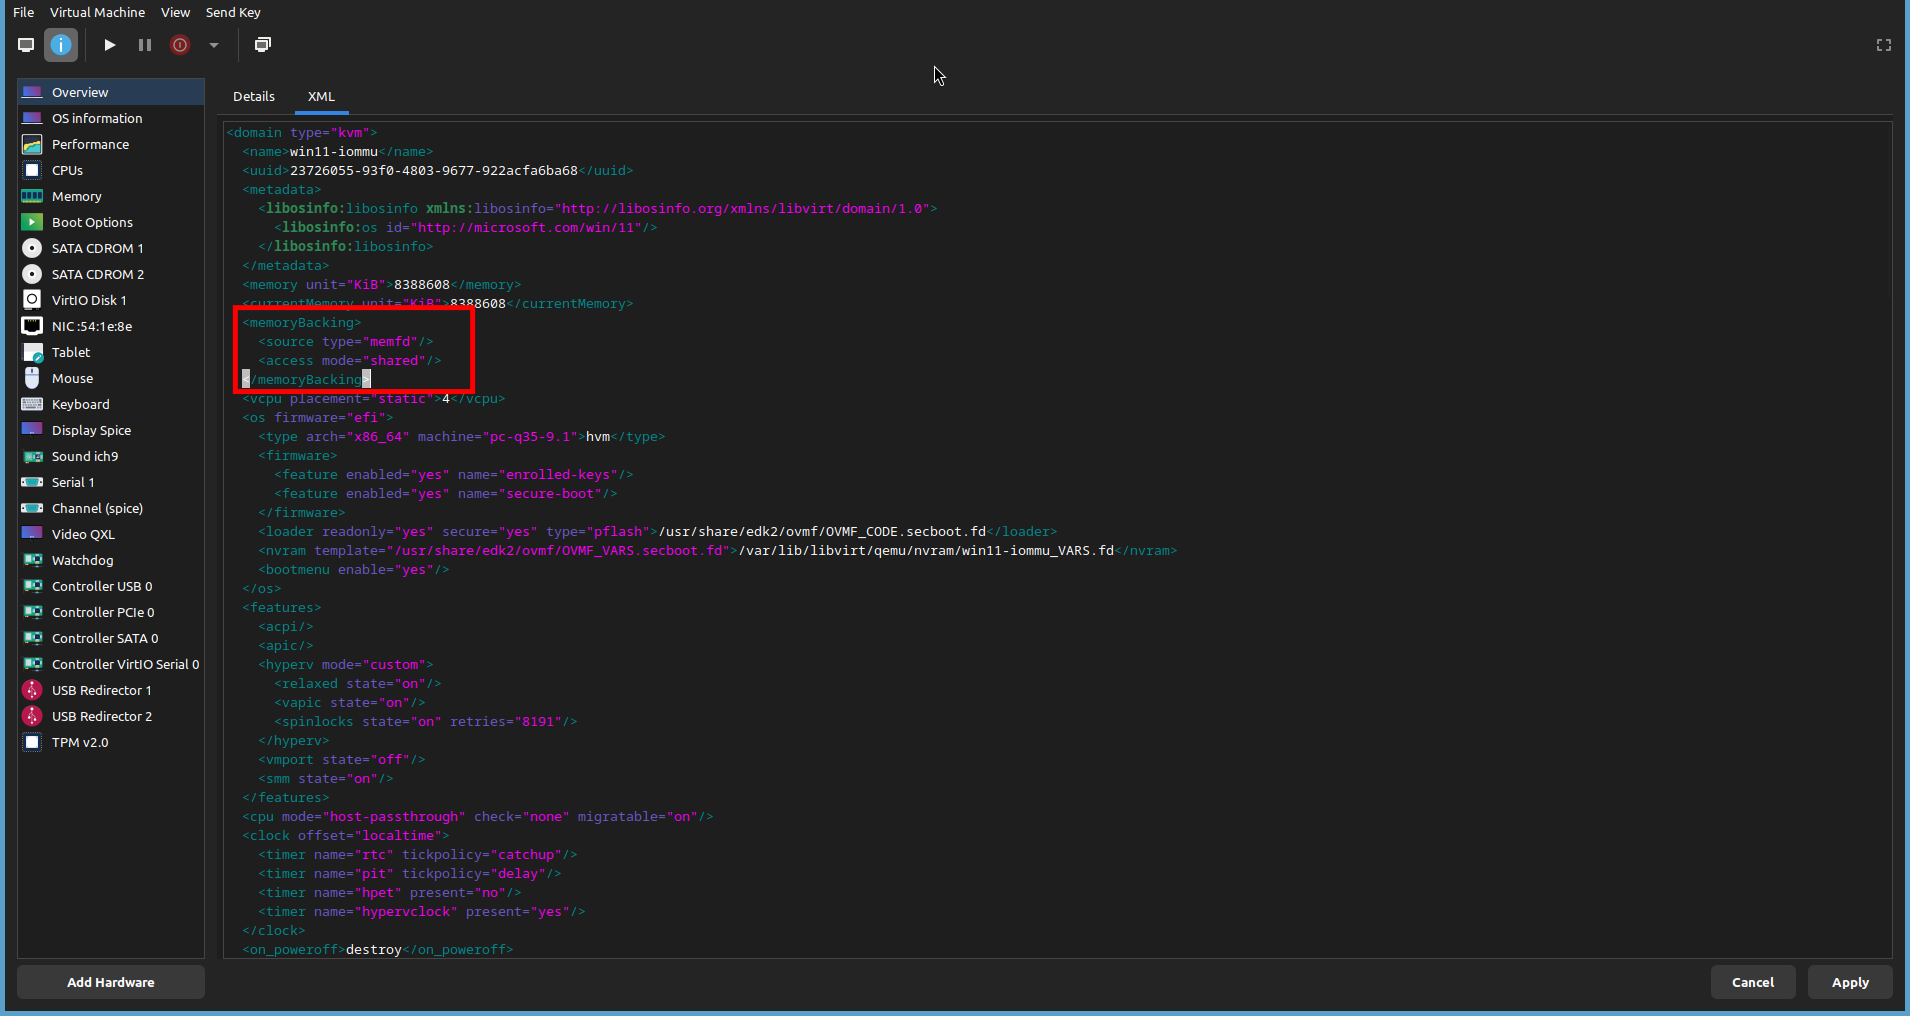
Go to the Memory tab, enable the Enable shared memory option.
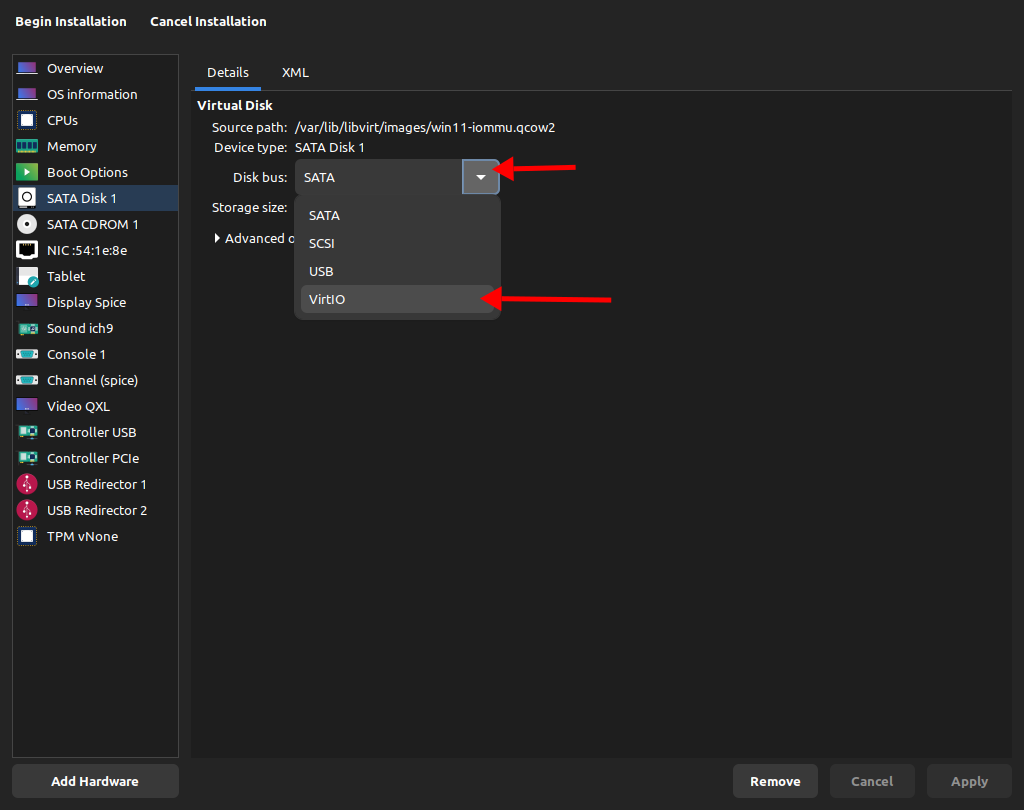
Select the Virtio option from the Disk bus menu in the SATA Disk 1 tab.
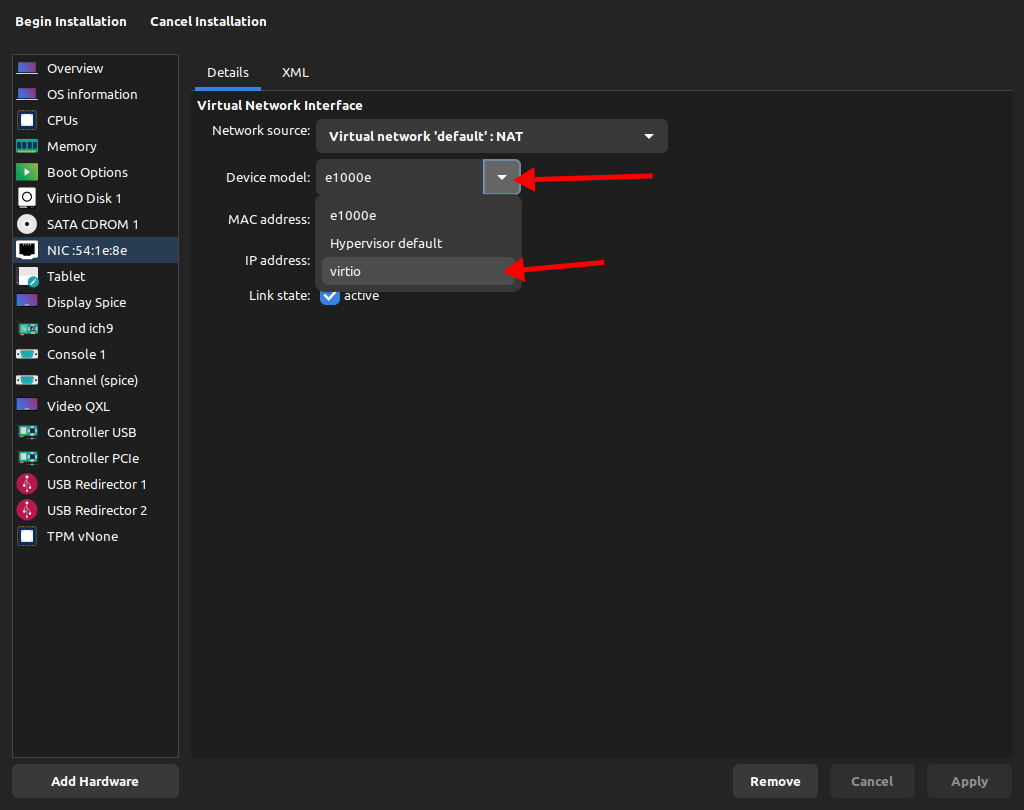
Select the virtio option from the NIC tab in the Device model section.
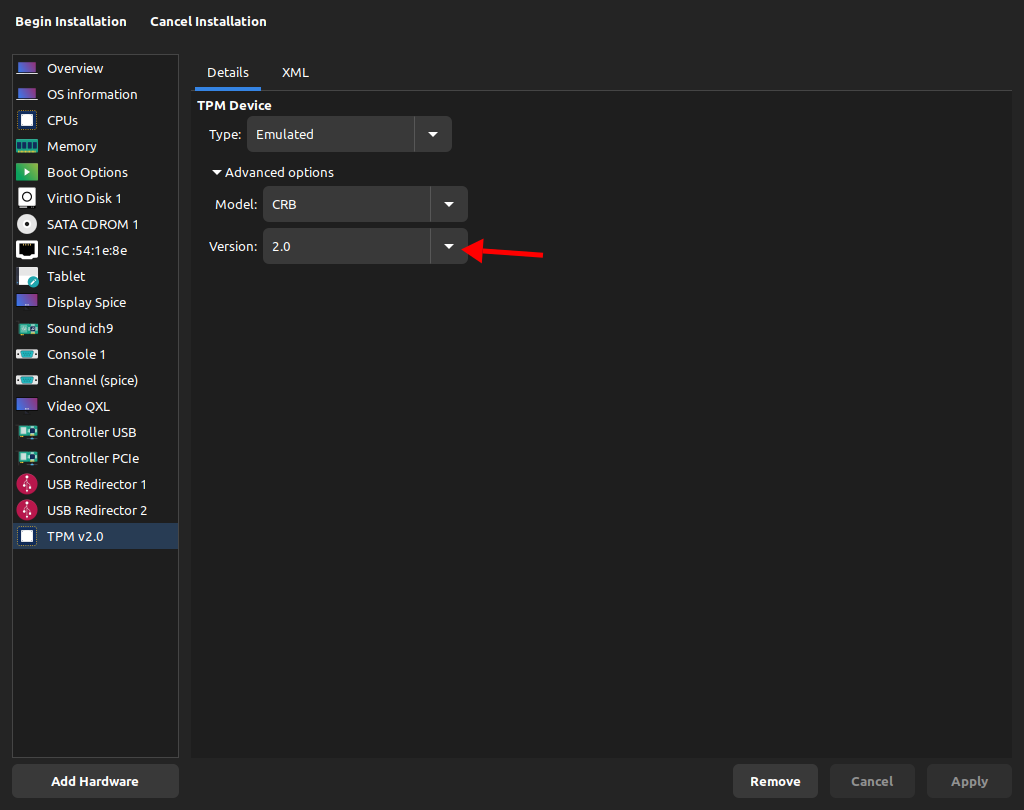
Go to the TPM tab, click on Advanced options and select TPM version to 2.0.
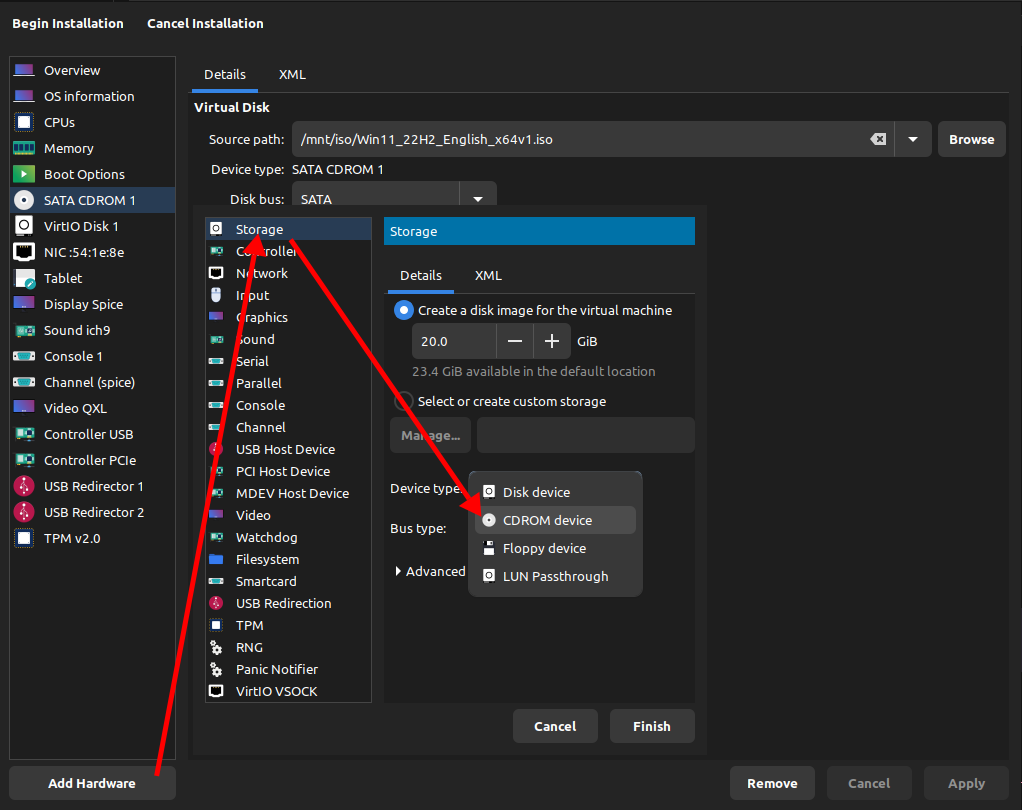
Click the Add Hardware button and select Storage. Select the CD-ROM
device option from the Device Type menu.
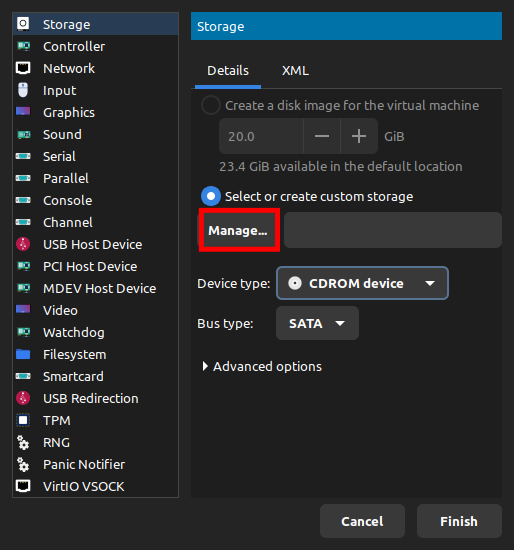
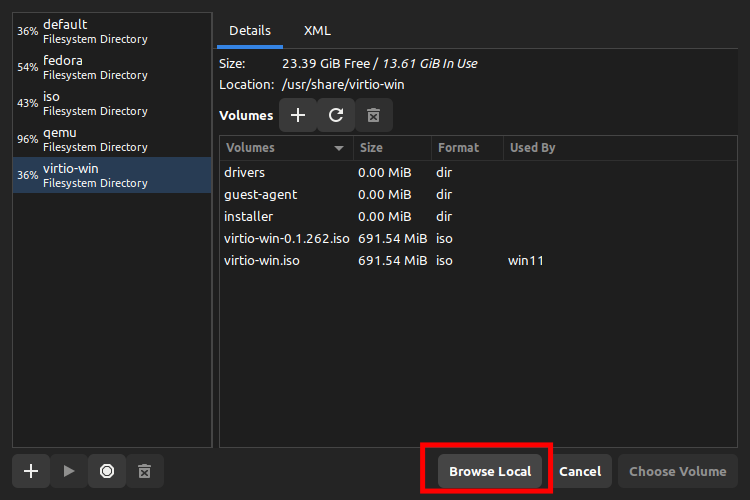
Click the Manage button.
Click the Browse Local button. Select the VirtIO ISO file.
In the Boot Options tab. Enable to SATA CDROM 1 option. Then move the SATA
CDROM 1 to the top of the boot order.
Step 11: Setup Windows
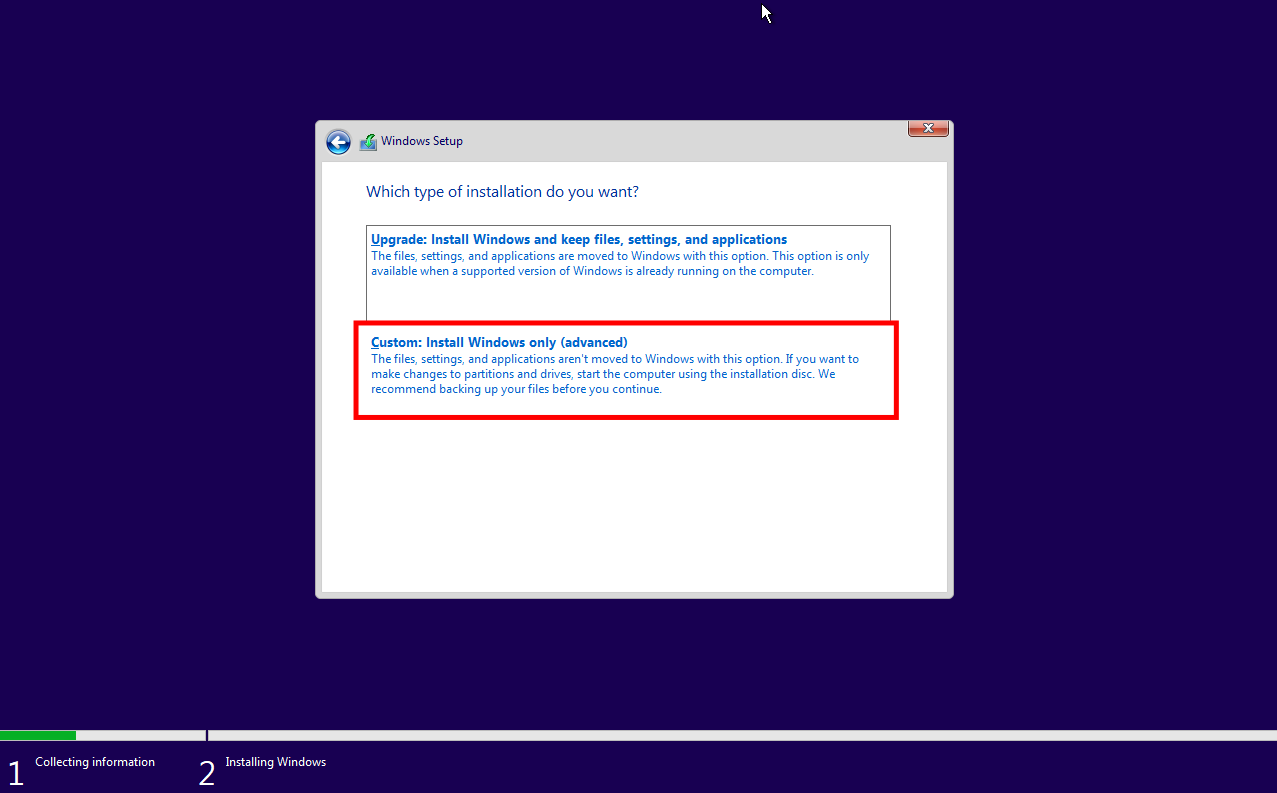
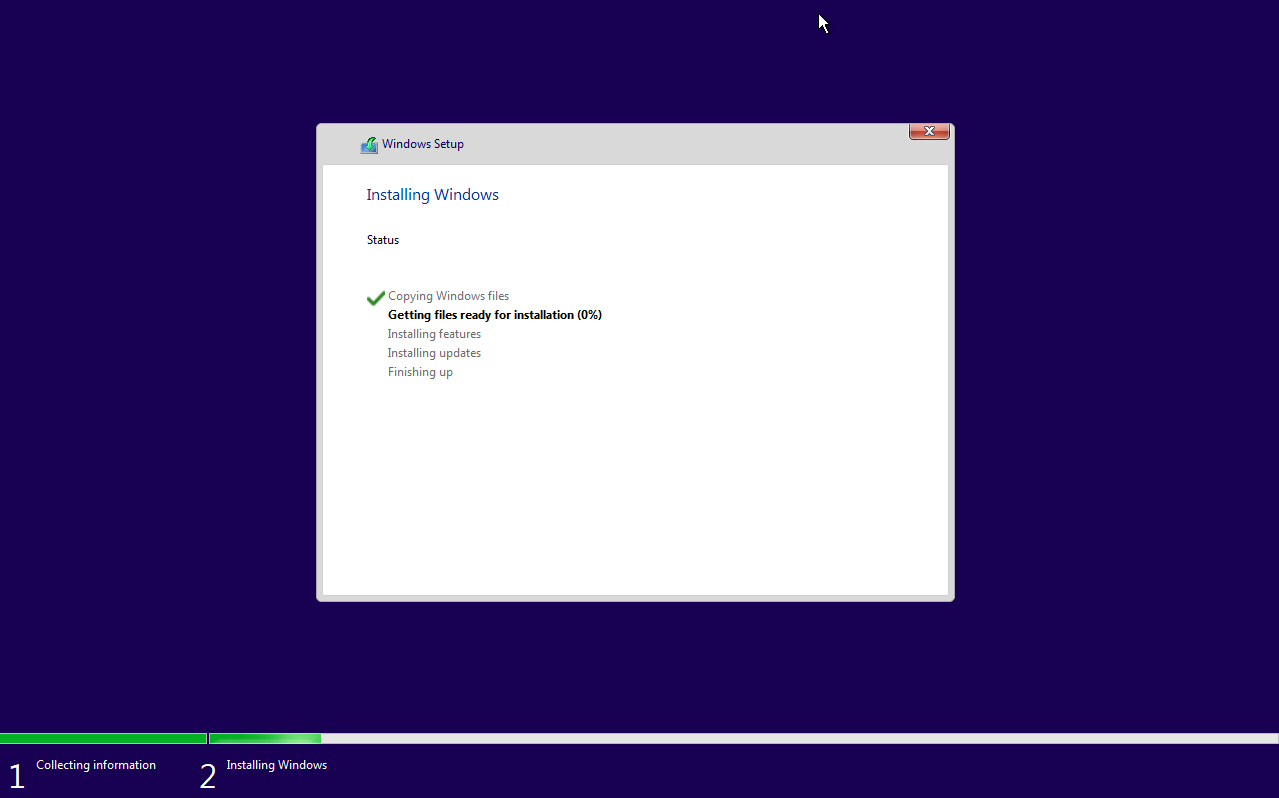
Start the virtual machine and install Windows as usual.
Agree to the licence agreement and choose the custom installation option.
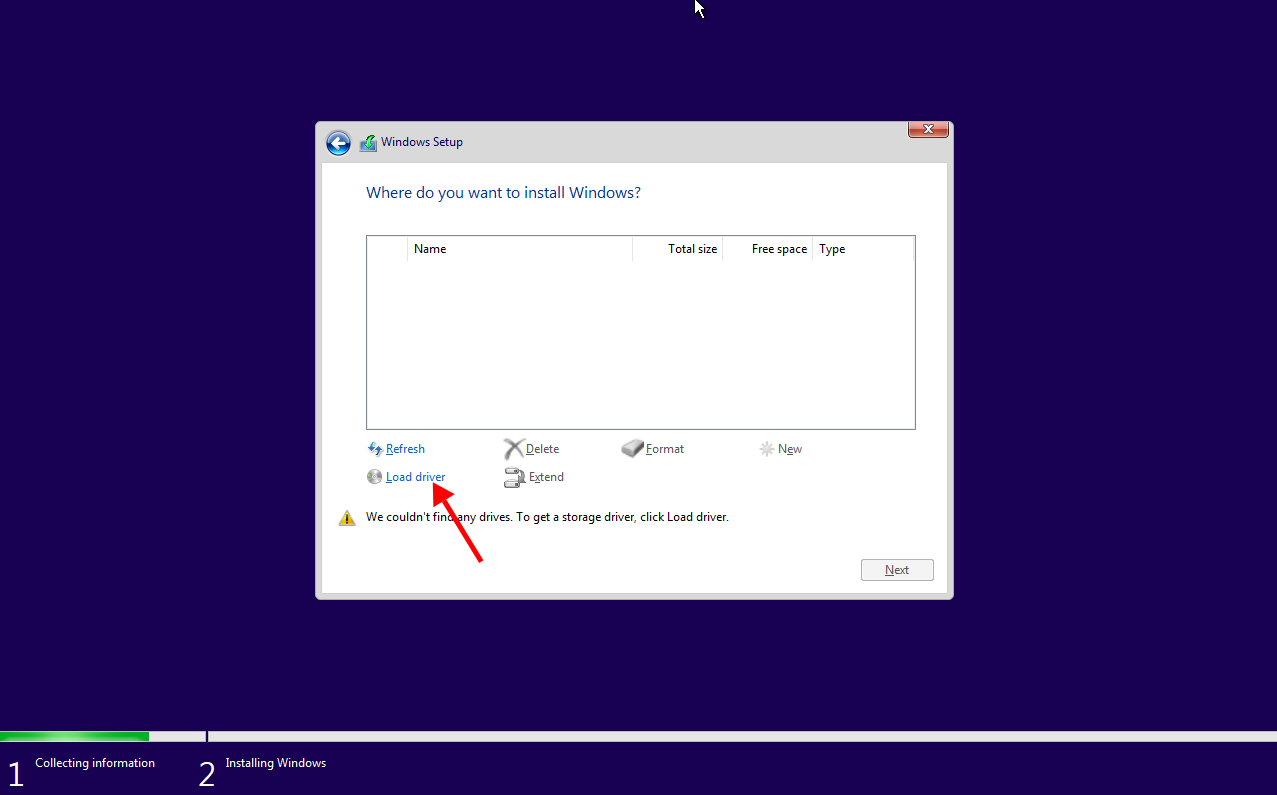
Select the Load driver option.
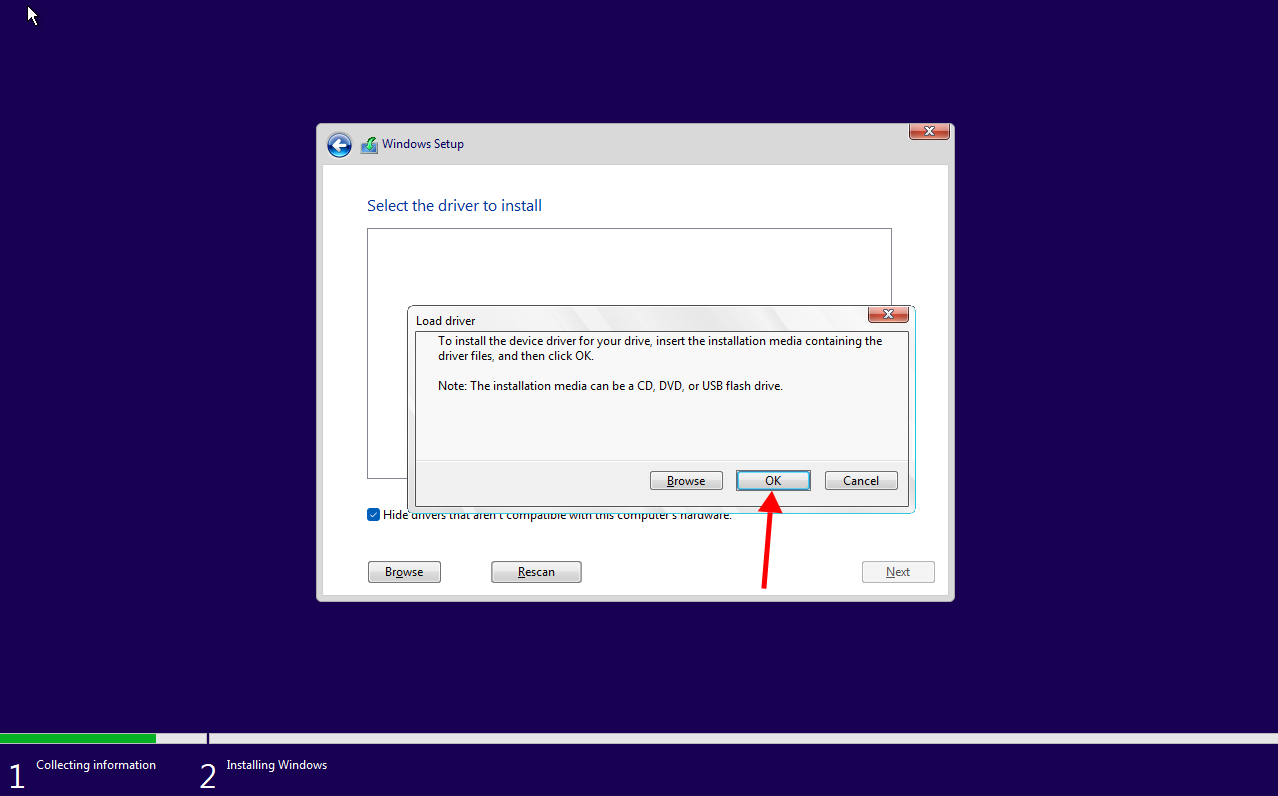
Select OK. Windows will find the VirtIO drivers automatically.
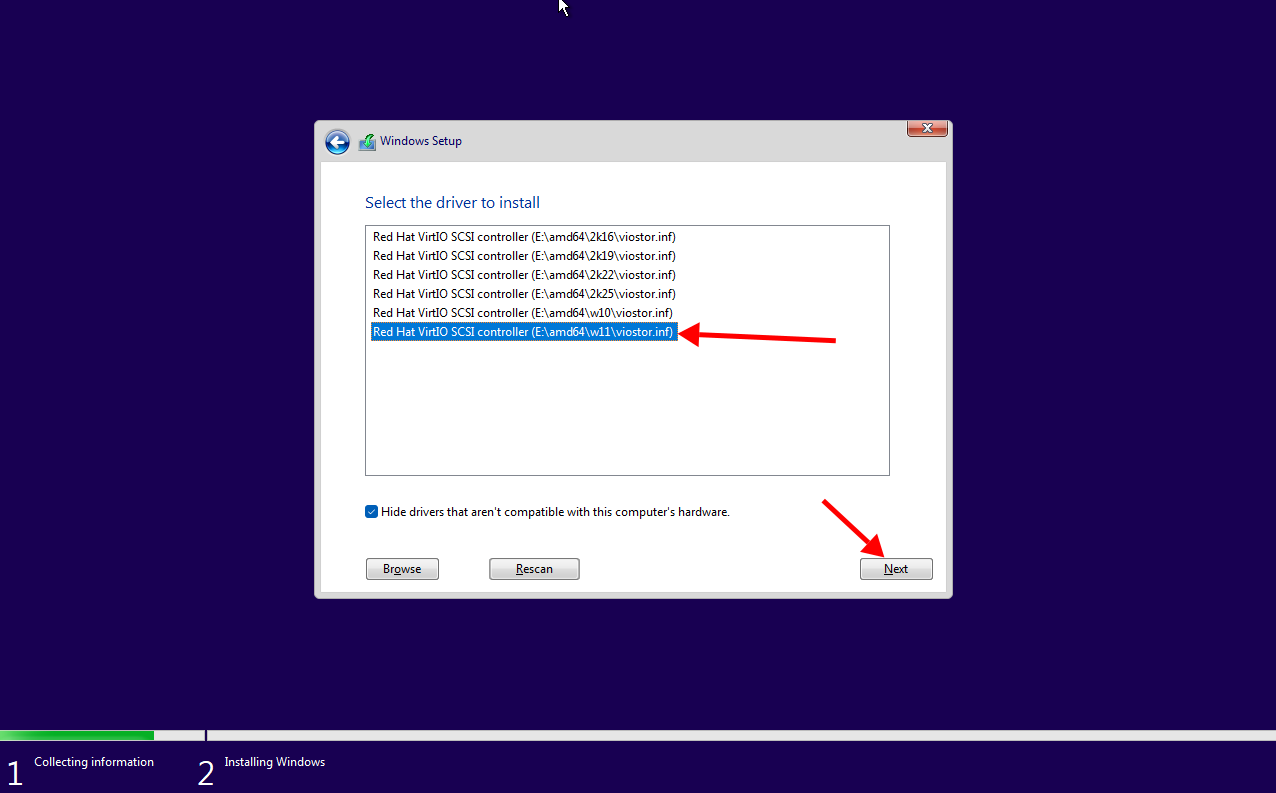
Select RedHat VirtIO SCSI controller and click Next.
Info
If you’re installing Windows 10, you must select the RedHat VirtIO SCSI controller (E:\amd64\w10\viostor.inf) driver.
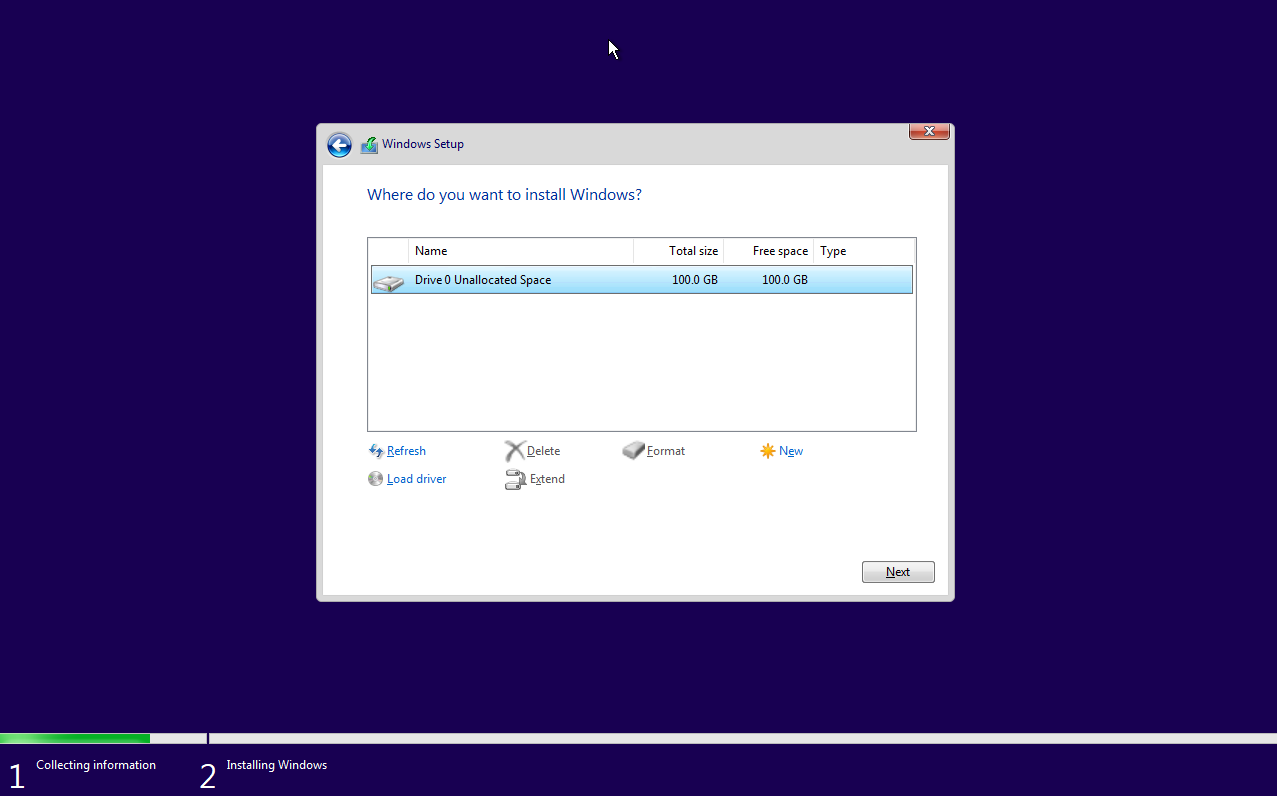
Click Next. Setup will automatically set up the partitions.
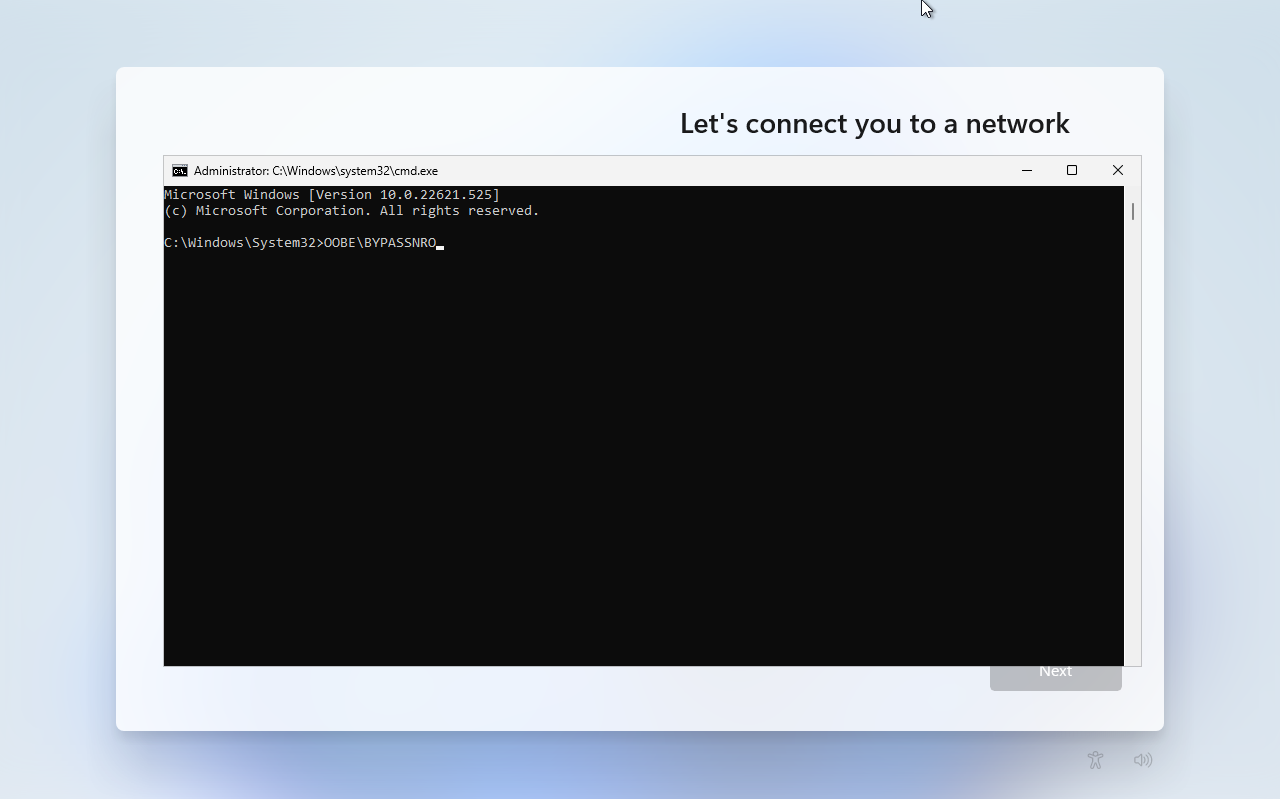
Once the installation is complete, the out-of-box experience (OOBE) will appear.
Since there is no network connection, we will press Shift+F10 and type the
following command.
OOBE\BYPASSNRO
Once you have completed the reboot, you can proceed to set up Windows as usual.
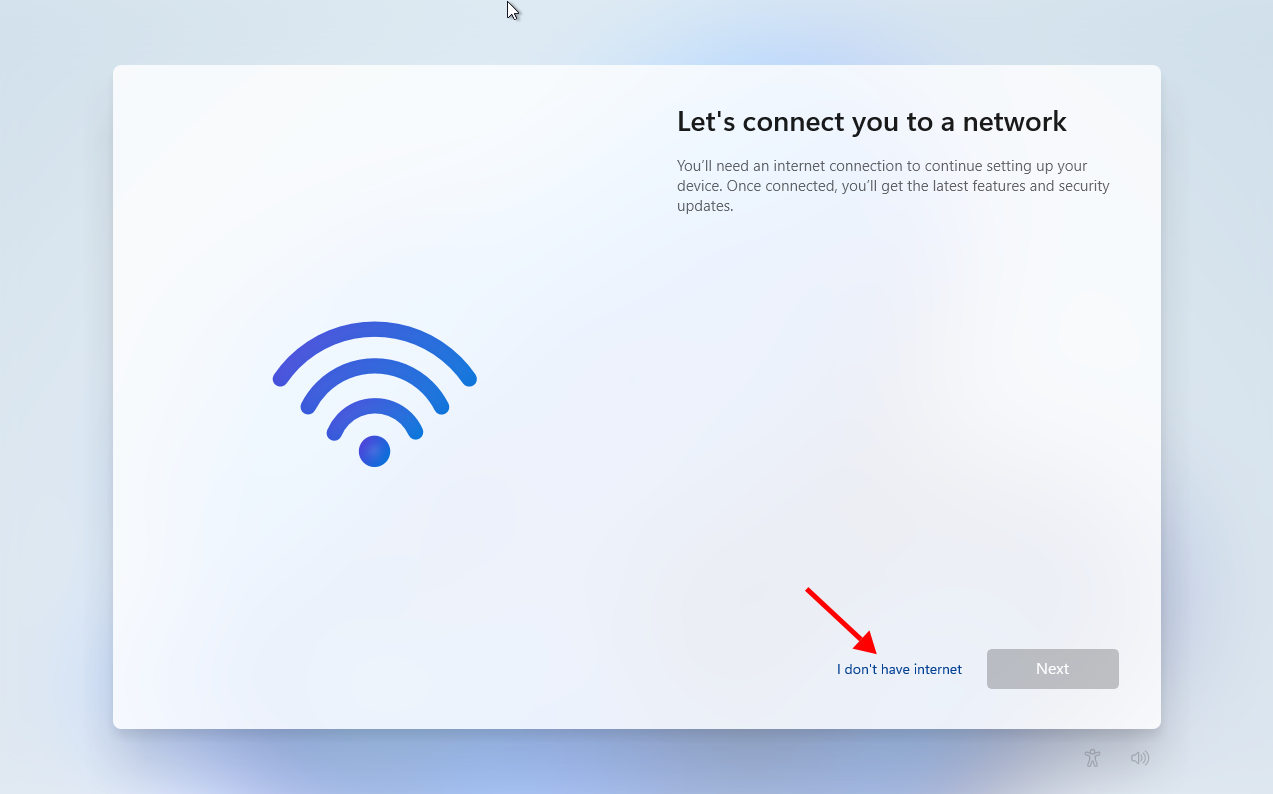
Select the I don't have internet option.
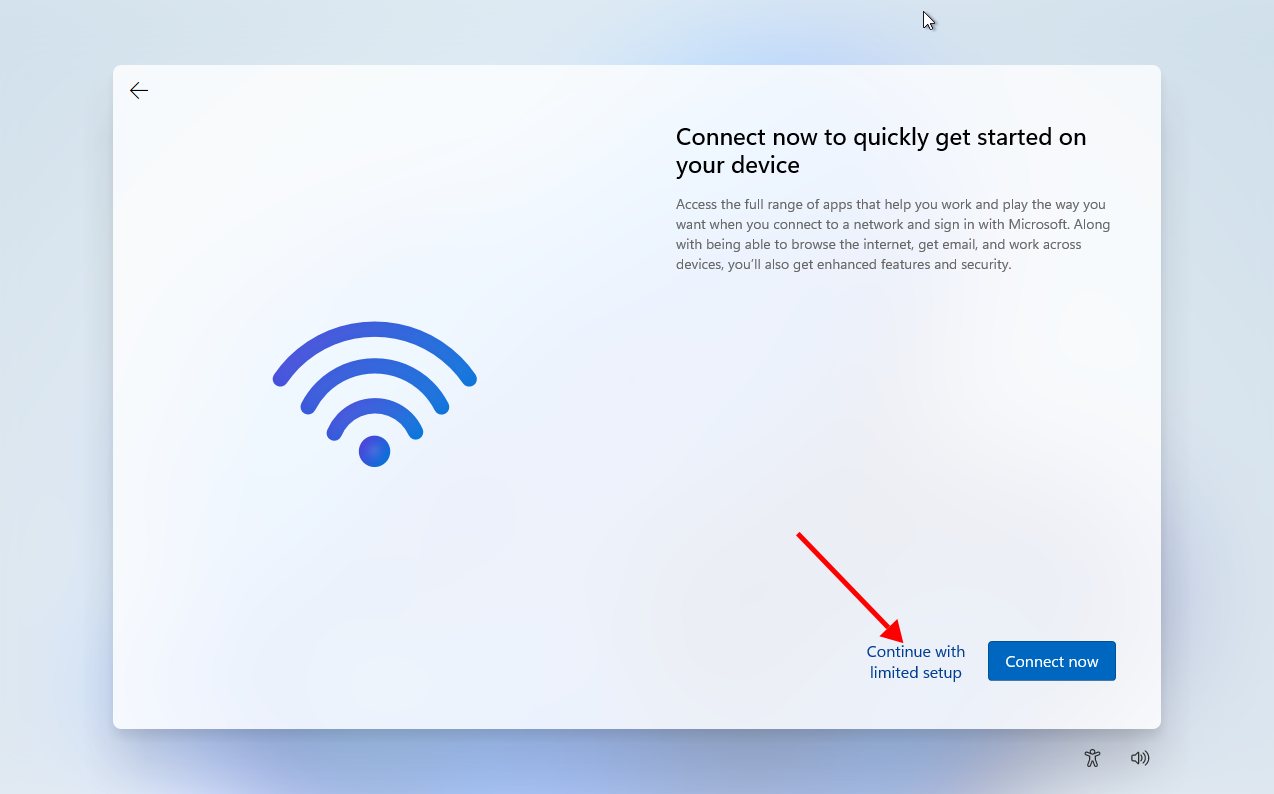
Select Continue with limited setup option.
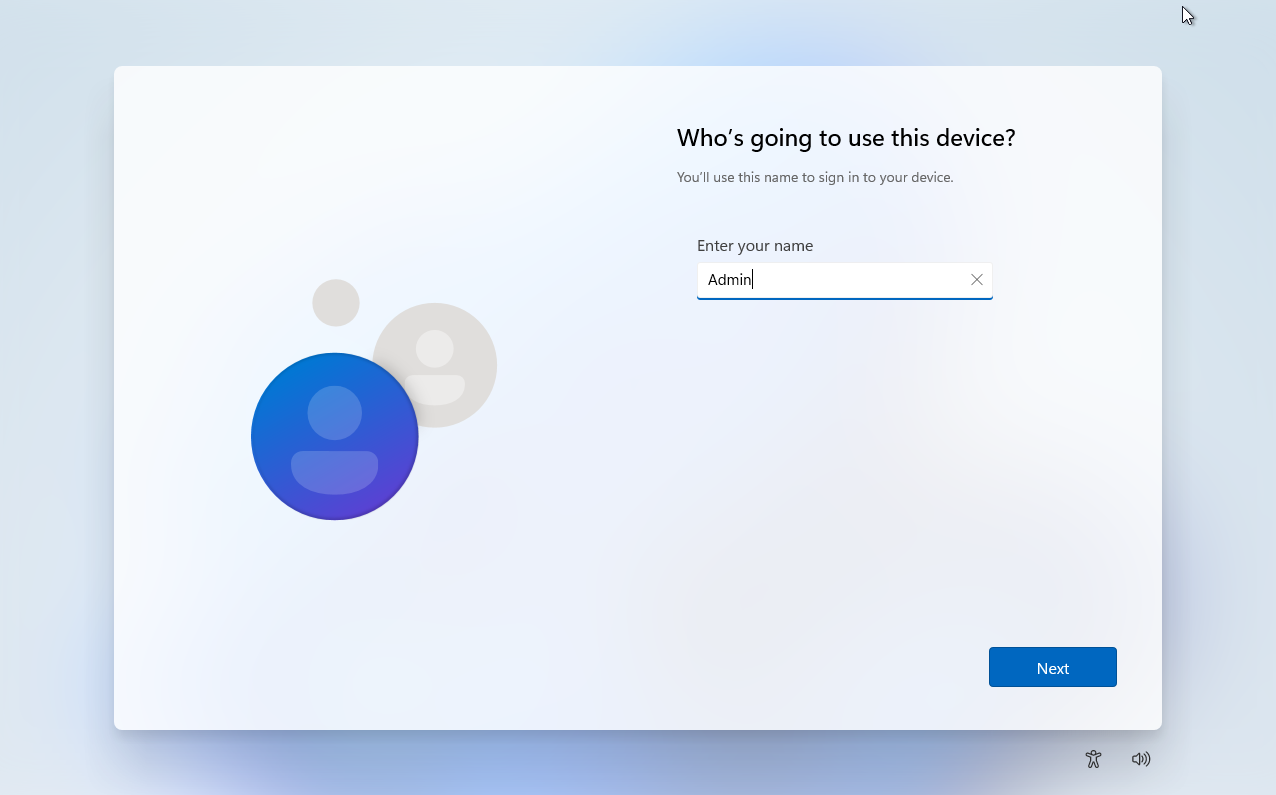
Type your username and password.
Once you have made the necessary adjustments, simply press Next. The
installation will complete itself.
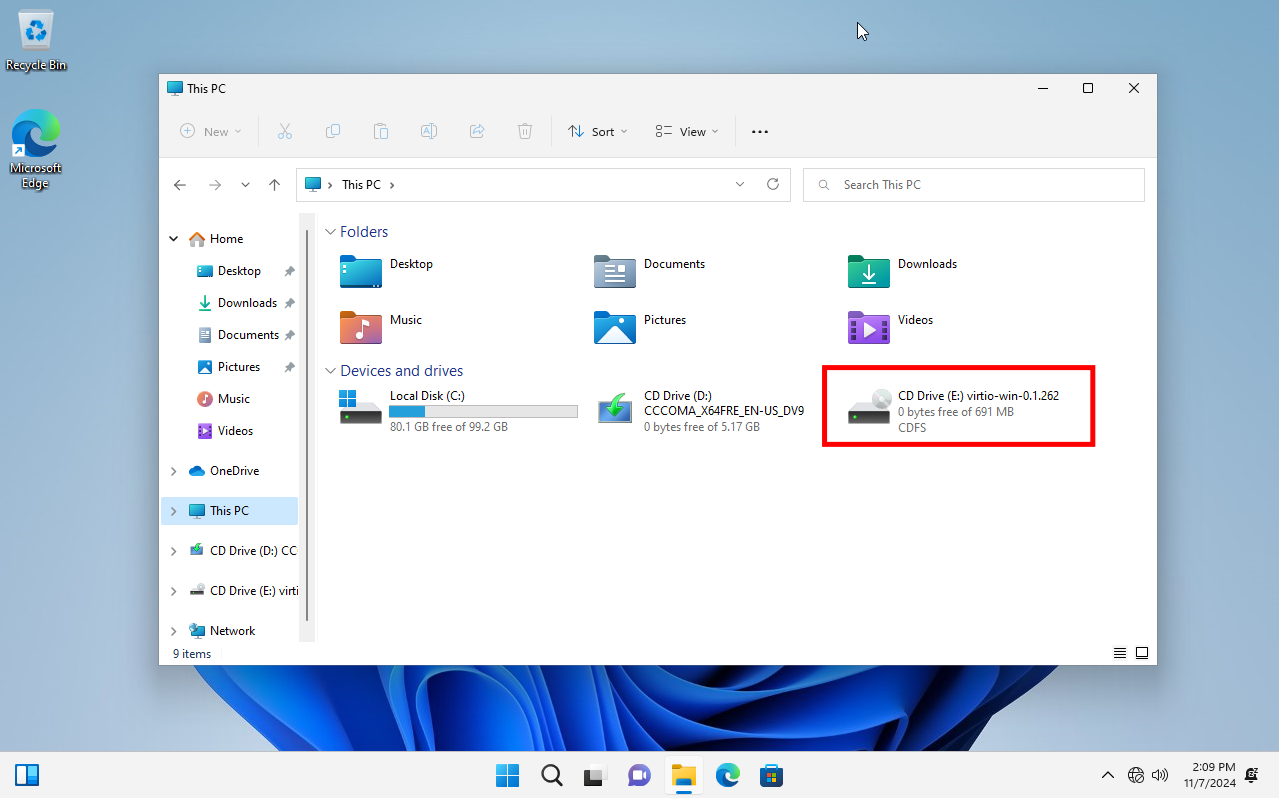
After the installation is complete, you must install the VirtIO drivers from
the VirtIO ISO file. Open the file manager and navigate to the virtio-win disk.
Run the virtio-win-guest-tools program. The program will install automatically
install the necessary files.
Info
The Windows update will install the GPU driver automatically, which will
cause the system to crash. You must disable the automatic updates from the Group
Policy Editor to prevent this.
For desktop GPUs, this step is not required with 465.xx and later drivers.
For laptop GPUs, this step is not required with 500.xx and later drivers.
Refer to the NVIDIA Customer Help Page
for more information
If you’re using Linux:
NVIDIA: Download NVFlash
and extract it to home folder. The file name should be nvflash.
AMD: Download ATIFlash
and extract it to home folder. The file name should be amdvbflash.
Make the nvflash or amdvbflash file executable.
NVIDIA: chmod +x nvflash
AMD: chmod +x amdvbflash
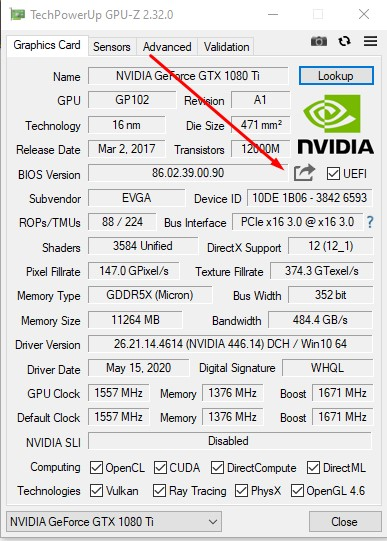
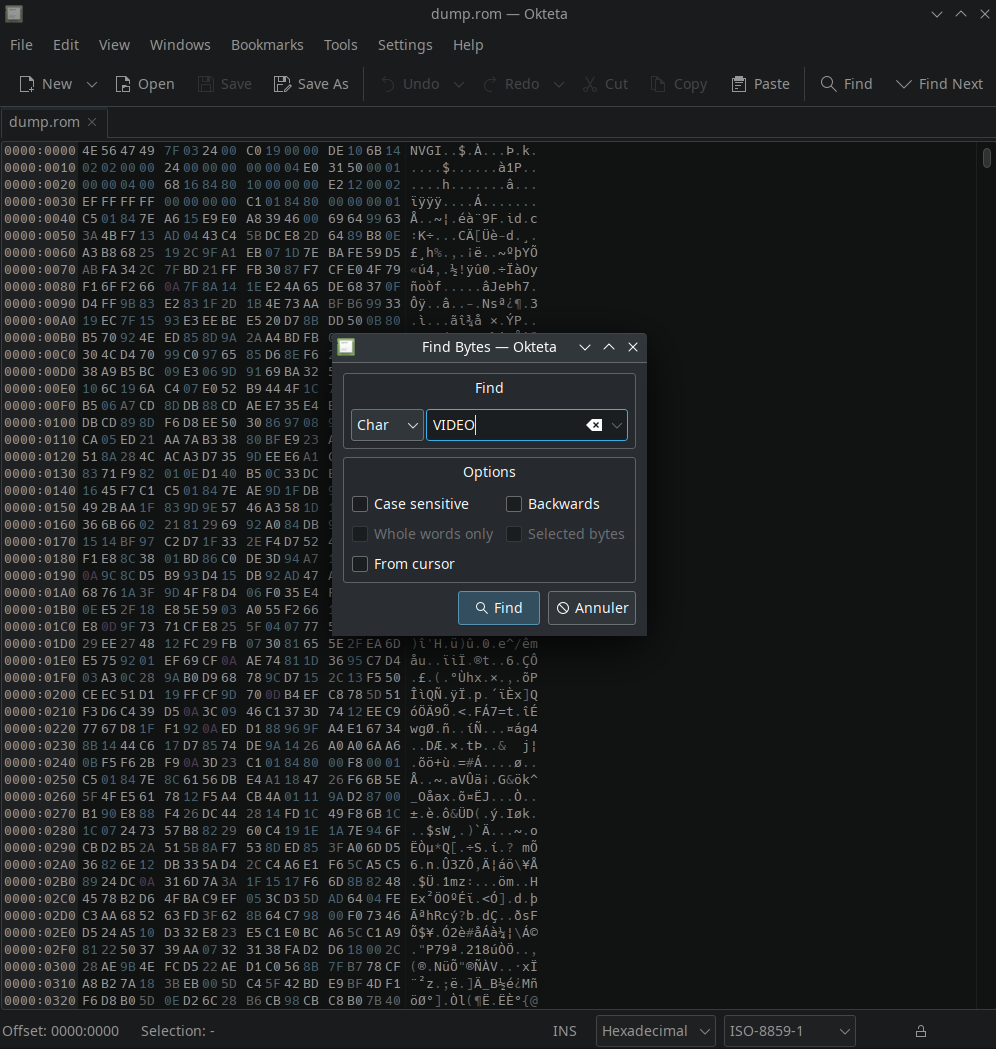
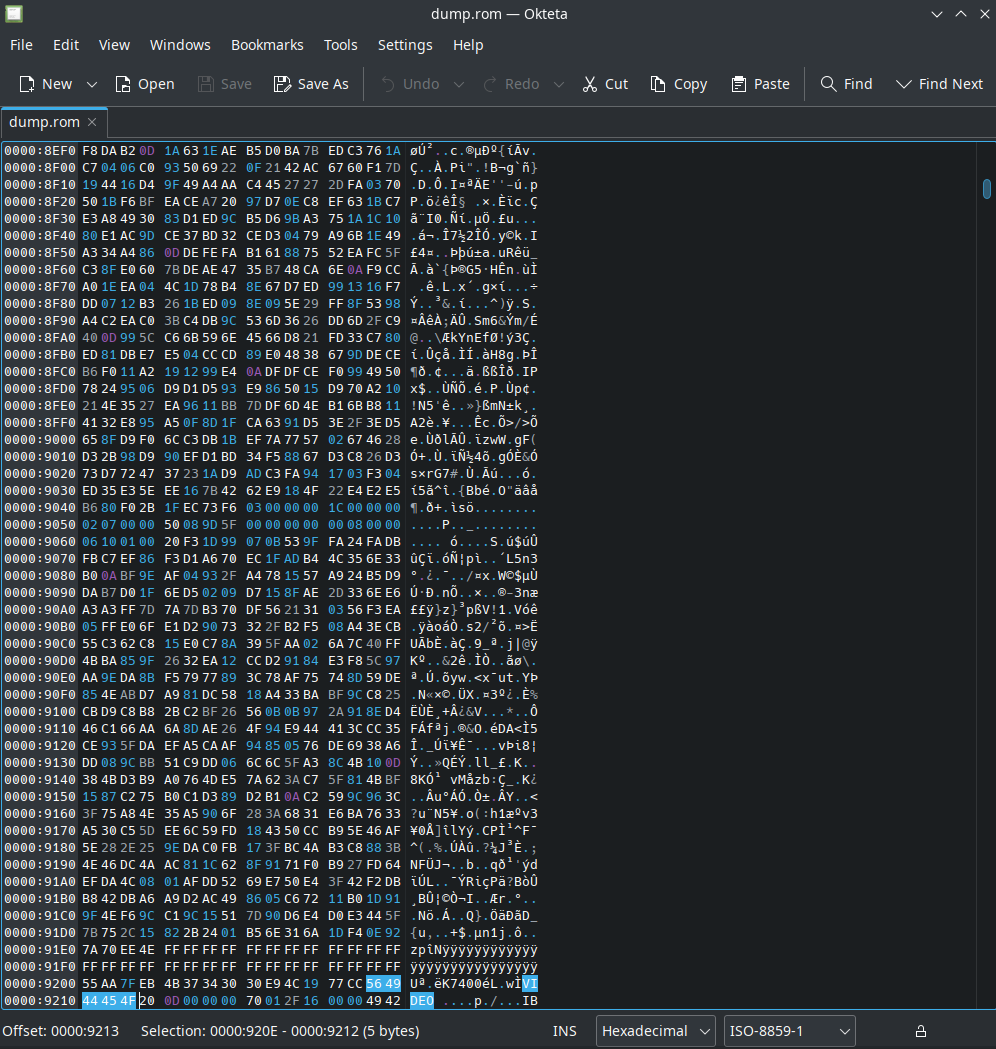
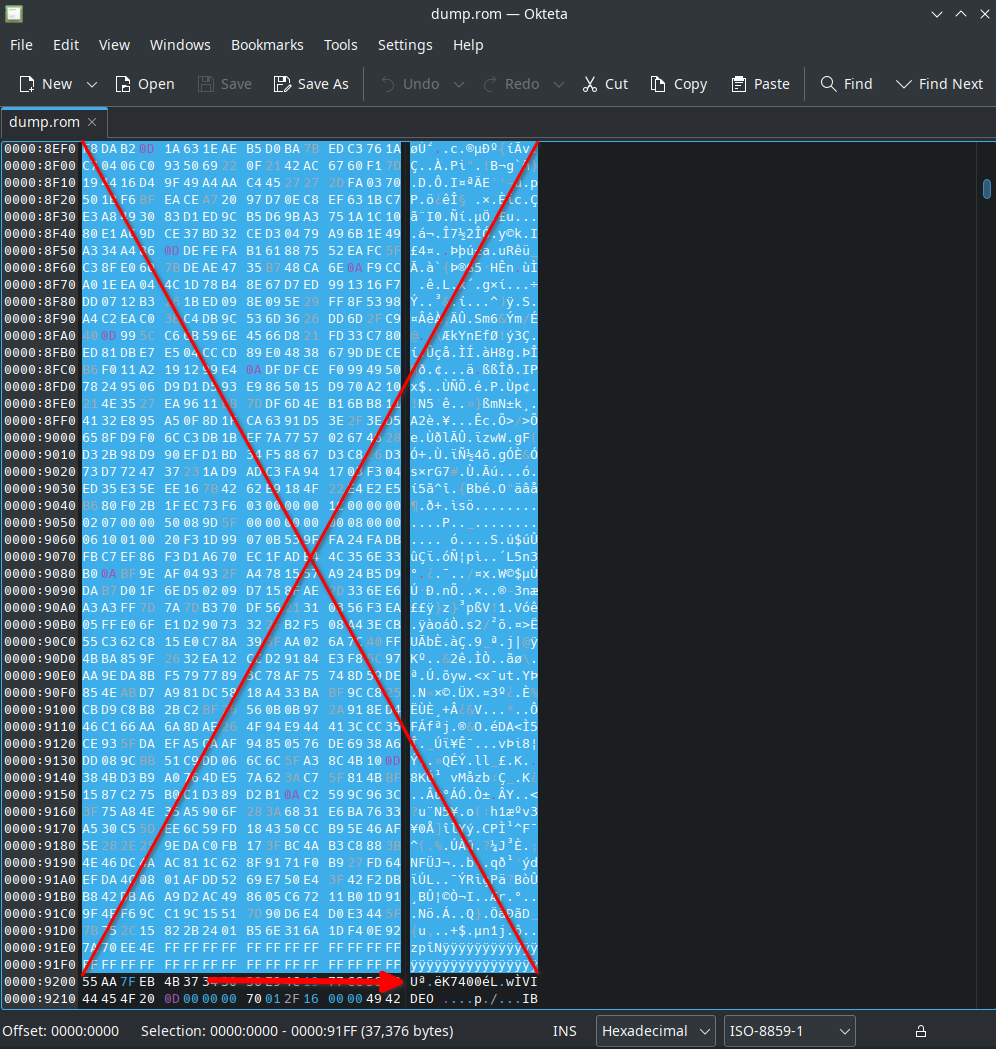
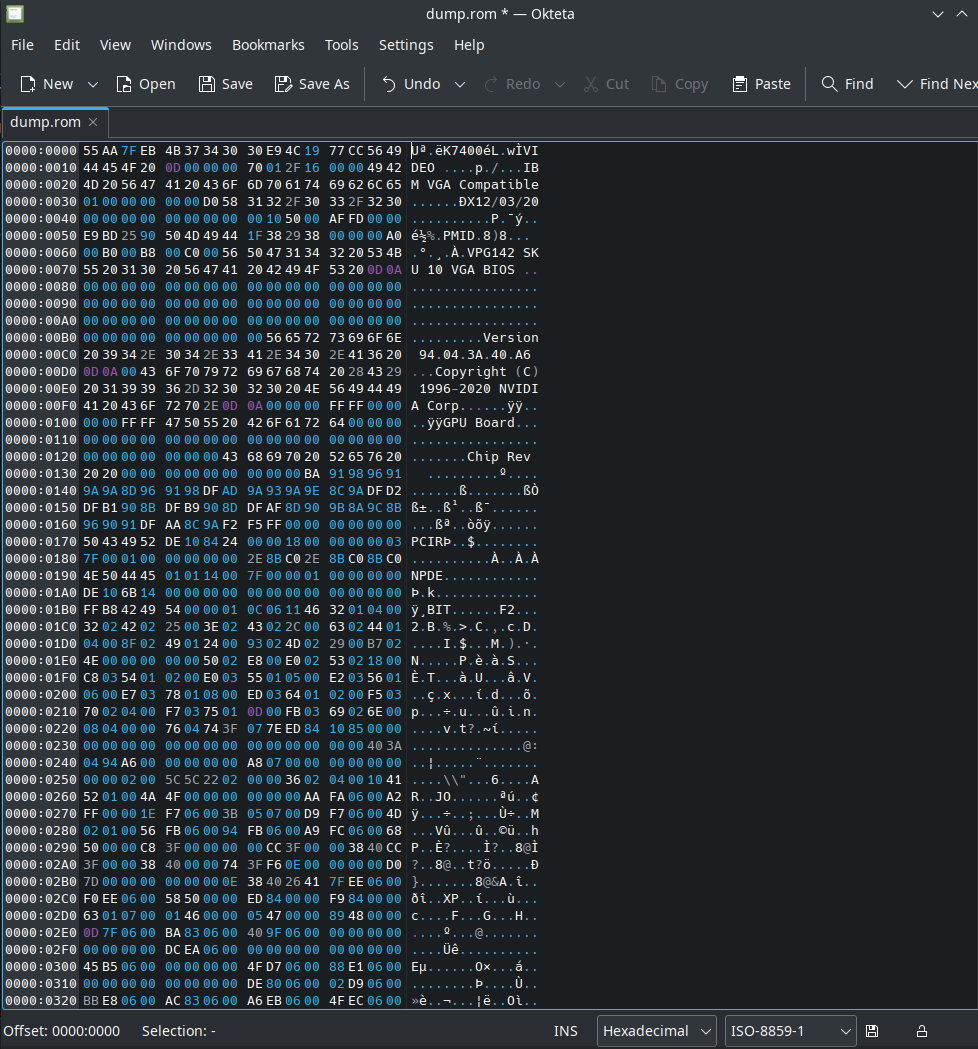
And extract the ROM file from the GPU.
NVIDIA: sudo ./nvflash --save vbios.rom
AMD: sudo ./amdvbflash -s 0 vbios.rom
Note for AMD: Use the -s 0 option to specify the GPU number. If you have
multiple GPUs, you can change the number to extract the ROM file from the
desired GPU. To learn the GPU number, use the sudo ./amdvbflash -i command.
Make the change to the client directory and then compile the program.
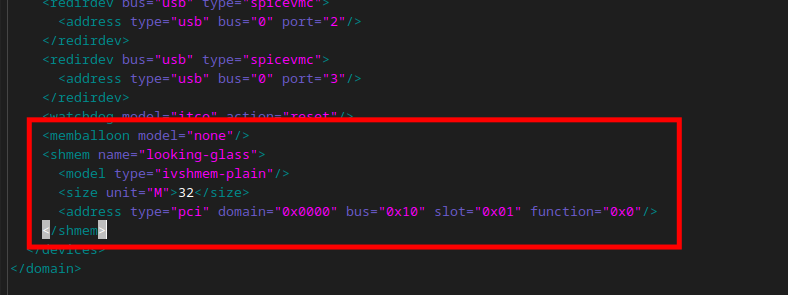
cd LookingGlass/clientmkdir buildcd buildcmake ..make
Copy the compiled program to the /usr/local/bin directory.
sudo cp looking-glass-client /usr/local/bin
Step 15: Setup dummy output
If you want to buy a dummy HDMI adapter. You can buy from the
Amazon, or you have already a dummy
HDMI adapter, you can use it.
Use the VirtualDisplay driver if
you don’t want to buy an HDMI adapter. This driver creates a dummy video card for
the virtual machine.
Visit the VirtualDisplay
repository and download the driver.
Extract the downloaded file.
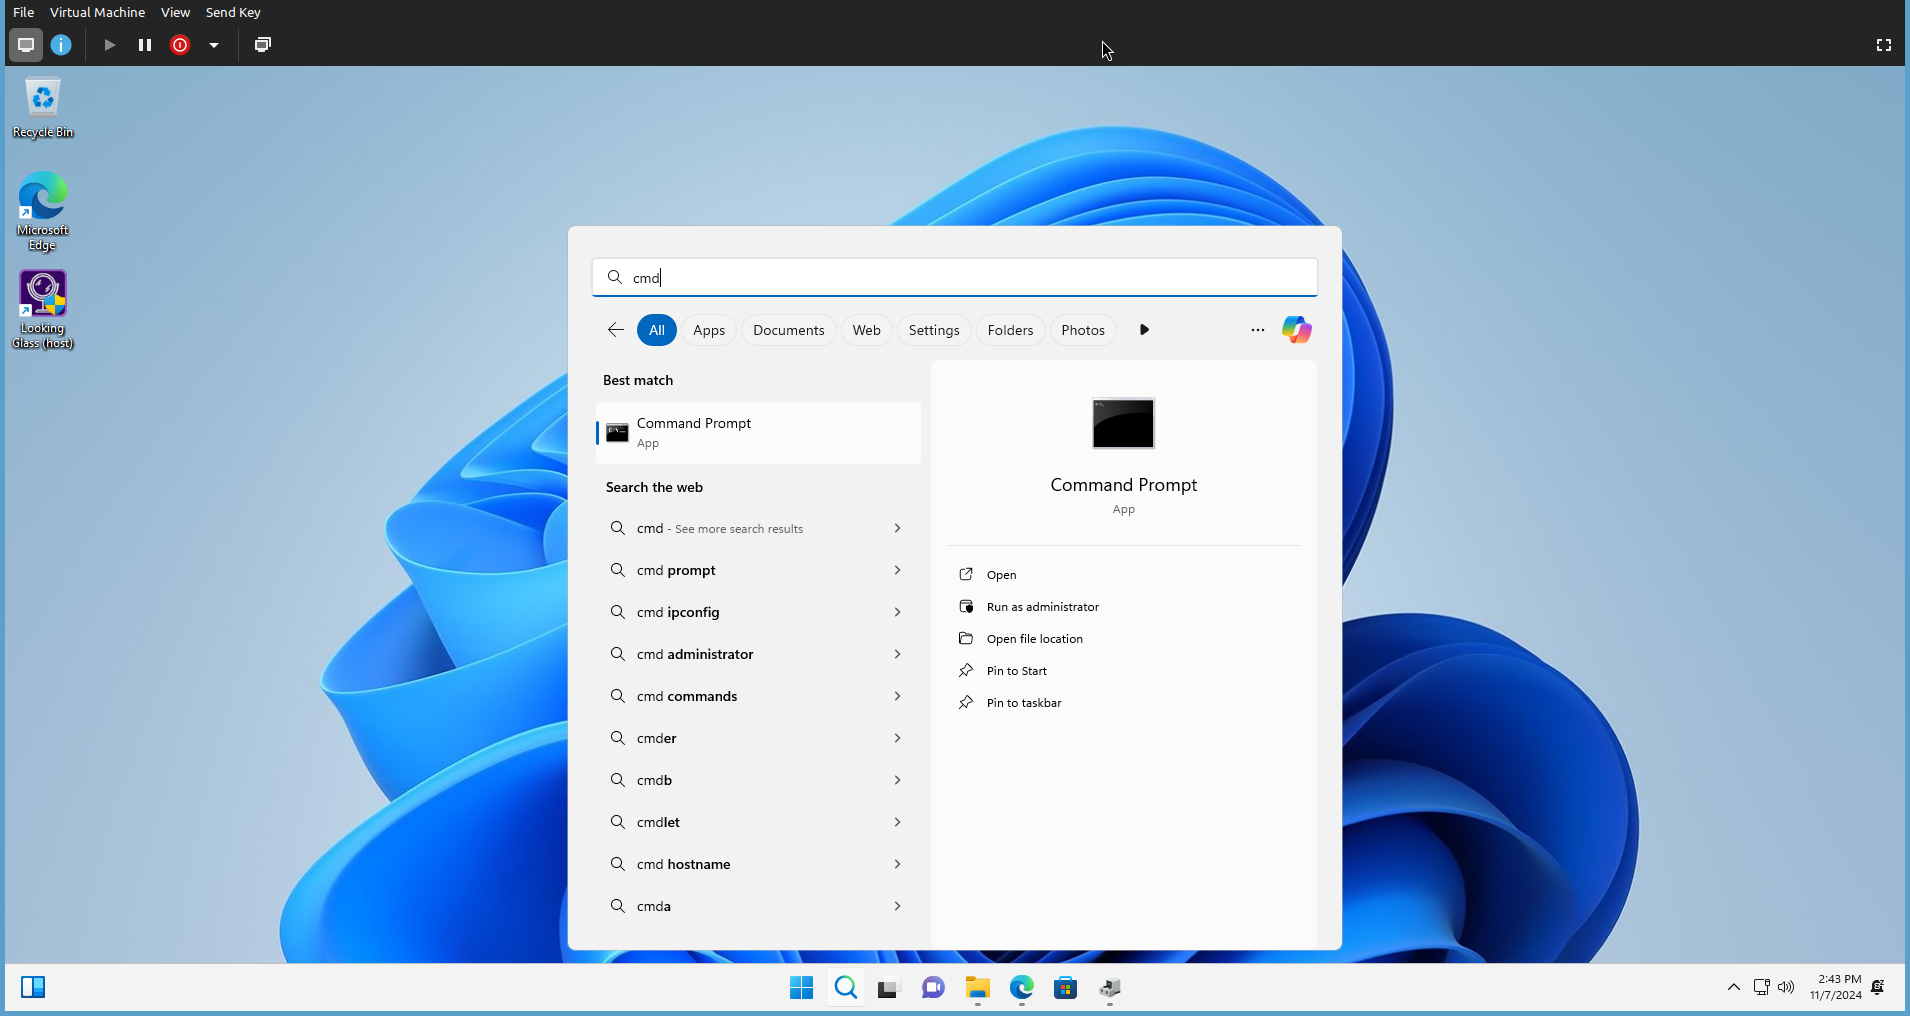
Go to the search menu. Type the cmd and run the command prompt as administrator.
(ctrl+shift+enter is the shortcut)
Install the driver certificate by typing the following command.
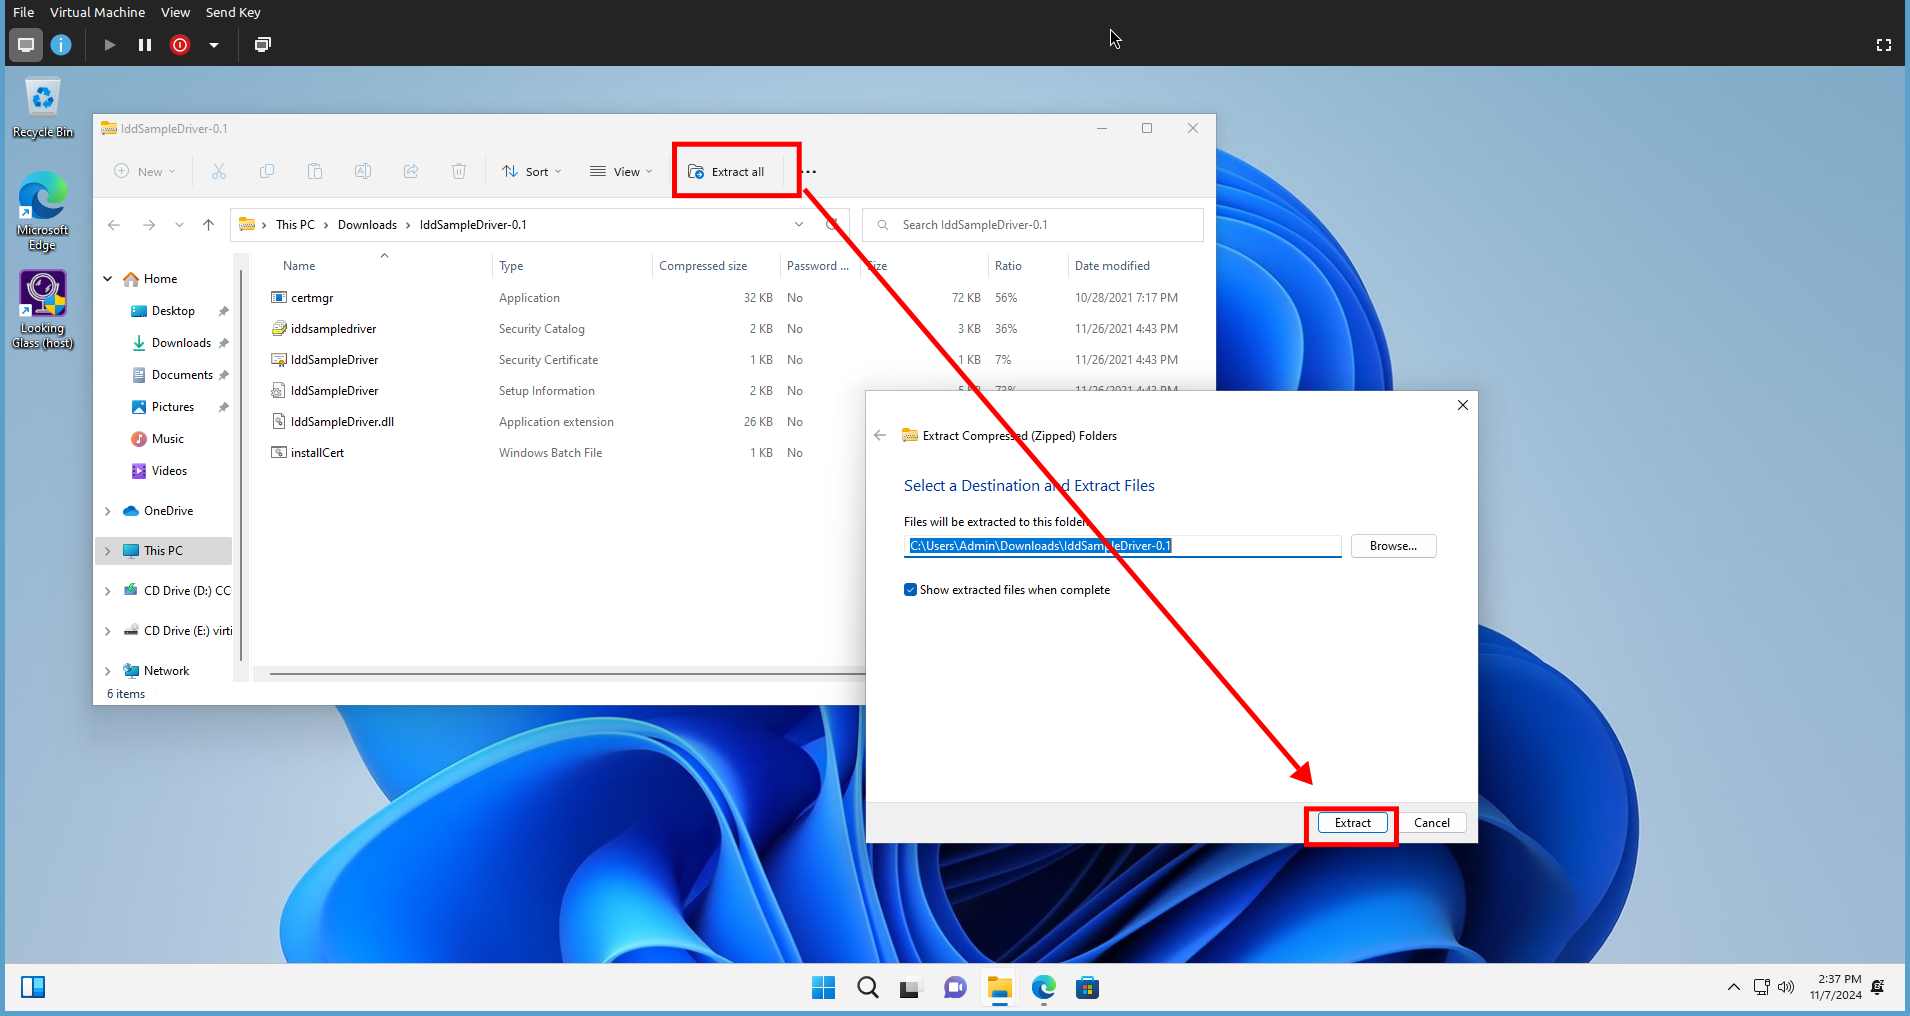
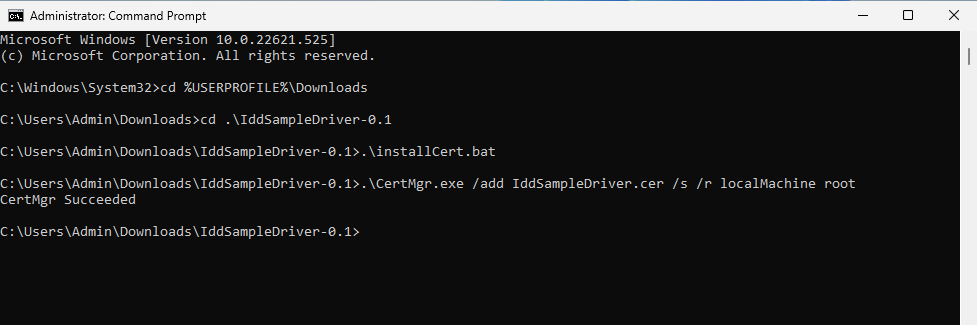
cd %USERPROFILE%\Downloads\IddSampleDriver-0.1.\installCert.bat
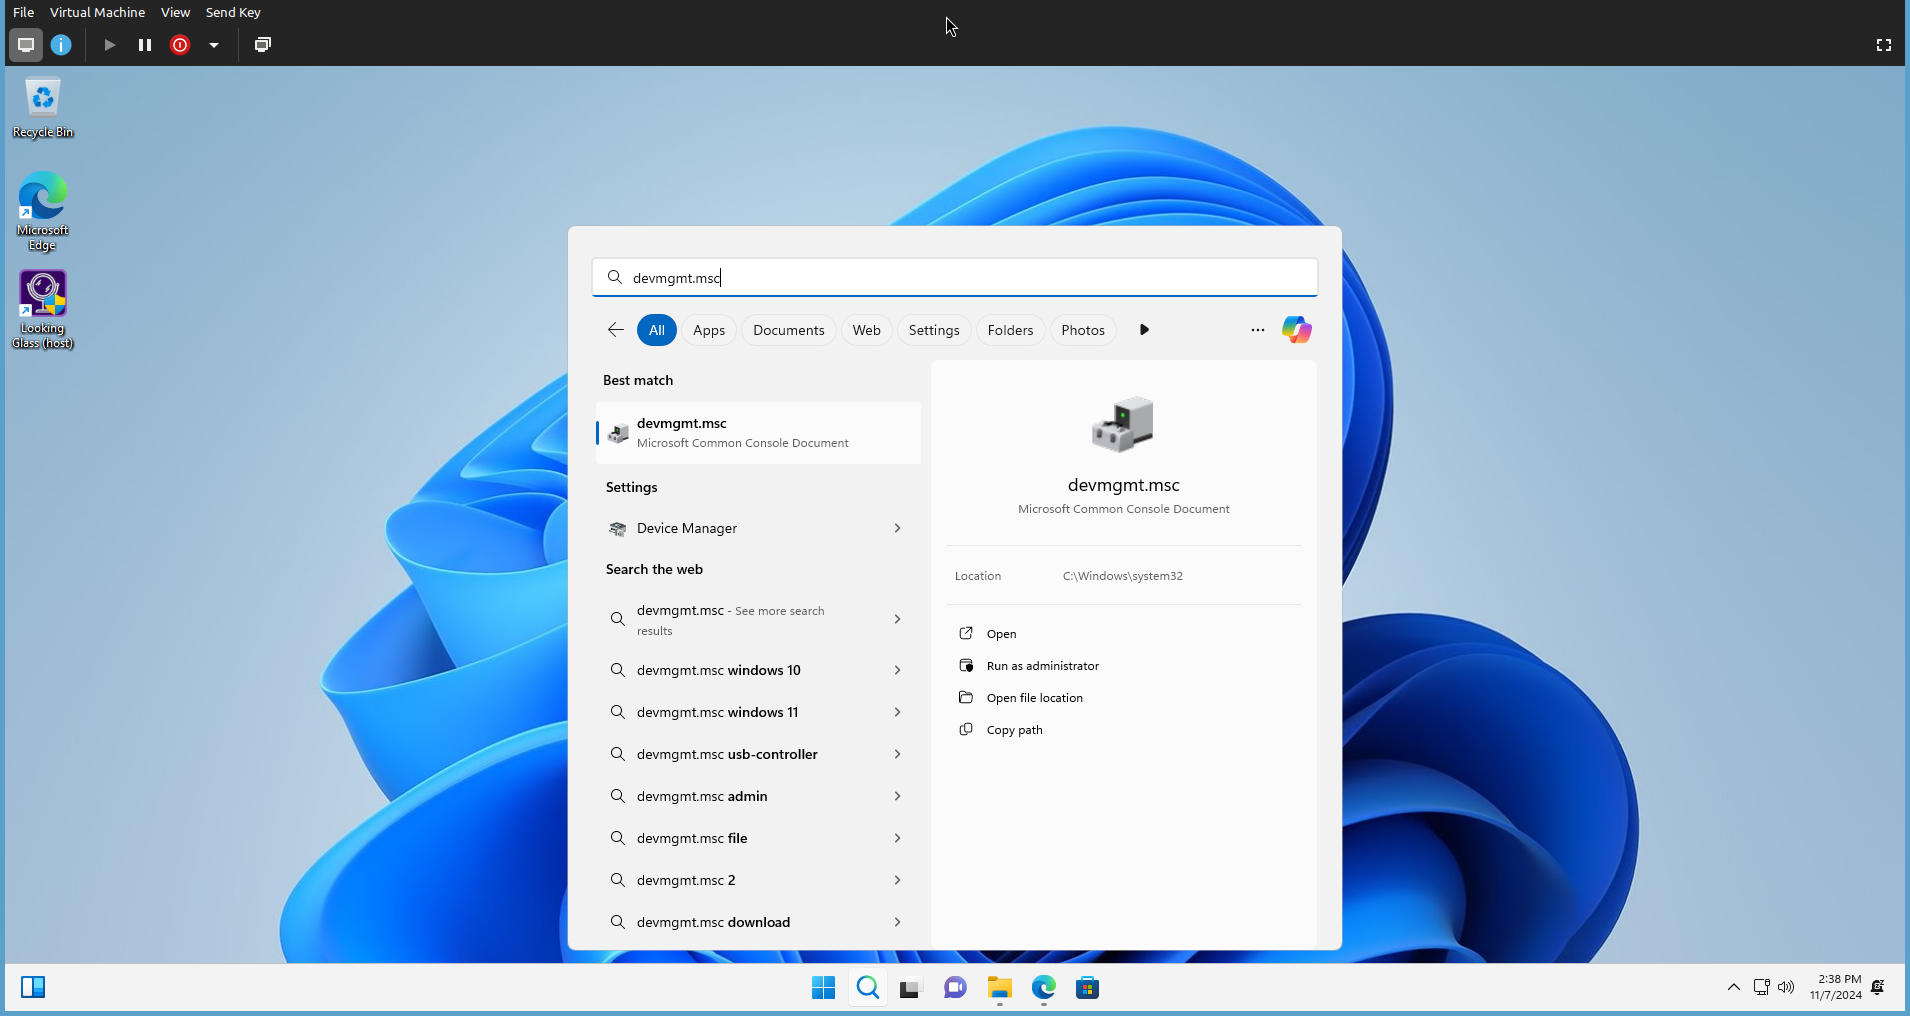
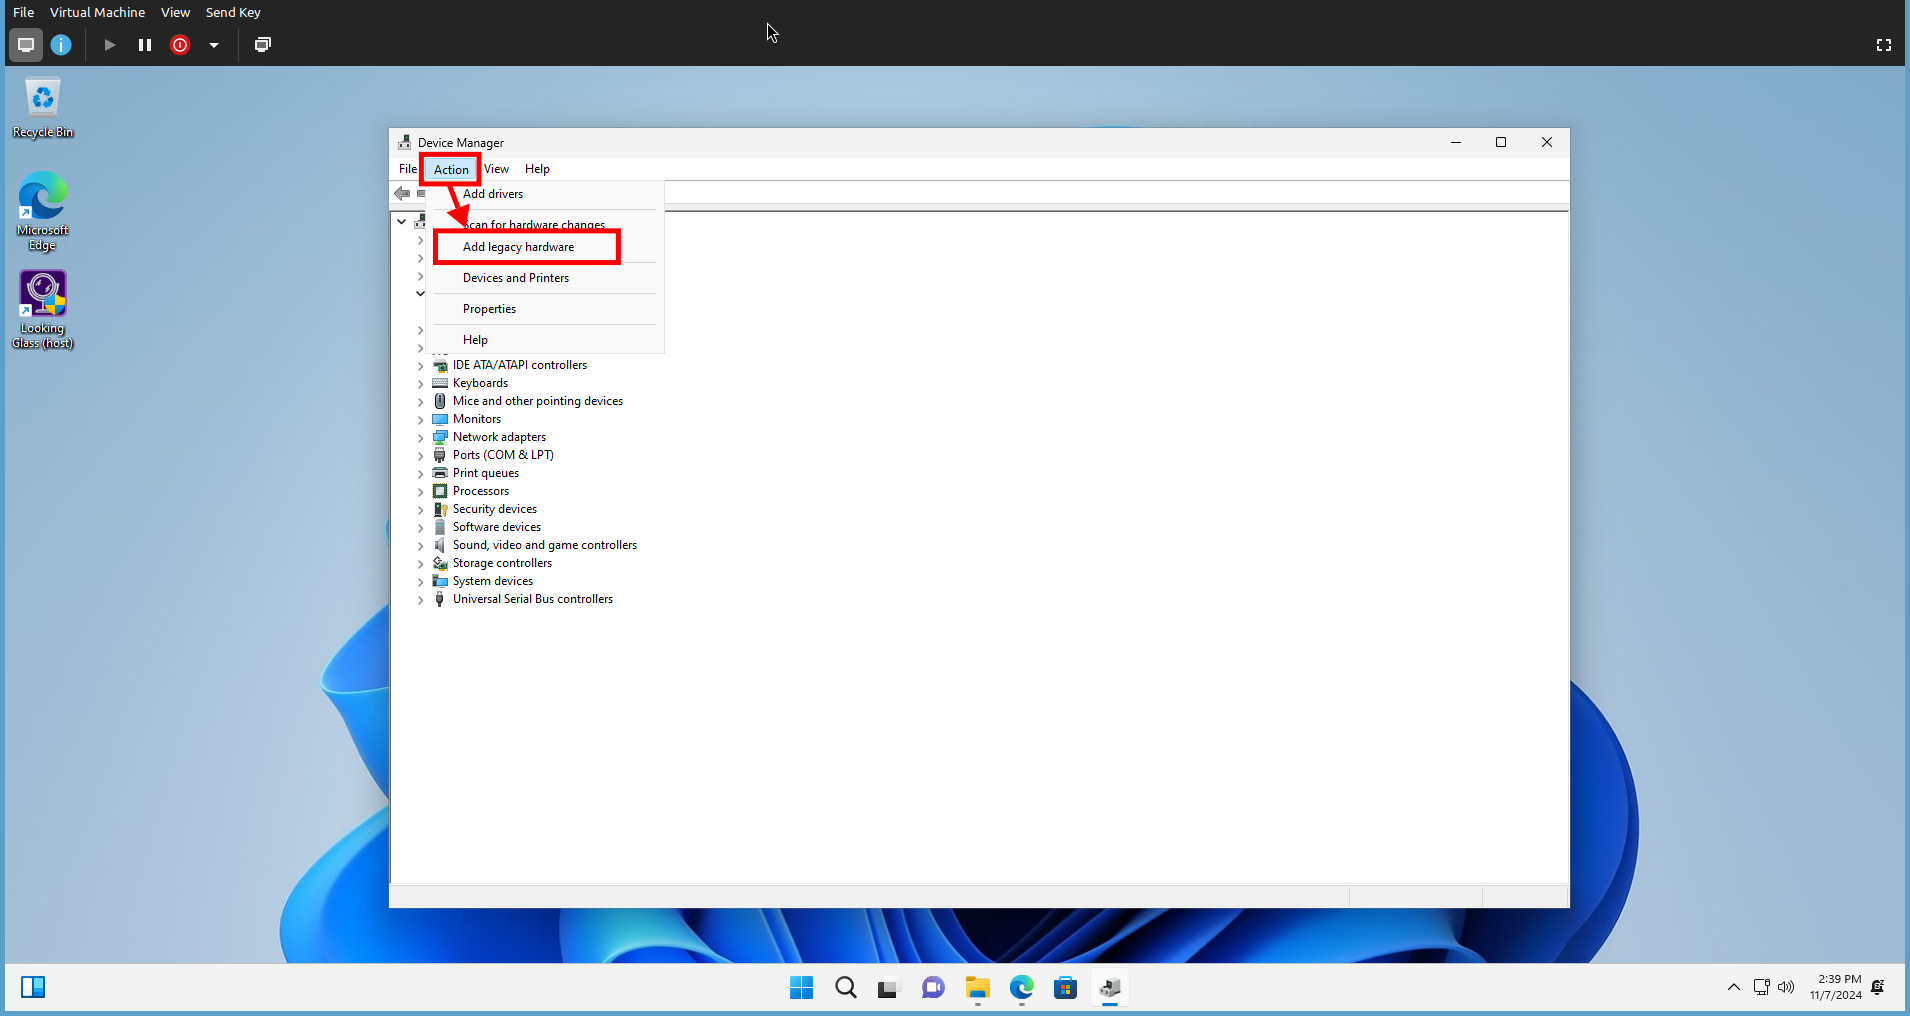
Then open the device management console. (devmgmt.msc)
Click Action menu and select the Add legacy hardware option.
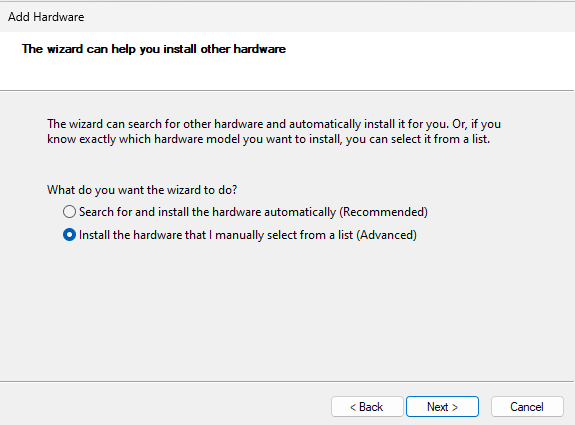
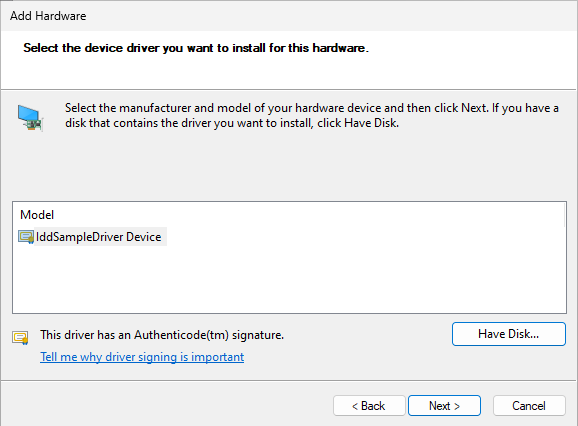
Click Next button. Then select the Install the hardware that I manually select from a list (Advanced) option.
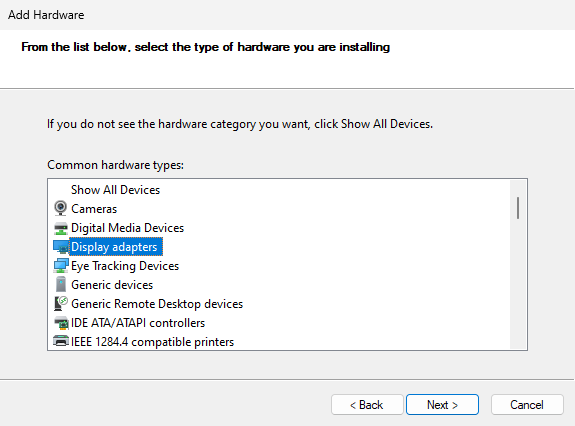
Click Next button. Then select the Display adapters option.
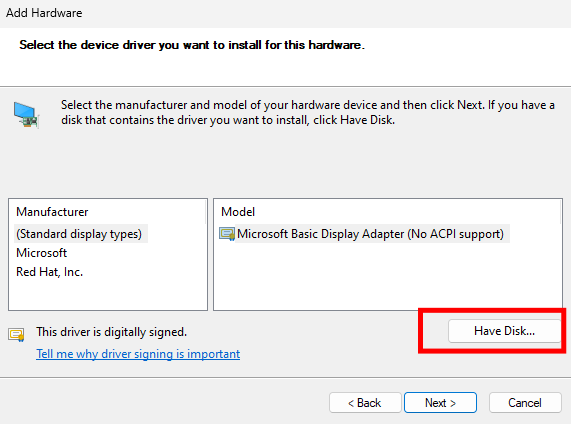
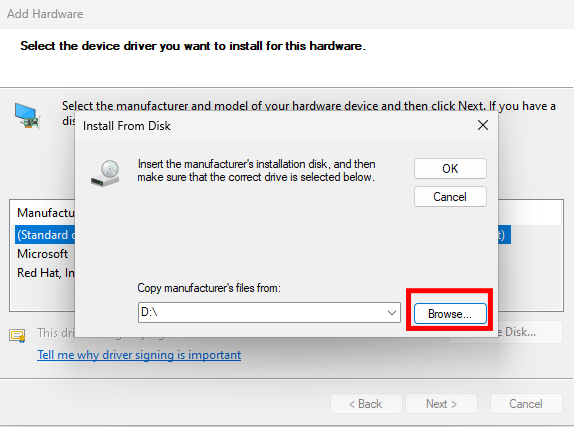
Click Next button. Then click on the Have Disk button.
Click Browse button. Select the %USERPROFILE%\Downloads\IddSampleDriver-0.1\IddSampleDriver.inf
file.
Click Open button. Then click on the Next button.
Click to Install button. Then click on the Finish button.
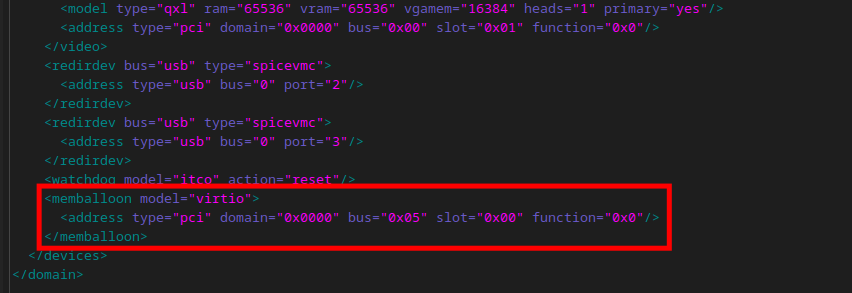
Step 16: Add GPU to the Virtual Machine
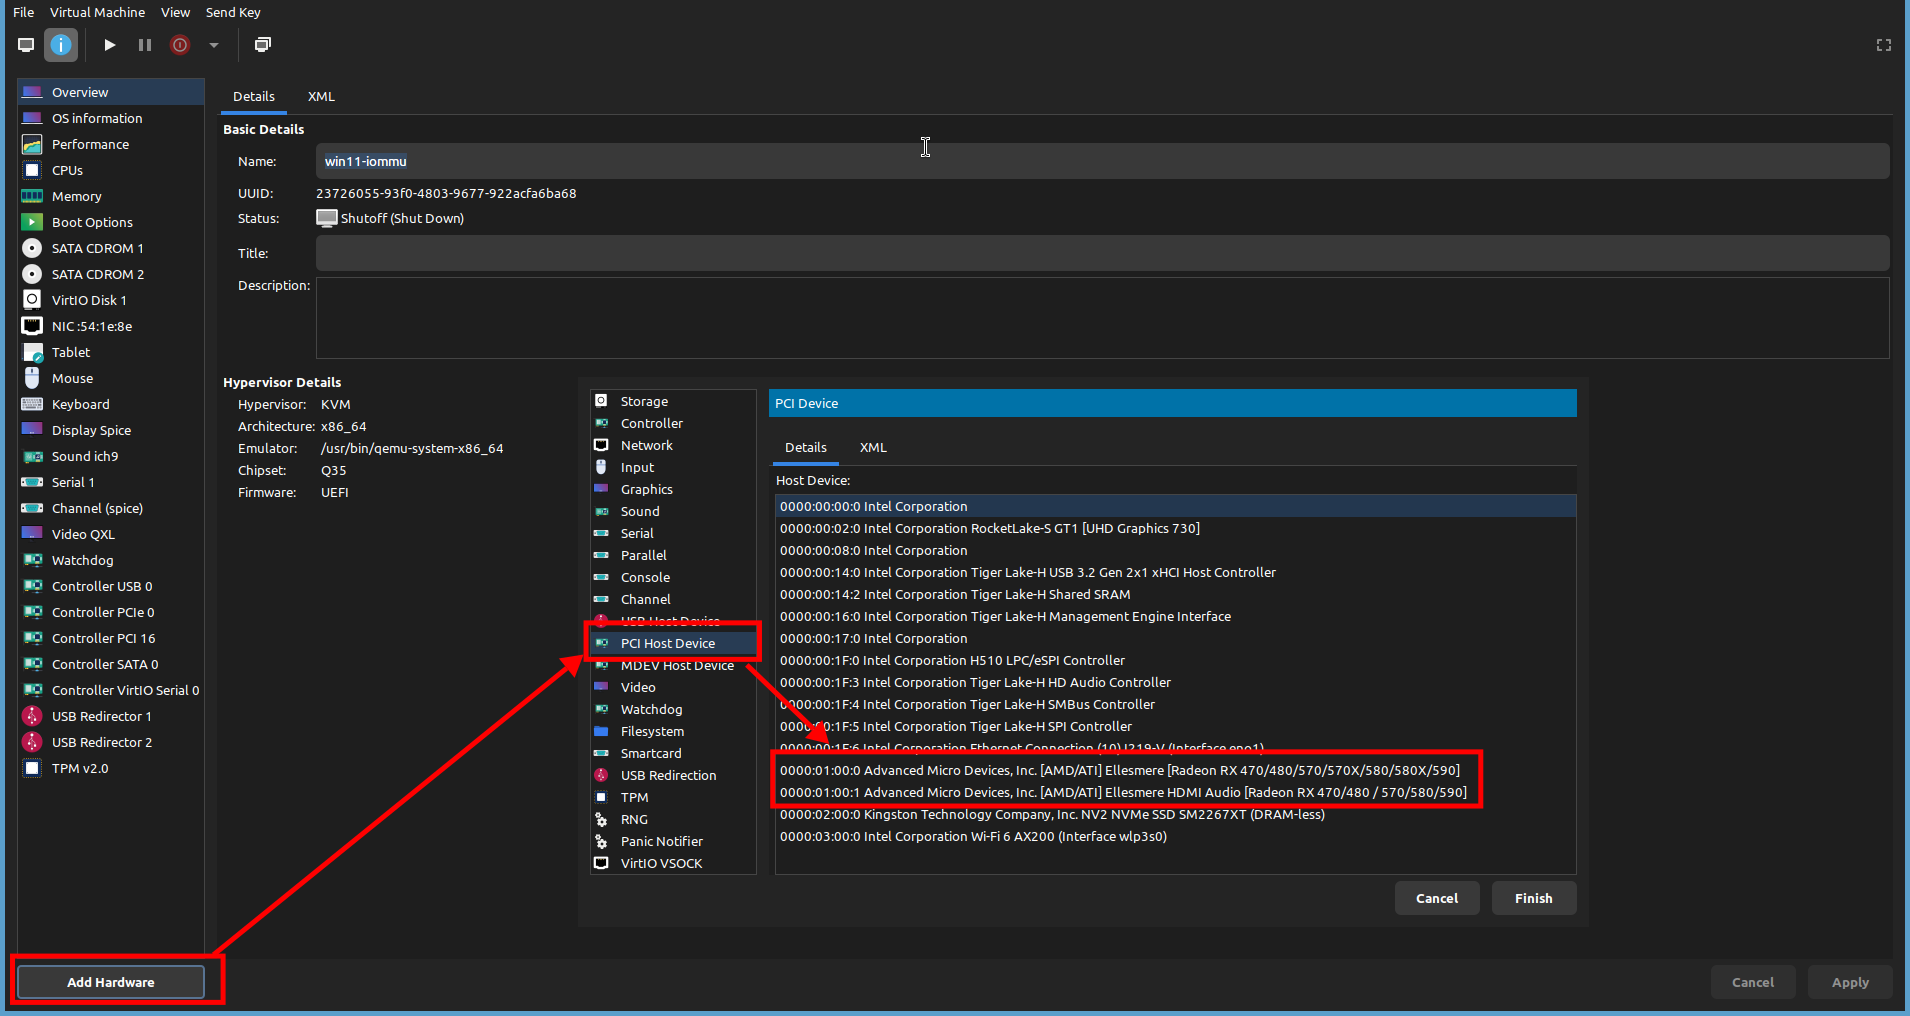
Close the virtual machine and open the configuration tab. Then click Add Hardware
button
Next, you will see the PCI Host Device option. Select the GPU and audio device.
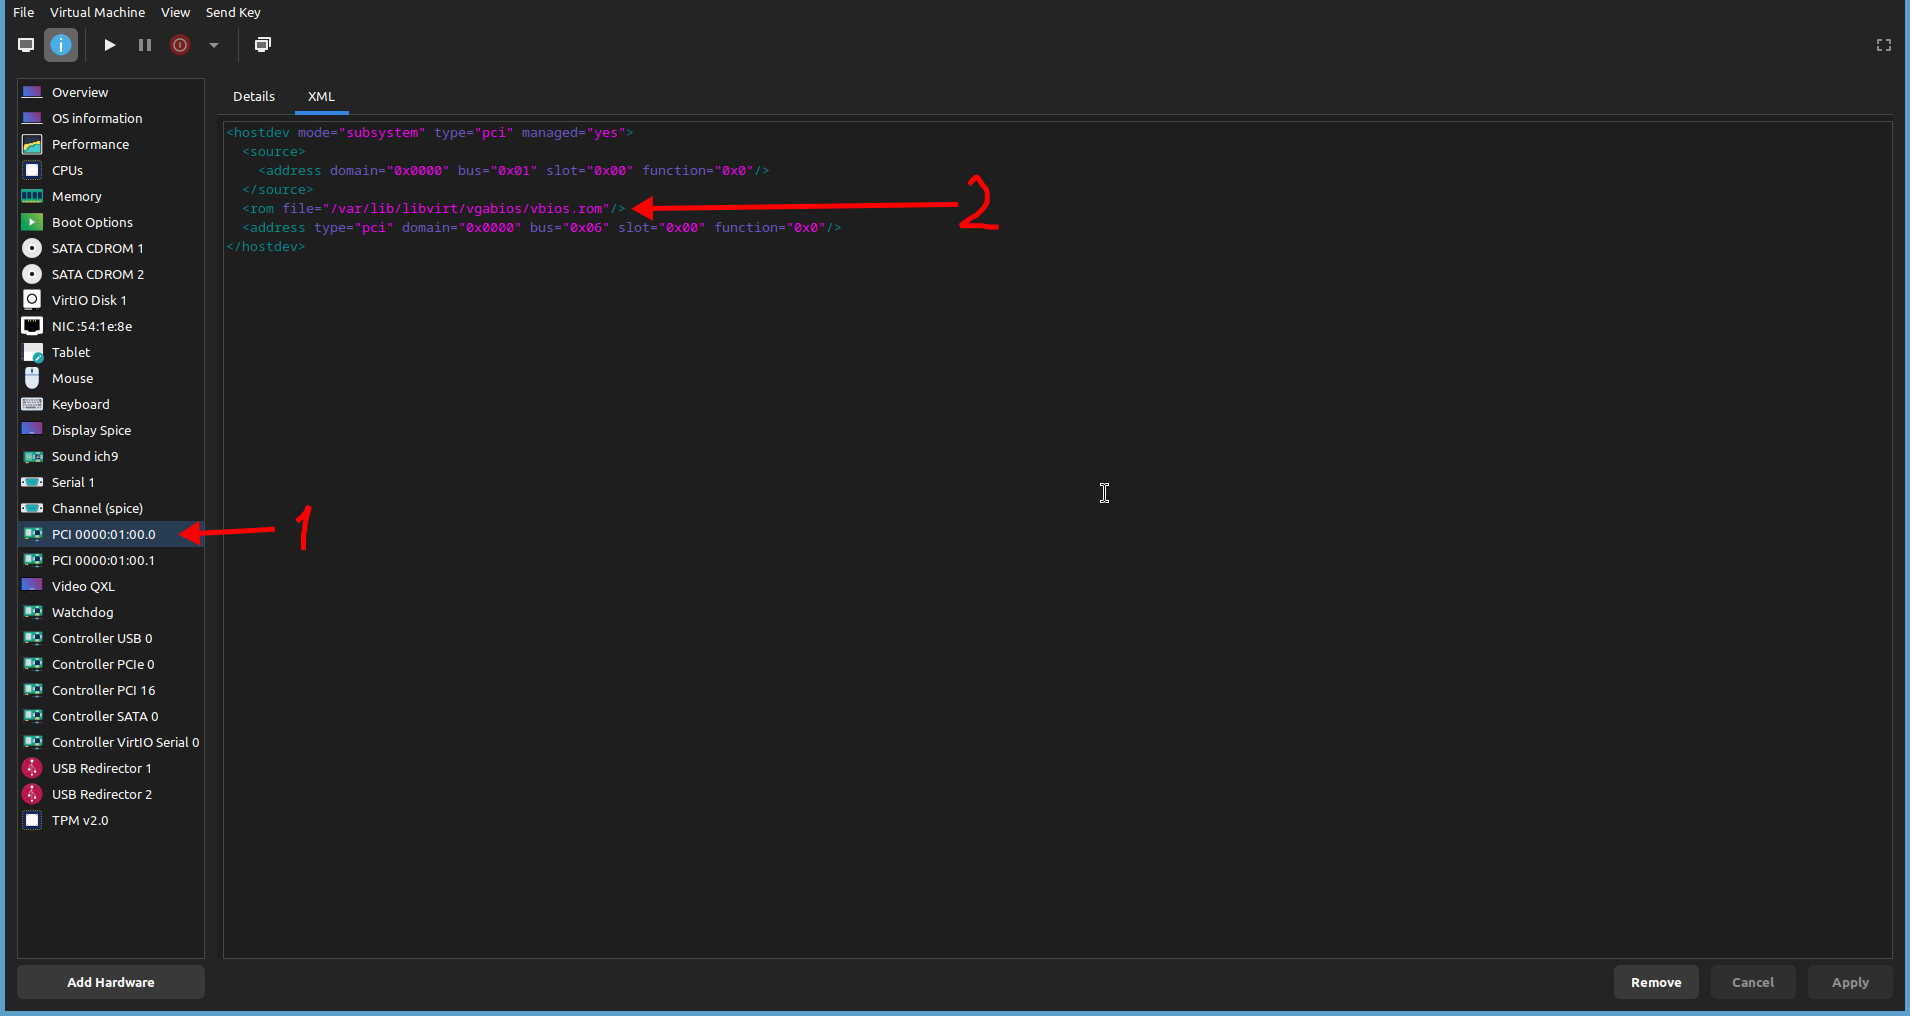
You must also add the GPU ROM file from the /var/lib/libvirt/vgabios directory.
Enter the following XML code in the Overview > XML section.
<rom file="/var/lib/libvirt/vgabios/vbios.rom"/>
Then boot virtual machine and open the device manager (devmgmt.msc).
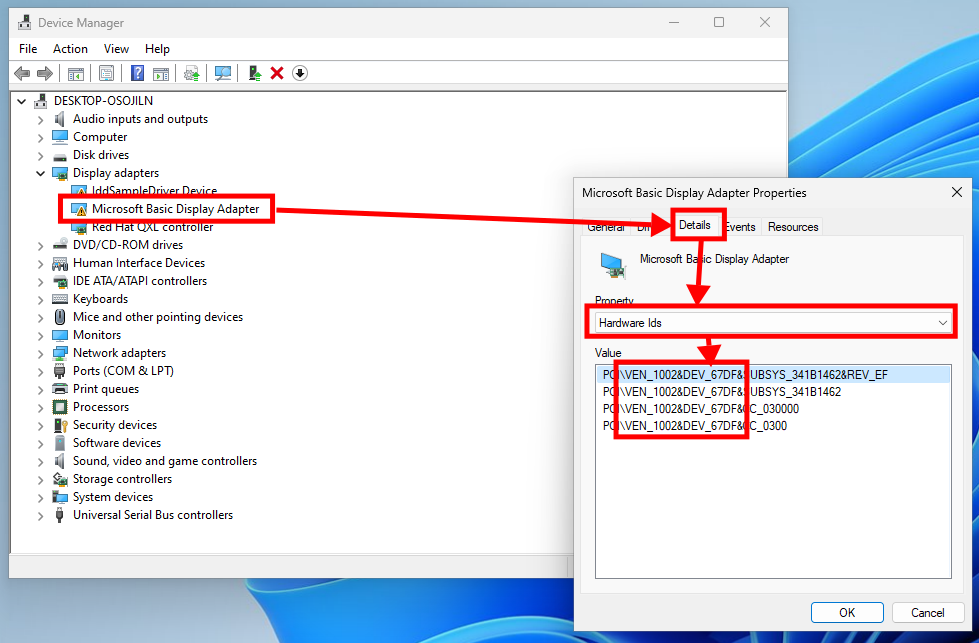
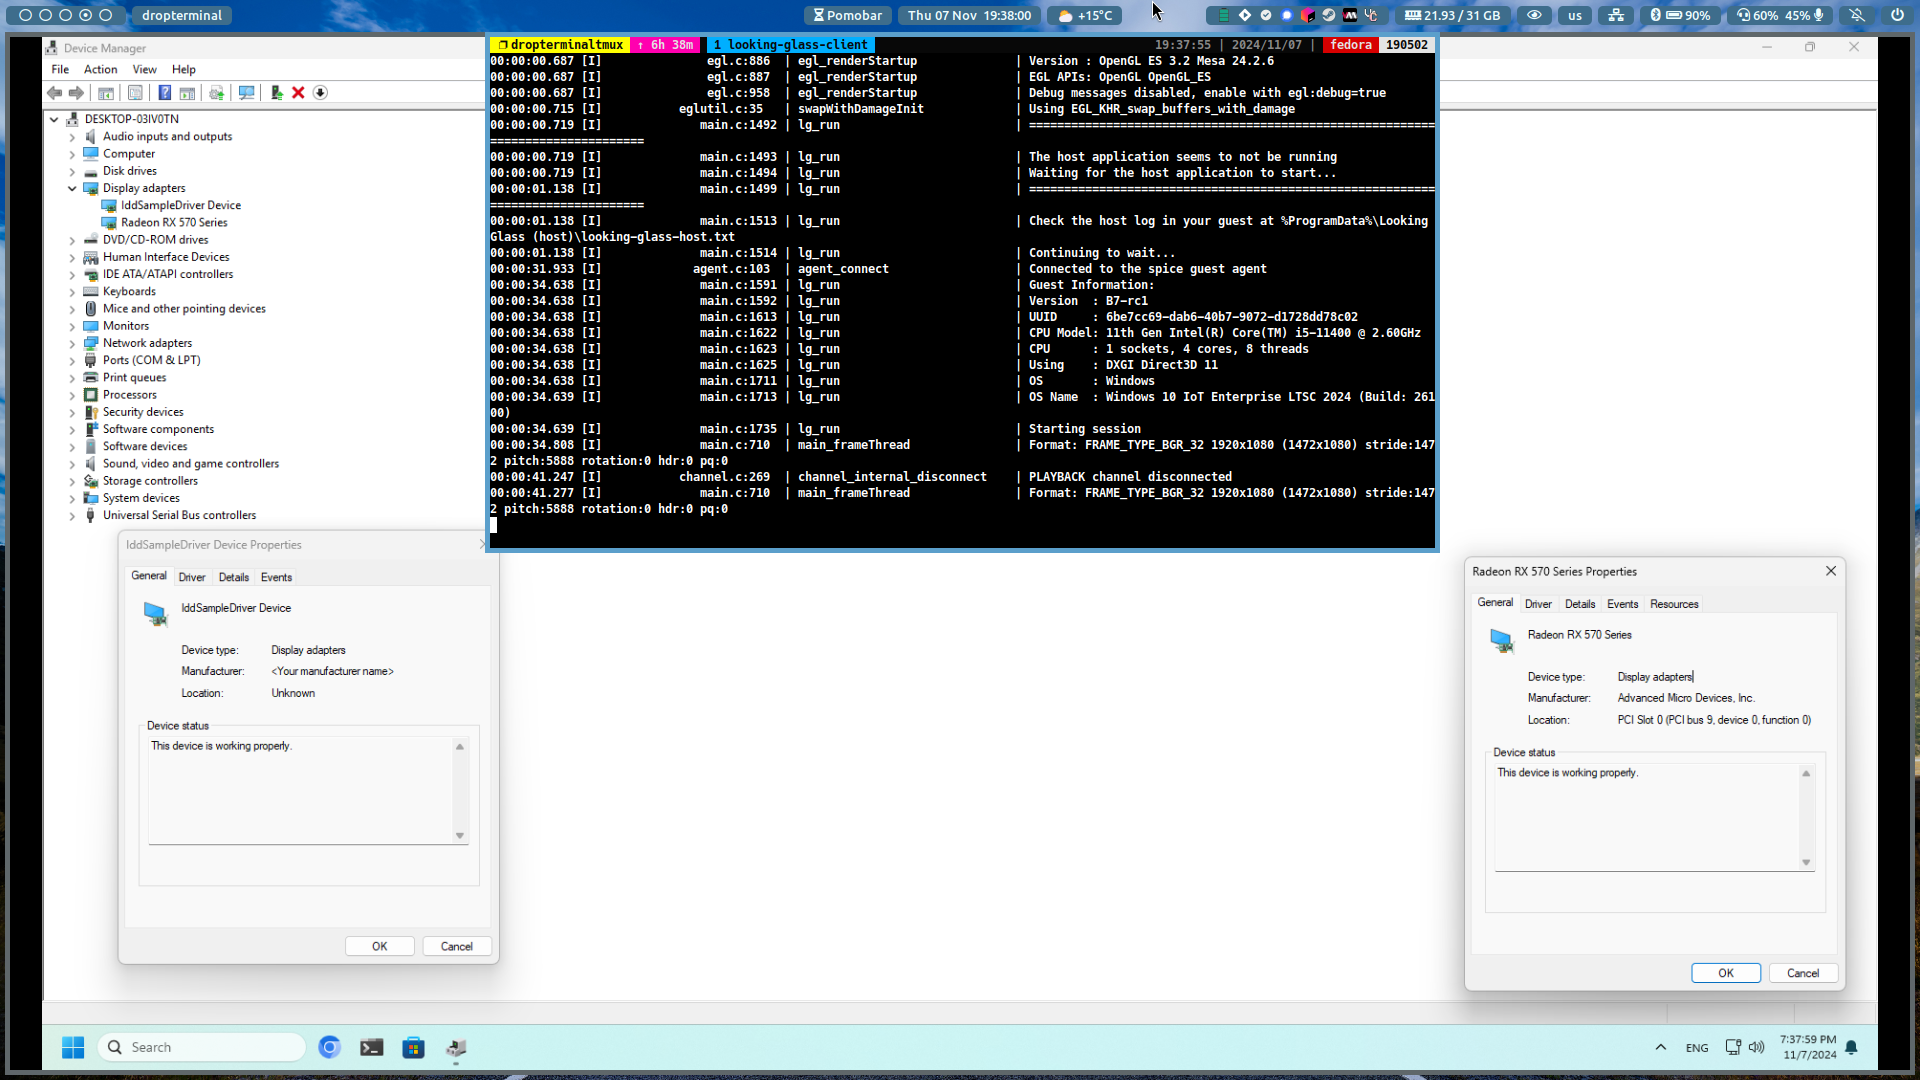
Open the Display adapters section. Right-click on the
Microsoft Basic Display Adapter and select the Details tab. Select
Hardware IDs. If the hardware ID matches your GPU vendor ID and device ID from
step 3, the GPU is installed correctly.
If everything is working correctly, you can install the standard drivers from
your video card manufacturer’s website and start using them.
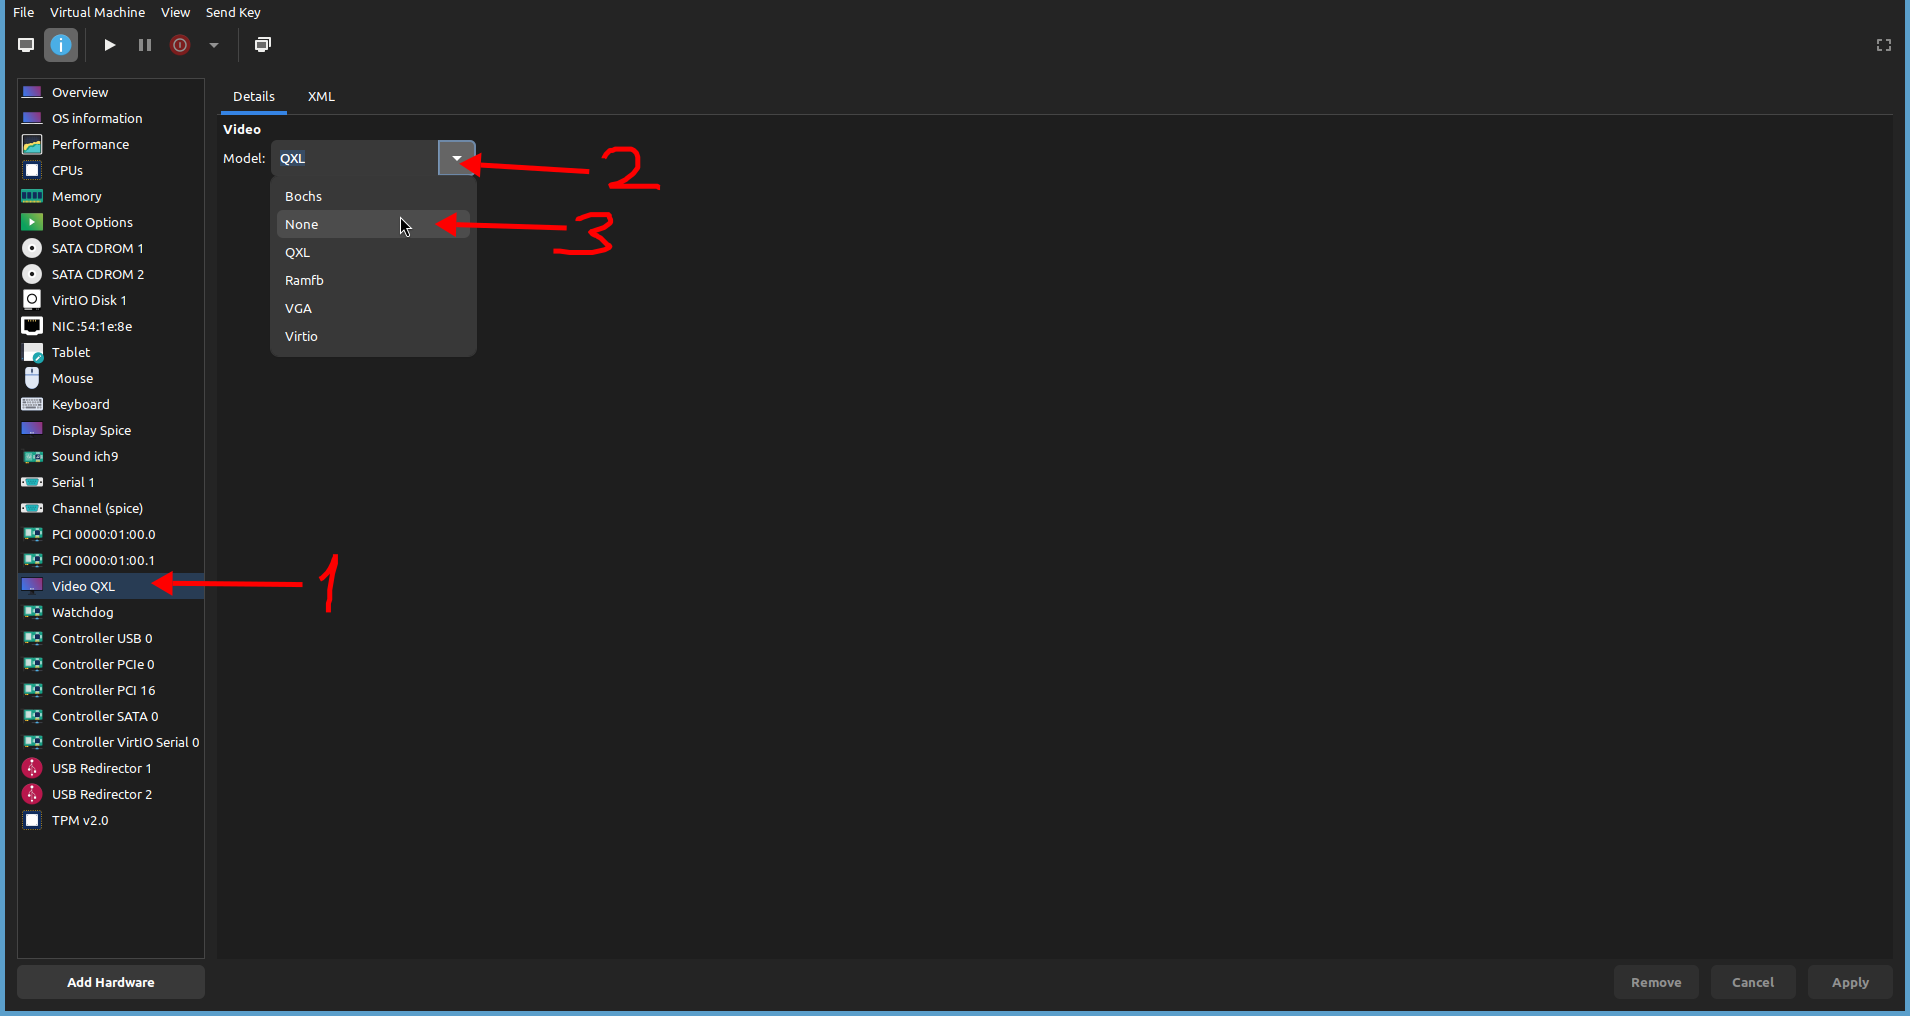
Then shutdown the virtual machine and set video type none from the Video QXL
tab.
Finally start the virtual machine and run the looking-glass-client program.
Conclusion
This guide shows you how to set up dual GPU passthrough on a Linux system. You
can assign a powerful graphics card to a Windows virtual machine running on a
Linux system, allowing you to run Windows and Linux on the same machine.