Introduction
- Domain Name System (DNS) provides computers and services on the network with easy-to-remember names. This allows us to access target machines through these names instead of IP addresses. Since IP addresses are difficult to remember, the DNS converts them into domain names. Users can then access the relevant server by simply typing the domain name. As the internet has grown, the DNS has become one of the fundamental building blocks of network communication.
DNS Hierarchy
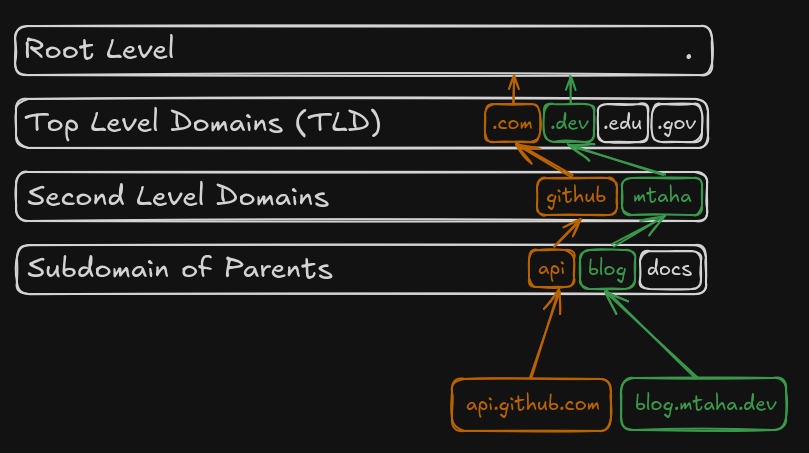
- The DNS hierarchy is structured in a tree-like format, with the root at the top.
Each level of the hierarchy is separated by a dot (.) in the domain name. The hierarchy
consists of several levels, including the root level, top-level domains (TLDs),
second-level domains, and subdomains.
- The root level is represented by a dot (.), and it is managed by the Internet Assigned Numbers Authority (IANA) under the oversight of ICANN (Internet Corporation for Assigned Names and Numbers).
- Below the root level are the TLDs, which include generic
TLDs (gTLDs) like
.com,.org, and.net, as well as country-code TLDs (ccTLDs) like.uk,.de, and.tr. - Second-level domains are the names registered under a TLD,
such as
github.comormtaha.dev. - Subdomains are additional divisions of a domain,
such as
api.github.comorblog.mtaha.dev.
How DNS Works
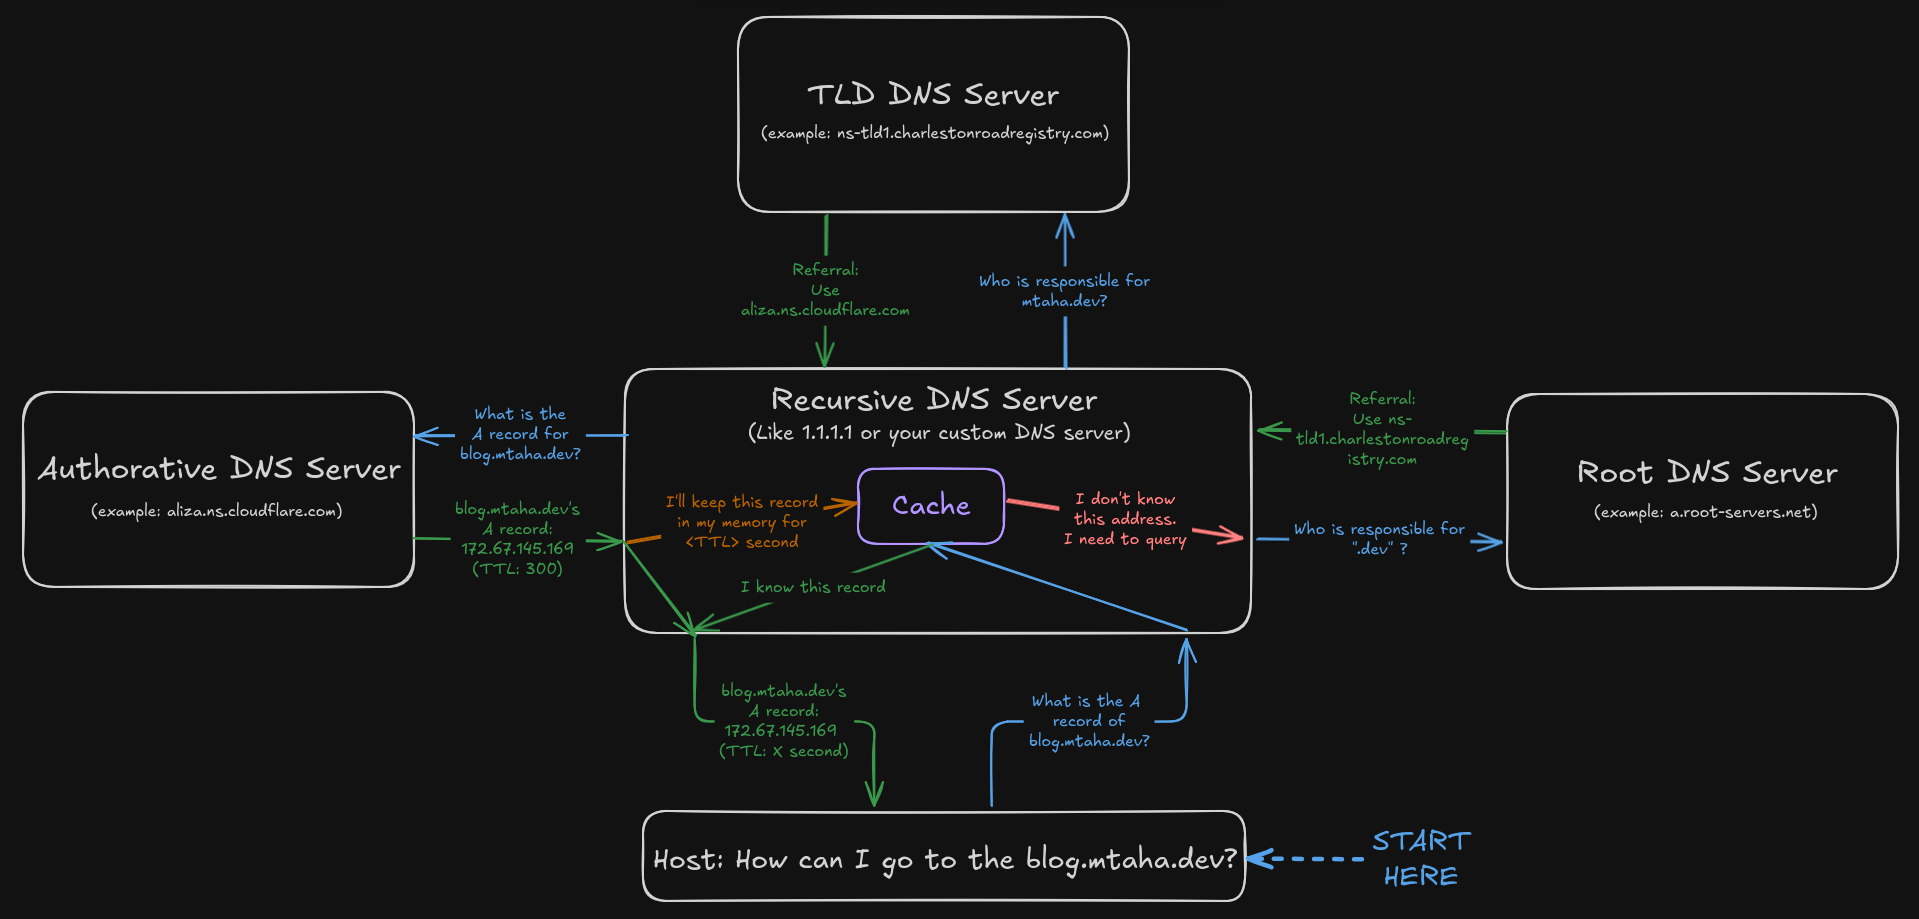
- Host says to local DNS server: “How can I go to the
blog.mtaha.dev?” - Local DNS server says two things:
- “I don’t know, but I’ll query the servers.”
- “I had previously asked about
blog.mtaha.dev, and here’s the answer:172.67.145.169.”
- If the local DNS server does not have the answer, it queries the root DNS server.
- Root DNS server responds with the address of a TLD DNS server for
.dev. - Local DNS server then asks the TLD DNS server for
mtaha.dev. - TLD DNS server responds with the address of the authoritative DNS server for
mtaha.dev:aliza.ns.cloudflare.com. - Finally, the local DNS server asks the authoritative DNS server (
aliza.ns.cloudflare.com) forblog.mtaha.dev. - Authoritative DNS server responds with the IP address
172.67.145.169.
How Reverse DNS Works
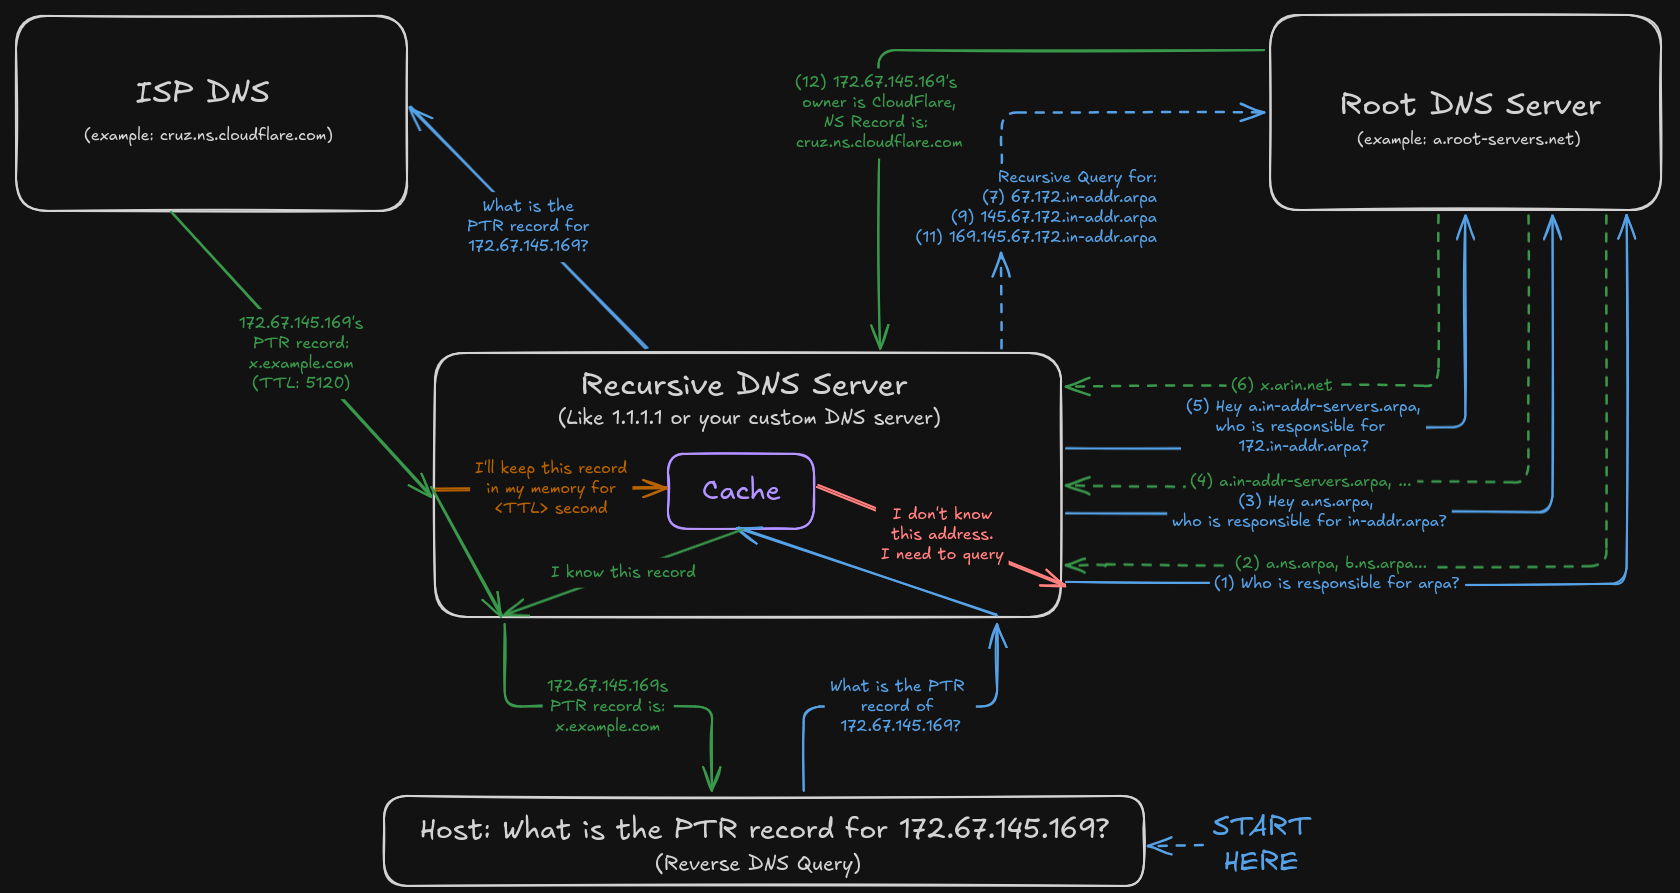
- Reverse DNS (rDNS) involves resolving an IP address back to a domain name.
- The host asks the local DNS server: ‘What is the PTR record for 172.67.145.169?’
- The local DNS server responds with two things:
- ‘I don’t know, but I’ll query the servers.’
- ‘I previously asked about 172.67.145.169 and the answer was x.example.com.’
- If the local DNS server does not have the answer, it queries the root DNS server.
- The root DNS server then converts the IP address into the special format used
for reverse DNS lookups. For IPv4 addresses, this involves reversing the octets
and appending ‘in-addr.arpa’. For
172.67.145.169, the reversed format would be169.145.67.172.in-addr.arpa. - Local DNS server then asks the root DNS server for the NS records of
.arpa. - Root DNS server responds with the NS record for the .arpa TLD DNS servers
(
a.ns.arpa,b.ns.arpa, etc.). - Local DNS server then asks these servers for the NS records for
.in-addr.arpa. - These servers respond with the address of the authoritative DNS server for
.in-addr.arpa(a.in-addr-servers.arpa,b.in-addr-servers.arpa, etc.). - Local DNS server then asks these servers for the NS records of
172.in-addr.arpa. - These servers respond with the address of the authoritative DNS server for
172.in-addr.arpa(x.arin.net,y.arin.net, etc.).
(Local DNS server repeats the same process for
67.172.in-addr.arpa,145.67.172.in-addr.arpaand169.145.67.172.in-addr.arpa)
- Last NS server responds with the address of the ISP’s authoritative DNS server
- Finally, the local DNS server asks the authoritative DNS server for the PTR record
of
169.145.67.172.in-addr.arpa.
Some Important DNS Terms
Common DNS Record Types
- A Record
- Points a domain or subdomain to an IPv4 address.
- Example:
blog.mtaha.dev IN A 172.67.145.169
- AAAA Record
- Points a domain or subdomain to an IPv6 address.
- Example:
blog.mtaha.dev IN AAAA 2606:4700:3035::6815:396f
- CNAME Record
- Maps an alias domain name to the canonical (true) domain name.
- Example:
blog.mtaha.dev IN CNAME mt190502.github.io
- MX Record
- Specifies the mail server responsible for receiving email on behalf of a domain.
- Example:
mtaha.dev IN MX 10 mx1.mtaha.dev
- NS Record
- Indicates the authoritative name servers for a domain.
- Example:
mtaha.dev IN NS ns1.mtaha.dev
- PTR Record
- Maps an IP address to a domain name (reverse DNS lookup).
- Example:
172.67.145.169 IN PTR blog.mtaha.dev
- TXT Record
- Allows the domain administrator to insert arbitrary text into a DNS record.
- Example:
mtaha.dev IN TXT "v=spf1 include:_spf.google.com ~all"- Commonly used for SPF (Sender Policy Framework) records to prevent email spoofing.
SOA Record
- Contains administrative information about the domain, including the primary name server, email of the domain administrator, domain serial number, and timers for refreshing the zone.
- Example:
mtaha.dev IN SOA ns1.mtaha.dev. admin.mtaha.dev. (2025091201 7200 3600 1209600 3600)- Here, SOA record fields are:
- Primary NS:
ns1.mtaha.dev - Responsible Person:
admin.mtaha.dev(note the dot instead of @) ->[email protected] 2025091201: Serial number for existing file (format: YYYYMMDDnn)7200: Query the zone file from the master for the secondary DNS servers every 7200 seconds (2 hours).3600: If the secondary DNS server fails to contact the master server, it will retry every 3600 seconds (1 hour).1209600: If the secondary DNS server cannot reach the master server for 1209600 seconds (14 days), it will stop answering queries for this zone.3600: Used in calculating the time to live for purposes of negative caching. (If resolver gets “NXDOMAIN” response, it should cache that response for 3600 seconds (1 hour)).
- Primary NS:
- Here, SOA record fields are:
Installing Local DNS Server (BIND9) on RHEL9
Prerequisites
- A server running RHEL9 with root or sudo access.
- Basic knowledge of Linux command line and networking concepts.
Step 1: Update System and Install BIND9
- First, ensure your system is up to date by running the following commands:
sudo dnf update -y- Next, install BIND9 and its utilities using the following command:
sudo dnf install bind9.18{,-utils} -y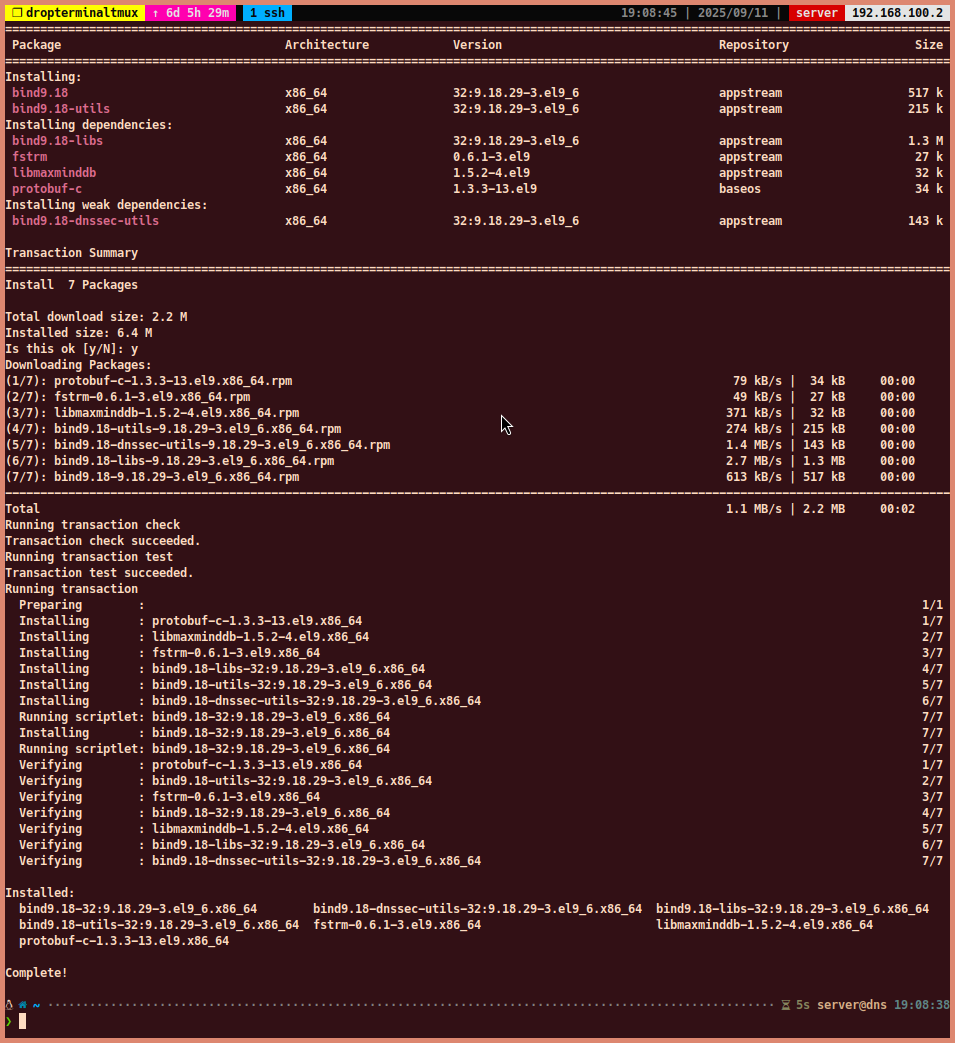
Step 2: Open DNS Port (53) in Firewall
- Then, open port 53 for both TCP and UDP protocols in the firewall to allow DNS traffic:
sudo firewall-cmd --permanent --add-service=dns
sudo firewall-cmd --reload
Step 3: Get Default IP Address and Block
- We need to know the server’s IP address and the default IP address block to configure BIND9 properly. You can use the following commands to find this information:
#~ get default gateway and ethernet interface name
ip route

#~ get IP address of the ethernet interface
ip a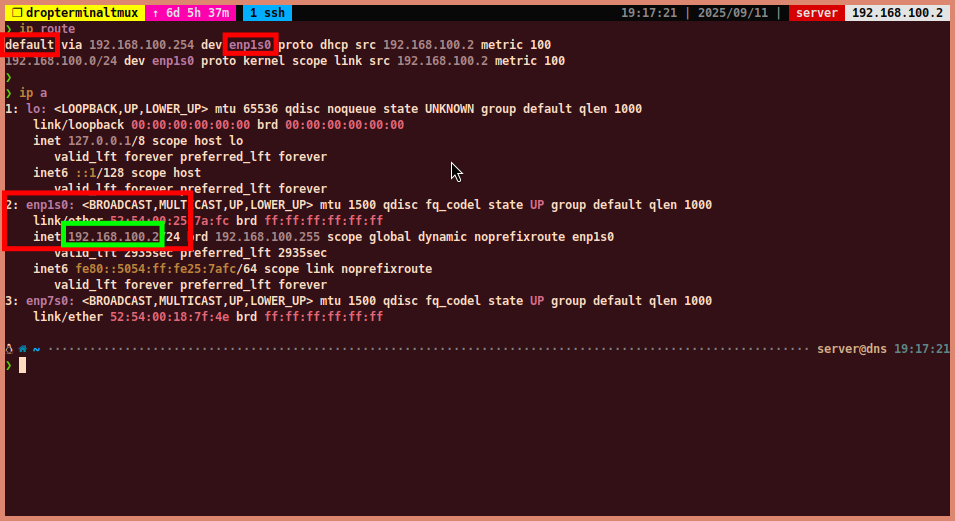
- In this example, the default gateway is
192.168.100.254(enp1s0) - The default IP address block is
192.168.100.0/24 - The server’s IP address is
192.168.100.2
Step 4: Configure BIND9
- Main configuration file for BIND9 is located at
/etc/named.conf. Open the file using a favorite text editor:
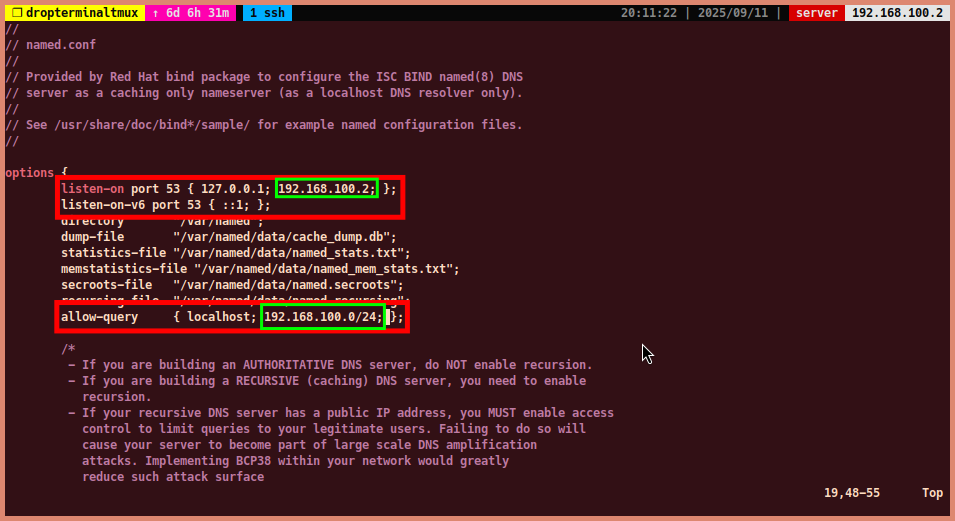
sudo vim /etc/named.conf- Modify the
optionsblock to allow queries from your local network.-
Add the IP address of your server to the
listen-ondirective. Example:- Note: If you want to listen on all interfaces, use
0.0.0.0.
listen-on port 53 { 127.0.0.1; 192.168.100.2; }; - Note: If you want to listen on all interfaces, use
-
If you have an IPv6 address, you can add it to the
listen-on-v6directive. Example:- Note: If you want to listen on all IPv6 interfaces, use
::.
listen-on-v6 { ::1; }; - Note: If you want to listen on all IPv6 interfaces, use
-
Add the IP address or IP address block of your local network to the
allow-querydirective. This specifies which clients or IP address blocks are allowed to query the DNS server. Example:allow-query { localhost; 192.168.100.0/24; };
-
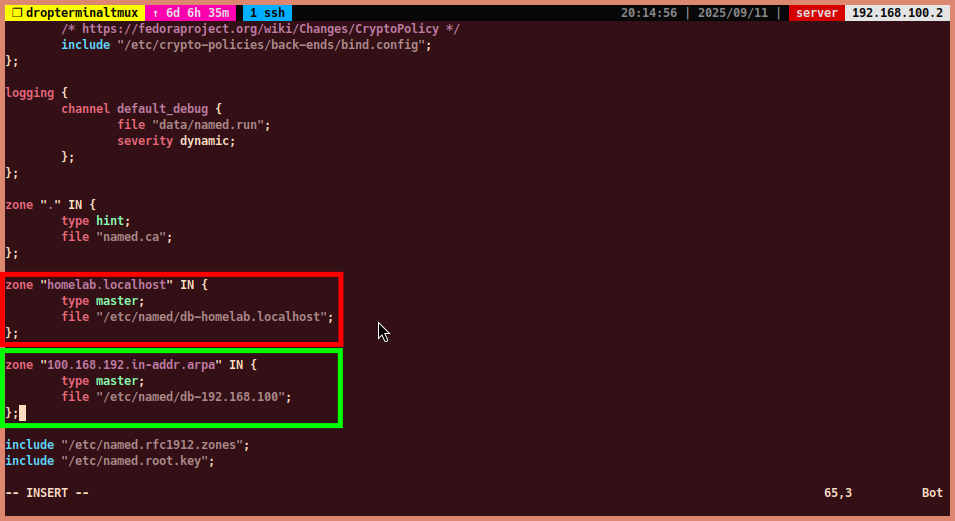
- Add the
zoneblocks to define the forward and reverse zones for your domain.-
type “master” indicates that this server is the primary source of information about this zone. If you were setting up a secondary DNS server, you would use “slave.”
-
file: specifies the location of the zone file that contains the DNS records for the zone.
-
Example forward zone for
homelab.localhost:zone "homelab.localhost" IN { type master; file "/etc/named/db-homelab.localhost"; }; -
Example reverse zone for
192.168.100.0/24:zone "100.168.192.in-addr.arpa" IN { type master; file "/etc/named/db-192.168.100"; };- Note: The reverse zone name is derived from the IP address block by reversing
the octets and appending
in-addr.arpa. For192.168.100.0/24, the reverse zone name would be100.168.192.in-addr.arpa. - Note: If you have an IPv6 address block, you can create a reverse zone for
it using the
ip6.arpadomain. For example, for the IPv6 block2606:4700:3035::/64, the reverse zone name would be5.3.0.3.0.0.4.7.6.0.6.2.ip6.arpa.
- Note: The reverse zone name is derived from the IP address block by reversing
the octets and appending
-
Step 5: Create Zone Files
-
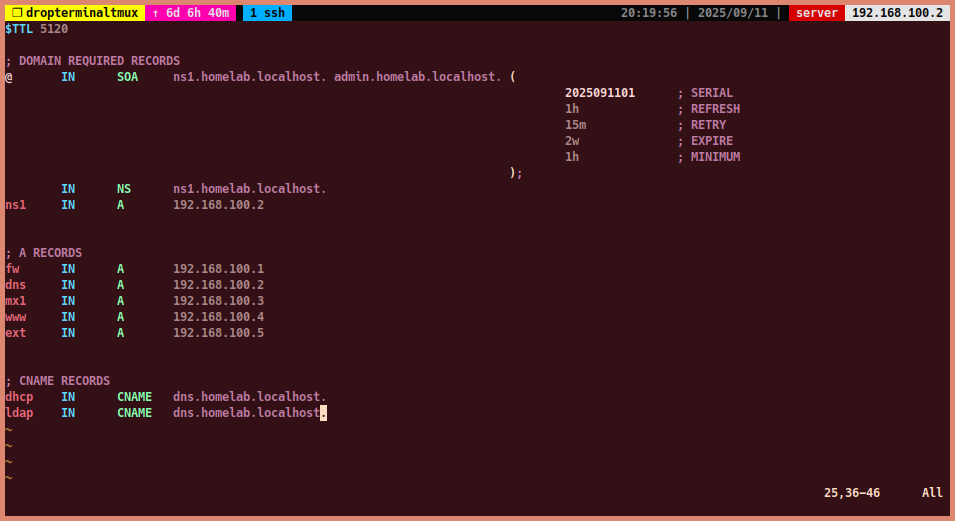
Create the forward zone file for
homelab.localhost:sudo vim /etc/named/db-homelab.localhost-
You can use the following template for the zone file:
$TTL 86400                                                                   ; Default TTL (time to live) for DNS records in seconds (1 day)
@   IN    SOA   ns1.homelab.localhost. admin.homelab.localhost. (
                                                                  2025091201 ; Serial
                                                                  7200       ; Refresh
                                                                  3600       ; Retry
                                                                  1209600    ; Expire
                                                                  3600       ; Minimum TTL
                                                                );

     IN  NS    ns1.homelab.localhost.                                        ; Name Server record
ns1  IN  A     192.168.100.2                                                 ; A record for ns1
dns  IN  A     192.168.100.3                                                 ; A record for dns
dhcp IN  CNAME dns.homelab.localhost.                                        ; CNAME record for dhcp
-
-
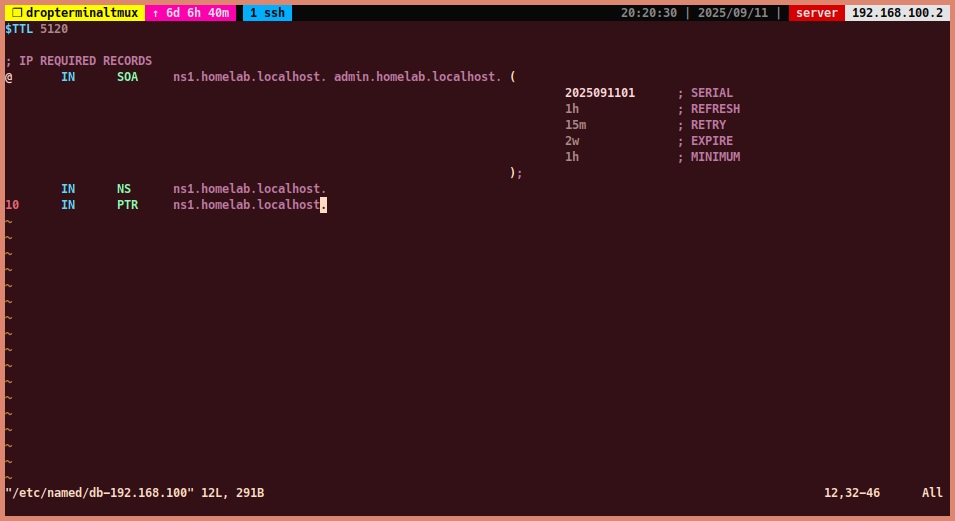
Create the reverse zone file for
192.168.100.0/24:sudo vim /etc/named/db-192.168.100-
You can use the following template for the reverse zone file:
$TTL 86400                                                                   ; Default TTL (time to live) for DNS records in seconds (1 day)
@   IN    SOA   ns1.homelab.localhost. admin.homelab.localhost. (
                                                                  2025091201 ; Serial
                                                                  7200       ; Refresh
                                                                  3600       ; Retry
                                                                  1209600    ; Expire
                                                                  3600       ; Minimum TTL
                                                                );

     IN  NS    ns1.homelab.localhost.                                        ; Name Server record
10   IN  PTR   ns1.homelab.localhost.                                        ; PTR record for 192.168.100.10
20   IN  PTR   dns.homelab.localhost.                                        ; PTR record for 192.168.100.20
-
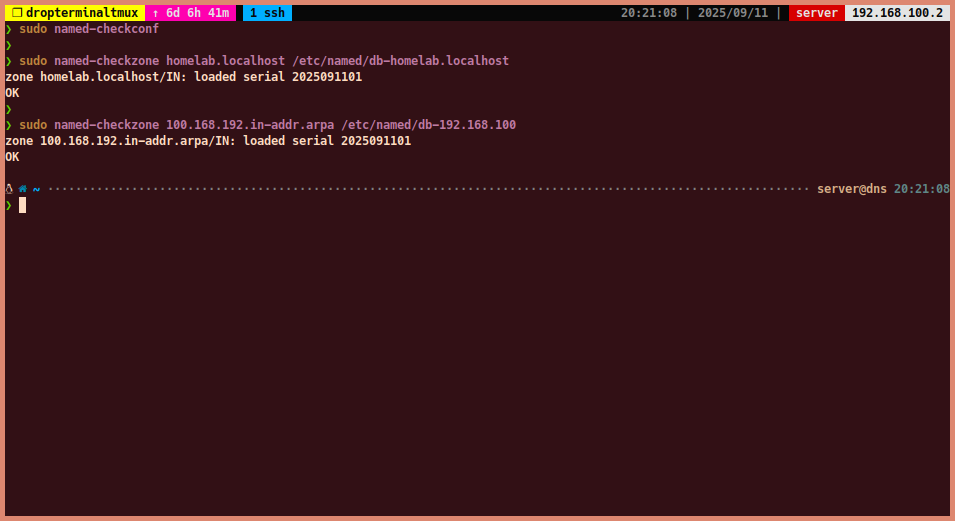
Step 6: Check Configuration and Zone Files
- Before starting the BIND9 service, it is important to check the configuration and zone files for syntax errors. Restarting the service without checking for errors may result in a failure. Use the following commands to check for errors:
#~ for main config file
sudo named-checkconf /etc/named.conf

#~ for forward and reverse zone files
sudo named-checkzone homelab.localhost /etc/named/db-homelab.localhost
sudo named-checkzone 100.168.192.in-addr.arpa /etc/named/db-192.168.100- If you see any errors, fix them before proceeding.
Step 7: Start and Enable BIND9 Service
- Now, start and enable the BIND9 service to run on boot:
sudo systemctl enable --now named- Then check the status of the service to ensure it is running:
sudo systemctl status named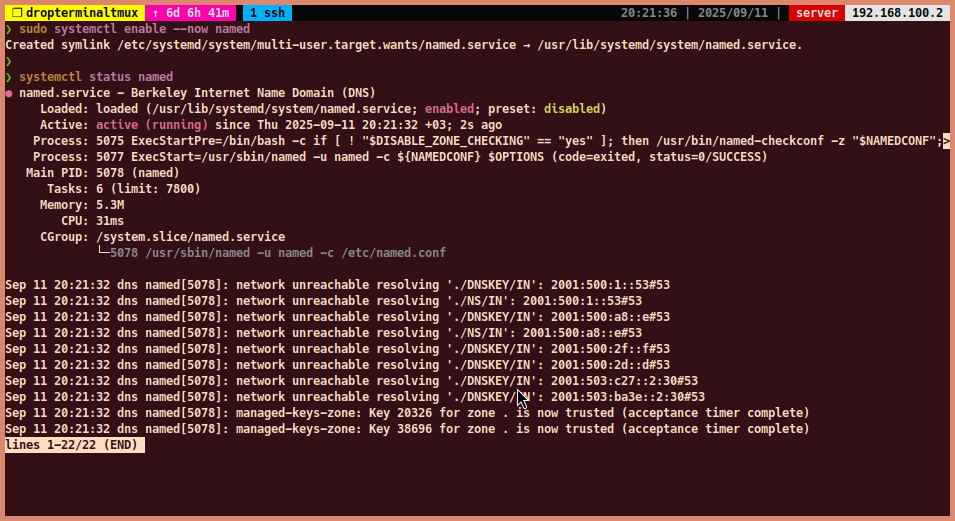
- If the service is running without any errors, you can check if BIND9 is listening
on port 53 using the
sscommand:
sudo ss -tulpn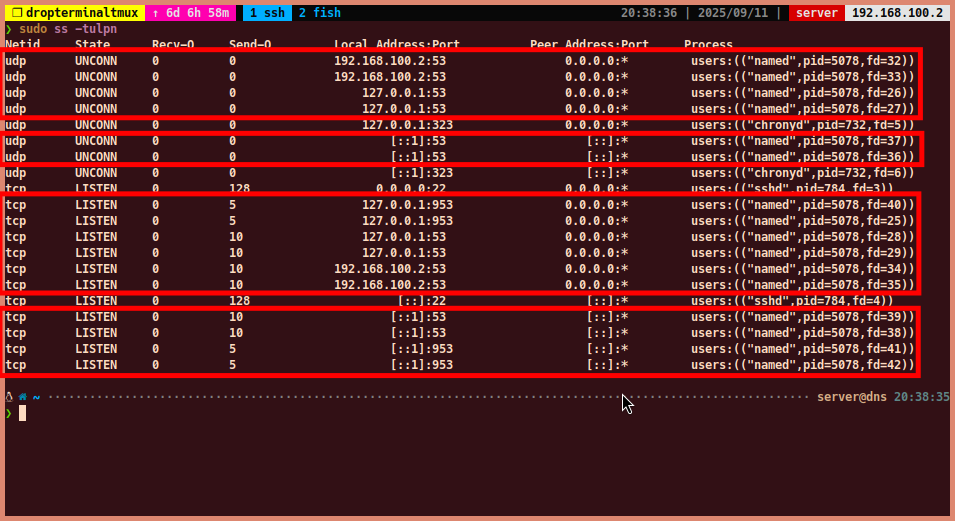
Step 8: Test DNS Server
-
Finally, we can test the DNS server and the records that we created. We can use the
digcommand to perform DNS queries and verify that the server is functioning correctly. If you are not familiar with thedigcommand, you can use thenslookuporhostcommands instead.-
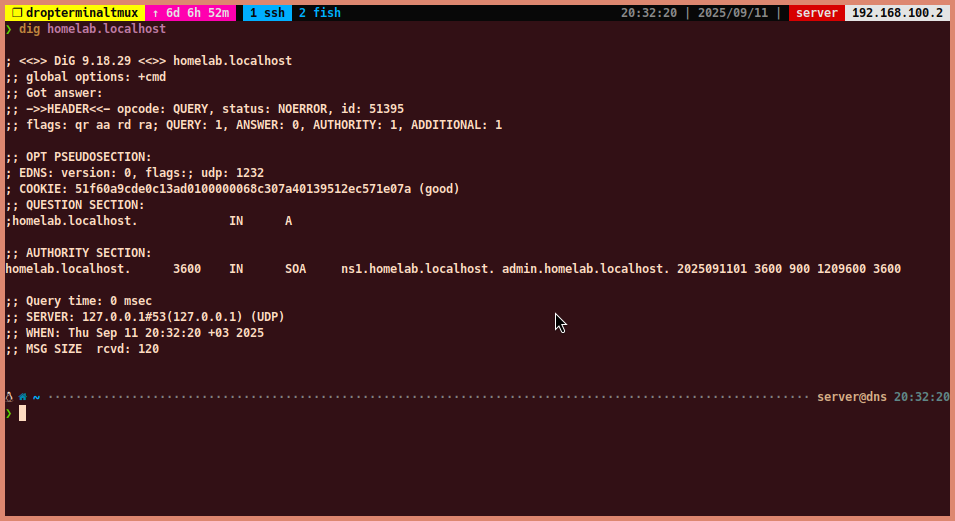
To query the A record for
homelab.localhostusing the DNS server at192.168.100.2:dig @192.168.100.2 homelab.localhost- The dig command will display the SOA record. Since an A record was not created for homelab.localhost, the answer section will be empty.

-
To query the A record for
dns.homelab.localhost:dig @192.168.100.2 dns.homelab.localhost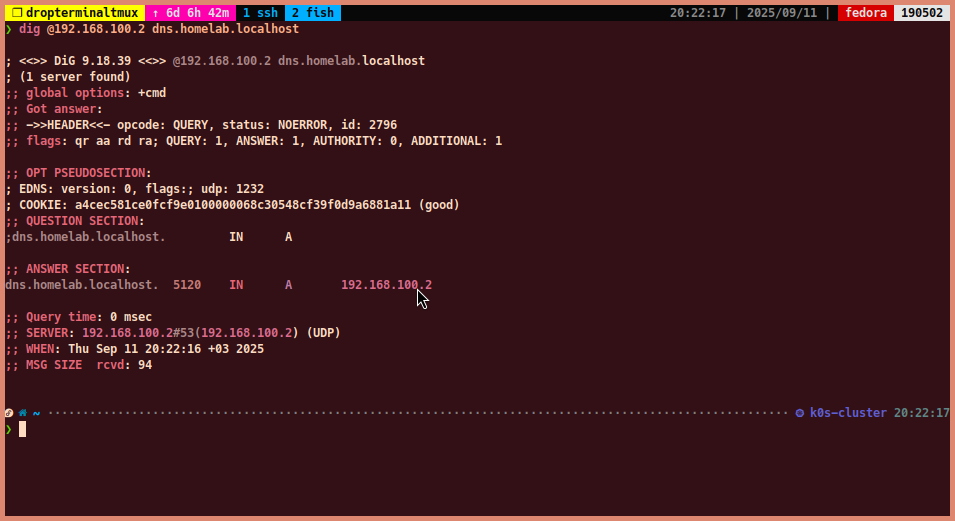
-
To query the CNAME record for
dhcp.homelab.localhost:dig @192.168.100.2 dhcp.homelab.localhost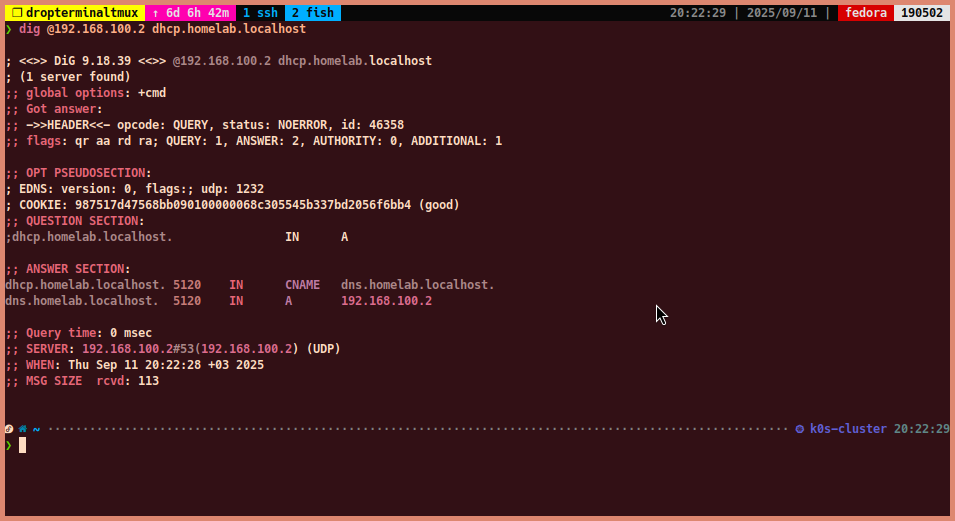
-
To query the SOA record for
100.168.192.in-addr.arpa:dig @192.168.100.2 100.168.192.in-addr.arpa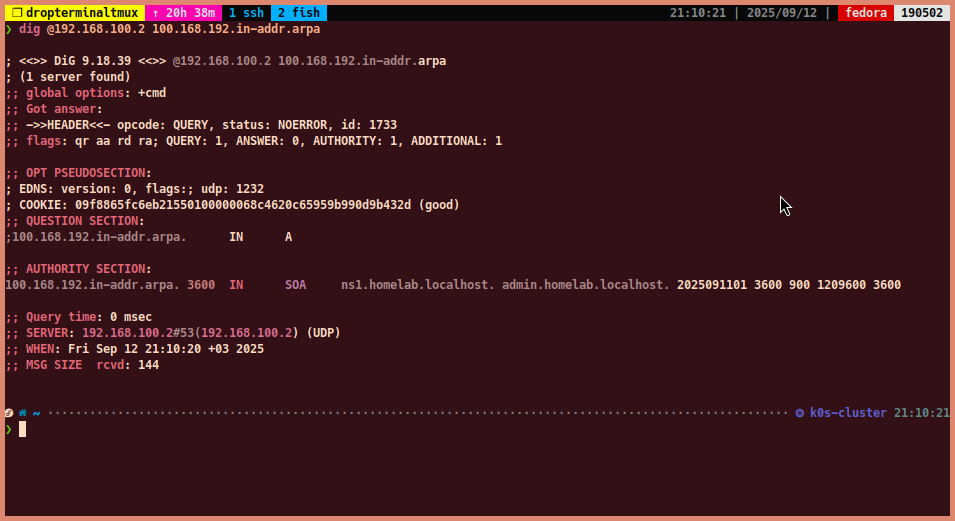
-
To query the PTR record for
192.168.100.10(reverse lookup):dig @192.168.100.2 -x 192.168.100.10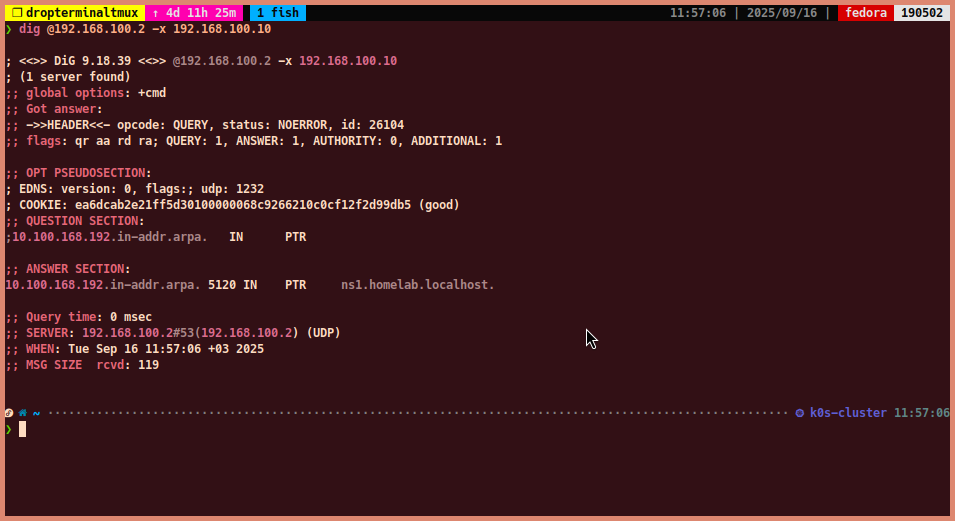
-
Step 9: Set DNS Server for Client Machines
-
Now that the DNS server has been set up and tested, you can configure client machines to use it for domain name resolution. For this example, we will configure the DNS settings on the same server.
-
On a Linux client machine, you can do this by editing network configuration for default connection:
-
Type
nmtuiin terminal, then select “Edit a connection”.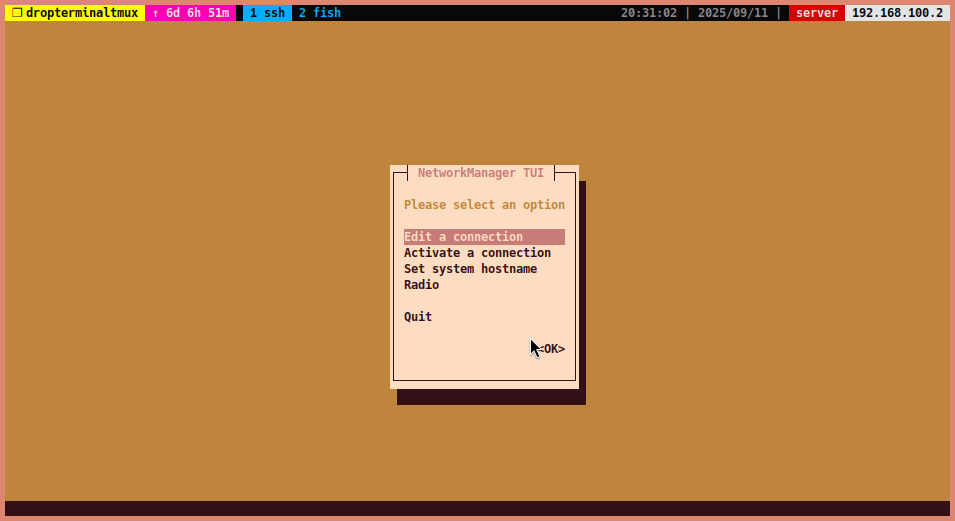
-
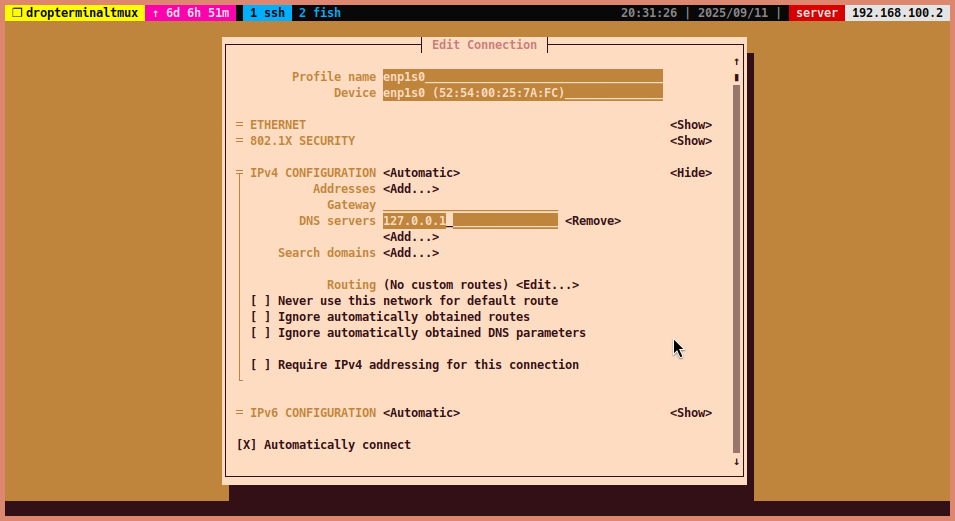
Select the default connection (in Step 3) and edit it.

-
Open the “IPv4 CONFIGURATION” section and select <Show>
-
Add the DNS server IP address (192.168.100.2) to the “DNS servers” field.
-
Save the changes and exit
nmtui. -
Restart the network manager to apply the changes:
sudo systemctl restart NetworkManager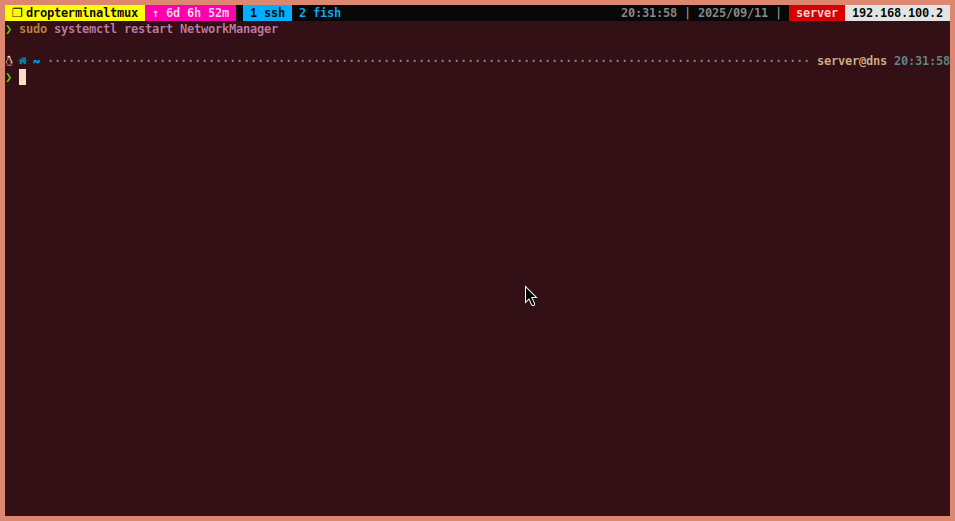
-
Check
/etc/resolv.confto ensure the DNS server is set correctly:cat /etc/resolv.conf-
You should see the DNS server IP address (192.168.100.2) listed. (In this example, I tested this in same server, so the DNS server is
127.0.0.1)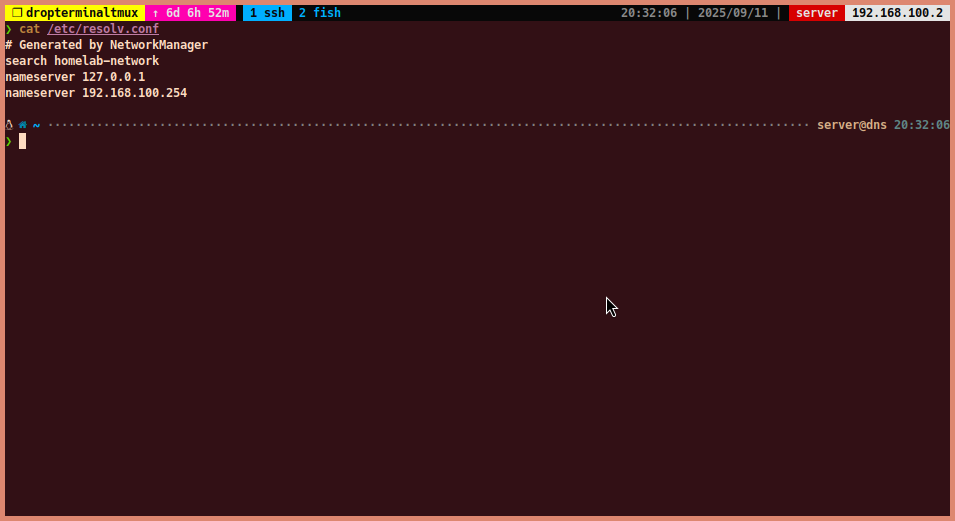
-
-
Now, test the DNS resolution on the client machine:
dig homelab.localhost dig dns.homelab.localhost dig dhcp.homelab.localhost-
You should see the correct DNS records in the answer section.
-
-
Conclusion
- In this guide, we have successfully installed and configured a local DNS server on RHEL9 using BIND9. We have also tested the DNS server to ensure it is functioning correctly. You can now use this local DNS server to resolve domain names within your network.
References
- https://blog.bytebytego.com/p/a-crash-course-in-dns-domain-name
- https://en.wikipedia.org/wiki/DNS_root_zone
- https://en.wikipedia.org/wiki/Domain_Name_System
- https://en.wikipedia.org/wiki/SOA_record
- https://root-servers.org/
- https://serverfault.com/questions/673230/how-reverse-dns-works
- https://www.arin.net/resources/manage/reverse/
- https://www.cloudflare.com/learning/dns/dns-records/dns-soa-record/
- https://www.iana.org/domains/root/db
- https://www.iana.org/domains/root/servers
- https://www.inetdaemon.com/tutorials/internet/dns/operation/hierarchy.shtml